Fingerstyle Guitar Technique - How To Play Fingerstyle Guitar
A great way to play your acoustic guitar is to use the fingers of your picking hand in place of a pick. This is commonly known as fingerstyle guitar playing. There are so many amazing things you can do with this style of guitar playing that you simply cannot do with a pick alone.
As with any guitar technique, there are right ways and wrong ways you can go about it. The aim of this lesson is to save you loads of time from the outset, and get you on your way to a great fingerstyle technique. This will then make it much easier for you to play songs that use this style of guitar playing.
The technique of fingerstyle guitar is all in your right hand, or if you are a left handed guitarist, your left hand. I will refer to it as the right throughout this lesson.
Right Hand Position
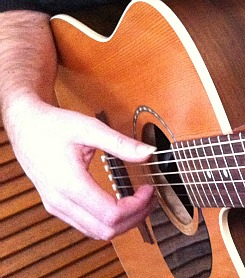 When playing fingerstyle guitar, the wrist of your right hand needs to be higher above the strings than it is when you are using a pick. The reason for this is that it gives you more power when plucking the strings with your fingers. They go from being at about a 45 degree angle to the strings, when using a flat pick, to more of a 90 degree angle when playing fingerstyle. Your forearm should be resting lightly on the top side of the guitar as it normally does when you are playing.
Refer to the picture on the right throughout to get a clearer idea of this as it is crucial to having a great fingerstyle technique.
When playing fingerstyle guitar, you primarily use the thumb (p), index (i), middle (m), and ring (a) fingers of your right hand to pluck the strings. The pinky can be used, and is in styles like flamenco, but in general fingerstyle guitar playing it usually isn’t.
Taking the above into consideration, and studying the picture carefully, get your right hand into the correct position for fingerstyle guitar playing. When you do this, place your thumb on the 6th string, your index finger (i) on the 3rd string, your middle finger (m) on the 2nd string, and your ring finger (a) on the first string.
We will call this the “The Right Hand Grip position” where the thumb and fingers of your picking hand are in contact with the strings all at the same time.
To develop your fingerstyle technique for guitar, you should spend a few moments each day holding this hand position. It will be your foundation for great fingerstyle guitar playing.
Fingerstyle Patterns For The Right Hand
When playing your guitar with a fingerstyle technique, your thumb (p) will play the lower E, A, and D strings, while the index (i), middle (m), and ring (a) fingers will play the upper strings of G, B, and E. There are exceptions to this, but this is the general rule to follow in developing a great fingerstyle technique.
Here are some right hand patterns to get you started with your fingerstyle guitar playing. I have purposely left all strings open so that you can totally focus on your right hand.
*Important*
When playing the following fingerstyle guitar exercises, begin with your right hand grip position, as explained above, before doing anything. Once you have this, then play one cycle of the pattern before resuming this position. One cycle is equal to one beat. You will then resume your right hand grip position before playing the next cycle. Reset this right hand grip position after each cycle of each finger picking pattern below. So you should set your right hand grip position 4 times for each exercise.
This is not how you would typically play fingerstyle on your guitar, per se, but it will help greatly in reinforcing the correct position for your right hand.
The first audio of each example below applies the right hand grip technique so you can be very clear on what it is you need to do. The second audio for each example simply plays the fingerstyle pattern straight through.
It is also important to note that when playing your guitar fingerstyle, the wrist of your right hand and your arm remain stationary. It is only your fingers that will need to move. Be aware of this when you play as it is vitally important in developing great fingerstyle technique for guitar.
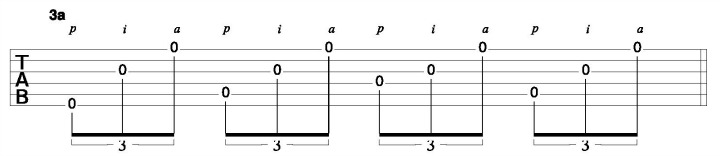
Exercise 1a is known as a forward arpeggio with the top 3 strings being played from lowest to highest. Exercise 1b is a reverse arpeggio with the top 3 strings being played highest to lowest. Your thumb plays the bass note first in both cases:

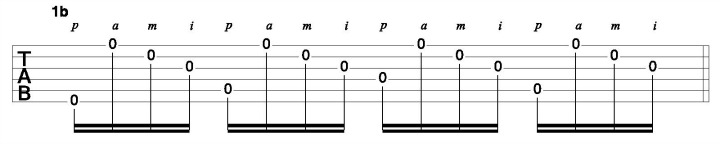
These are very common patterns with fingerstyle guitar playing and will serve you well in developing a great technique.
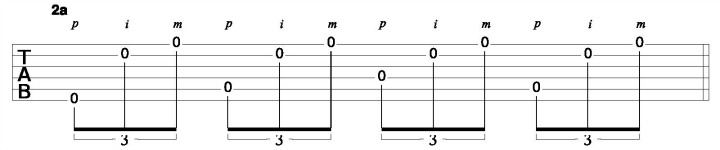
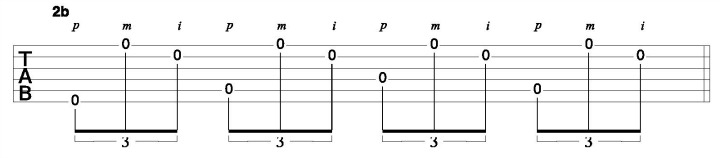
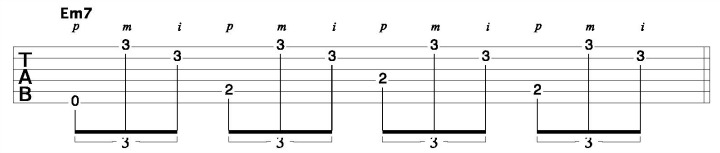
Here are two more exercise to further develop the technique of fingerstyle into your guitar playing. Each exercise has a forward and reverse arpeggio with various combinations of the fingers of your right hand being used:

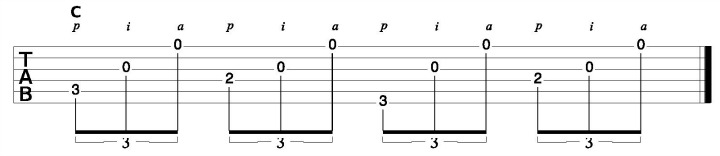
I will leave you with some of the fingerstyle exercises above being applied to chords. Check them out and be sure to try them with other chords you know. Spend some time each day working on your fingerstyle technique. You will find that it is worth every second you invest into it.

Learn the art of fingerpicking with online fingerstyle guitar lessons