How to Play Thousands Of Songs With The Travis Picking Pattern
by Simon Candy
 Today's lesson is all about a fingerpicking pattern that can be used over and over again in many, many different playing situations.
Once you have the basics of this pattern down, you will find it easy to create lots of variations, further extending its use and possibilities in your own guitar playing.
This particular fingerpicking pattern can be heard in thousands of songs such as “Landslide” (Fleetwood Mac), Dust In The Wind (Kansas), The Boxer (Simon & Garfunkel) and many more.
What is it?
It is the Travis Picking pattern. The video below will reinforce and further train the concepts taught in this article, so bookmark it to check out after working through this lesson:
The Travis Picking Pattern
Your reference point for the travis picking pattern is the bass, as it consistently falls on the downbeat (1, 2, 3, 4 etc), and is played with the thumb of your picking hand.
If we take a C open chord for example, and apply the bass component of the travis picking pattern in isolation, it looks like this:

In the example above I am simply alternating between the root of the chord on the 5th string (C) and the 3rd of the chord on the 4th string (E) with my thumb picking each note throughout.
Once we have the bass down, we simply add combinations of higher notes/strings in-between the bass hits, on the off beats. Here is one very common pattern, again using a C open chord:

Notice the bass part has not changed. It remains on the beat, alternating between the 5th and 4th strings while my fingers play combinations of the 2nd and 3rd strings of the chord on the off beats.
This in essence is the travis picking pattern.
It’s that simple!
We can take this a step further, however by creating a variation in the bass. The previous pattern we used is what is sometimes referred to as a 5 4 5 4 pattern. This is in reference to the bass strings and the order in which they are plucked.
The following is known as a 5 4 6 4 pattern, as we are now going to add more movement by bringing the 6th string into our bass, like so:

And here is our 5 4 6 4 bass with the higher strings of the chord added in as per the first example:

Both of these bass patterns are suitable to use, and sometimes one will be more appropriate than the other depending on the situation.
However, note that the 5-4-6-4 pattern requires a little more effort from your thumb, so take your time with it.
Once you have mastered these bass patterns, you can apply the travis picking pattern to any chord you wish. Just make sure to adjust the pattern to fit the specific chord you are playing.
For example, if I was to apply this pattern to a G chord, I would need to start it from the 6th string because this is where the root note of a G chord is (You want to always start the bass pattern from the root note of the chord to which it is being applied).
So I could apply my travis picking pattern to the G chord with a 6 4 6 4 bass.
First, here is the bass in isolation:

And the complete pattern:

Or I could use a 6 4 5 4 bass pattern, again in reference to the order in which my thumb is plucking the lower strings of the chord.
Here is the bass pattern in isolation:

And the complete pattern:

Travis Picking Pattern Application
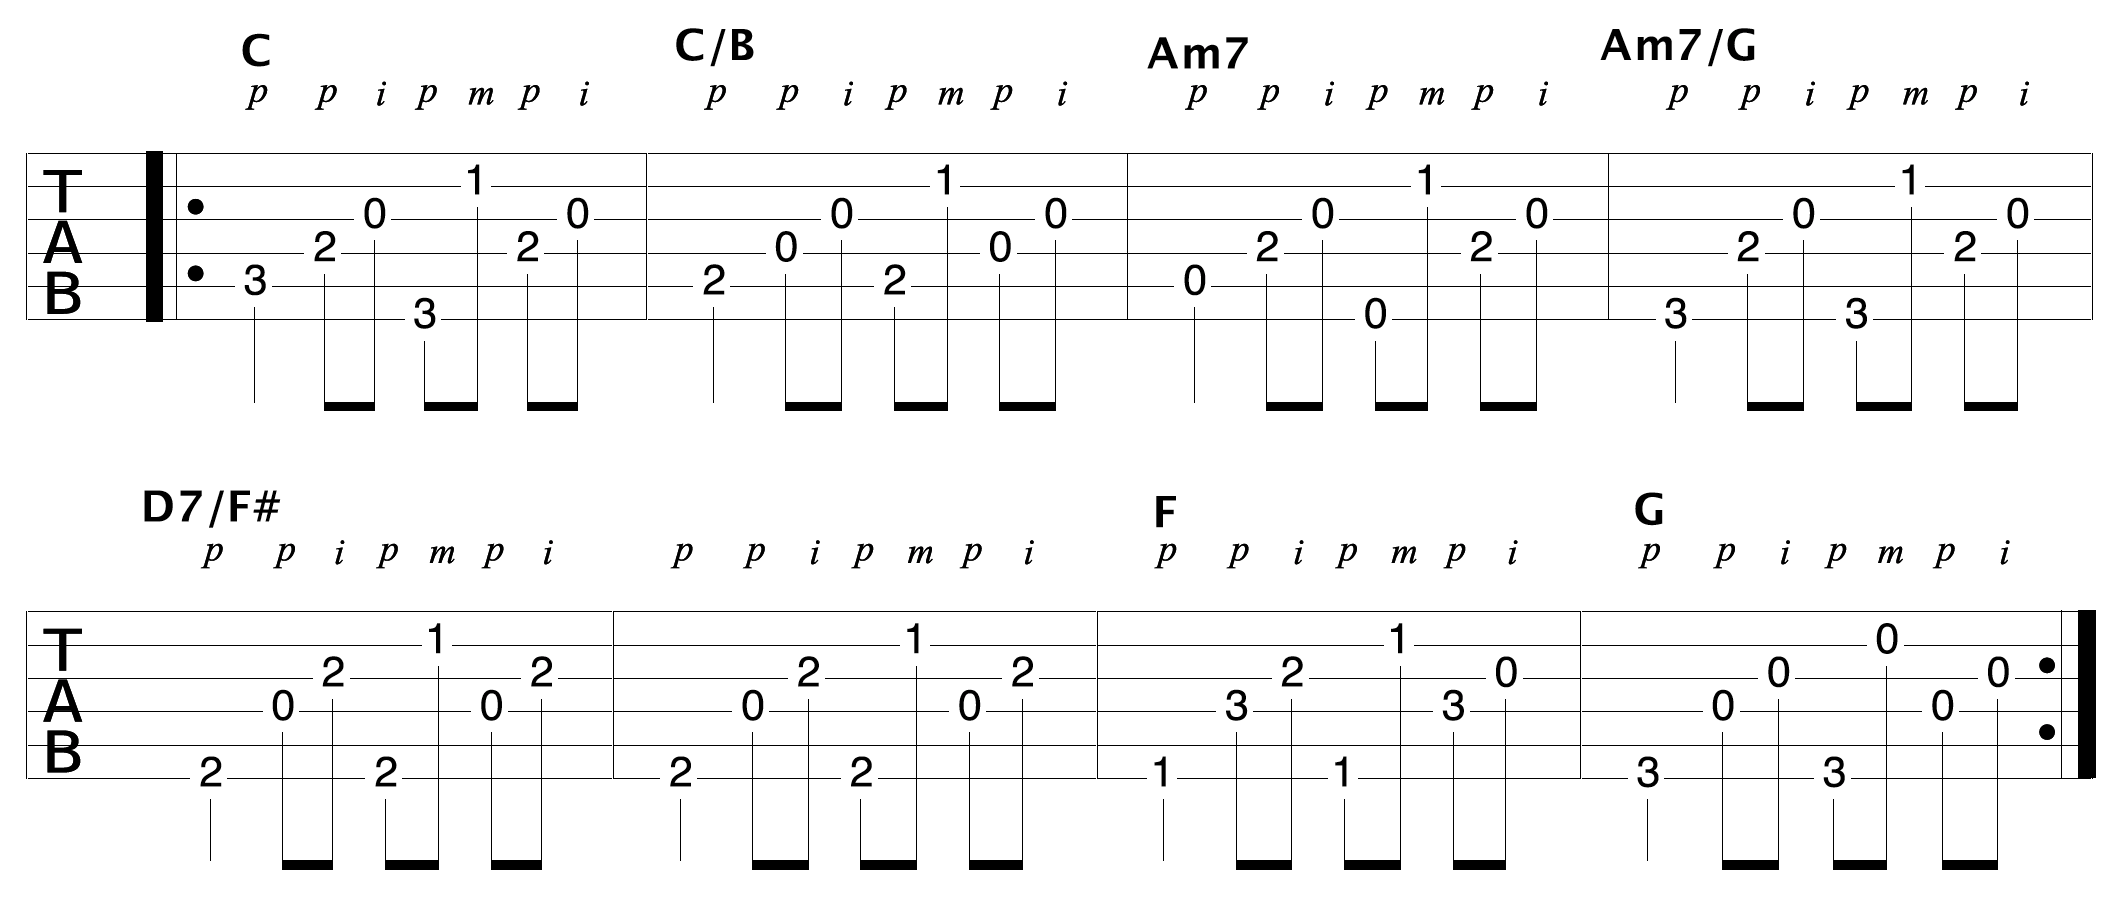
After practising the travis picking pattern on individual chords, it is time to apply the pattern to a chord progression. It is recommended to try this on many progressions until it becomes a natural part of your guitar playing.
To get started, here is an example of a progression.

In the example above, I am using slash chords to create nice voice leading between the shapes I am using. Slash chords are great for creating smooth connections between the chords you play in a progression.
Check out the video below to learn all about slash chords:
Upgrade your fingerpicking with these 10 melodic fingerpicking patterns you can learn in 10 minutes or less