How To Play A Walking A Bass Line With Chords At The Same Time On One Guitar
by Simon Candy
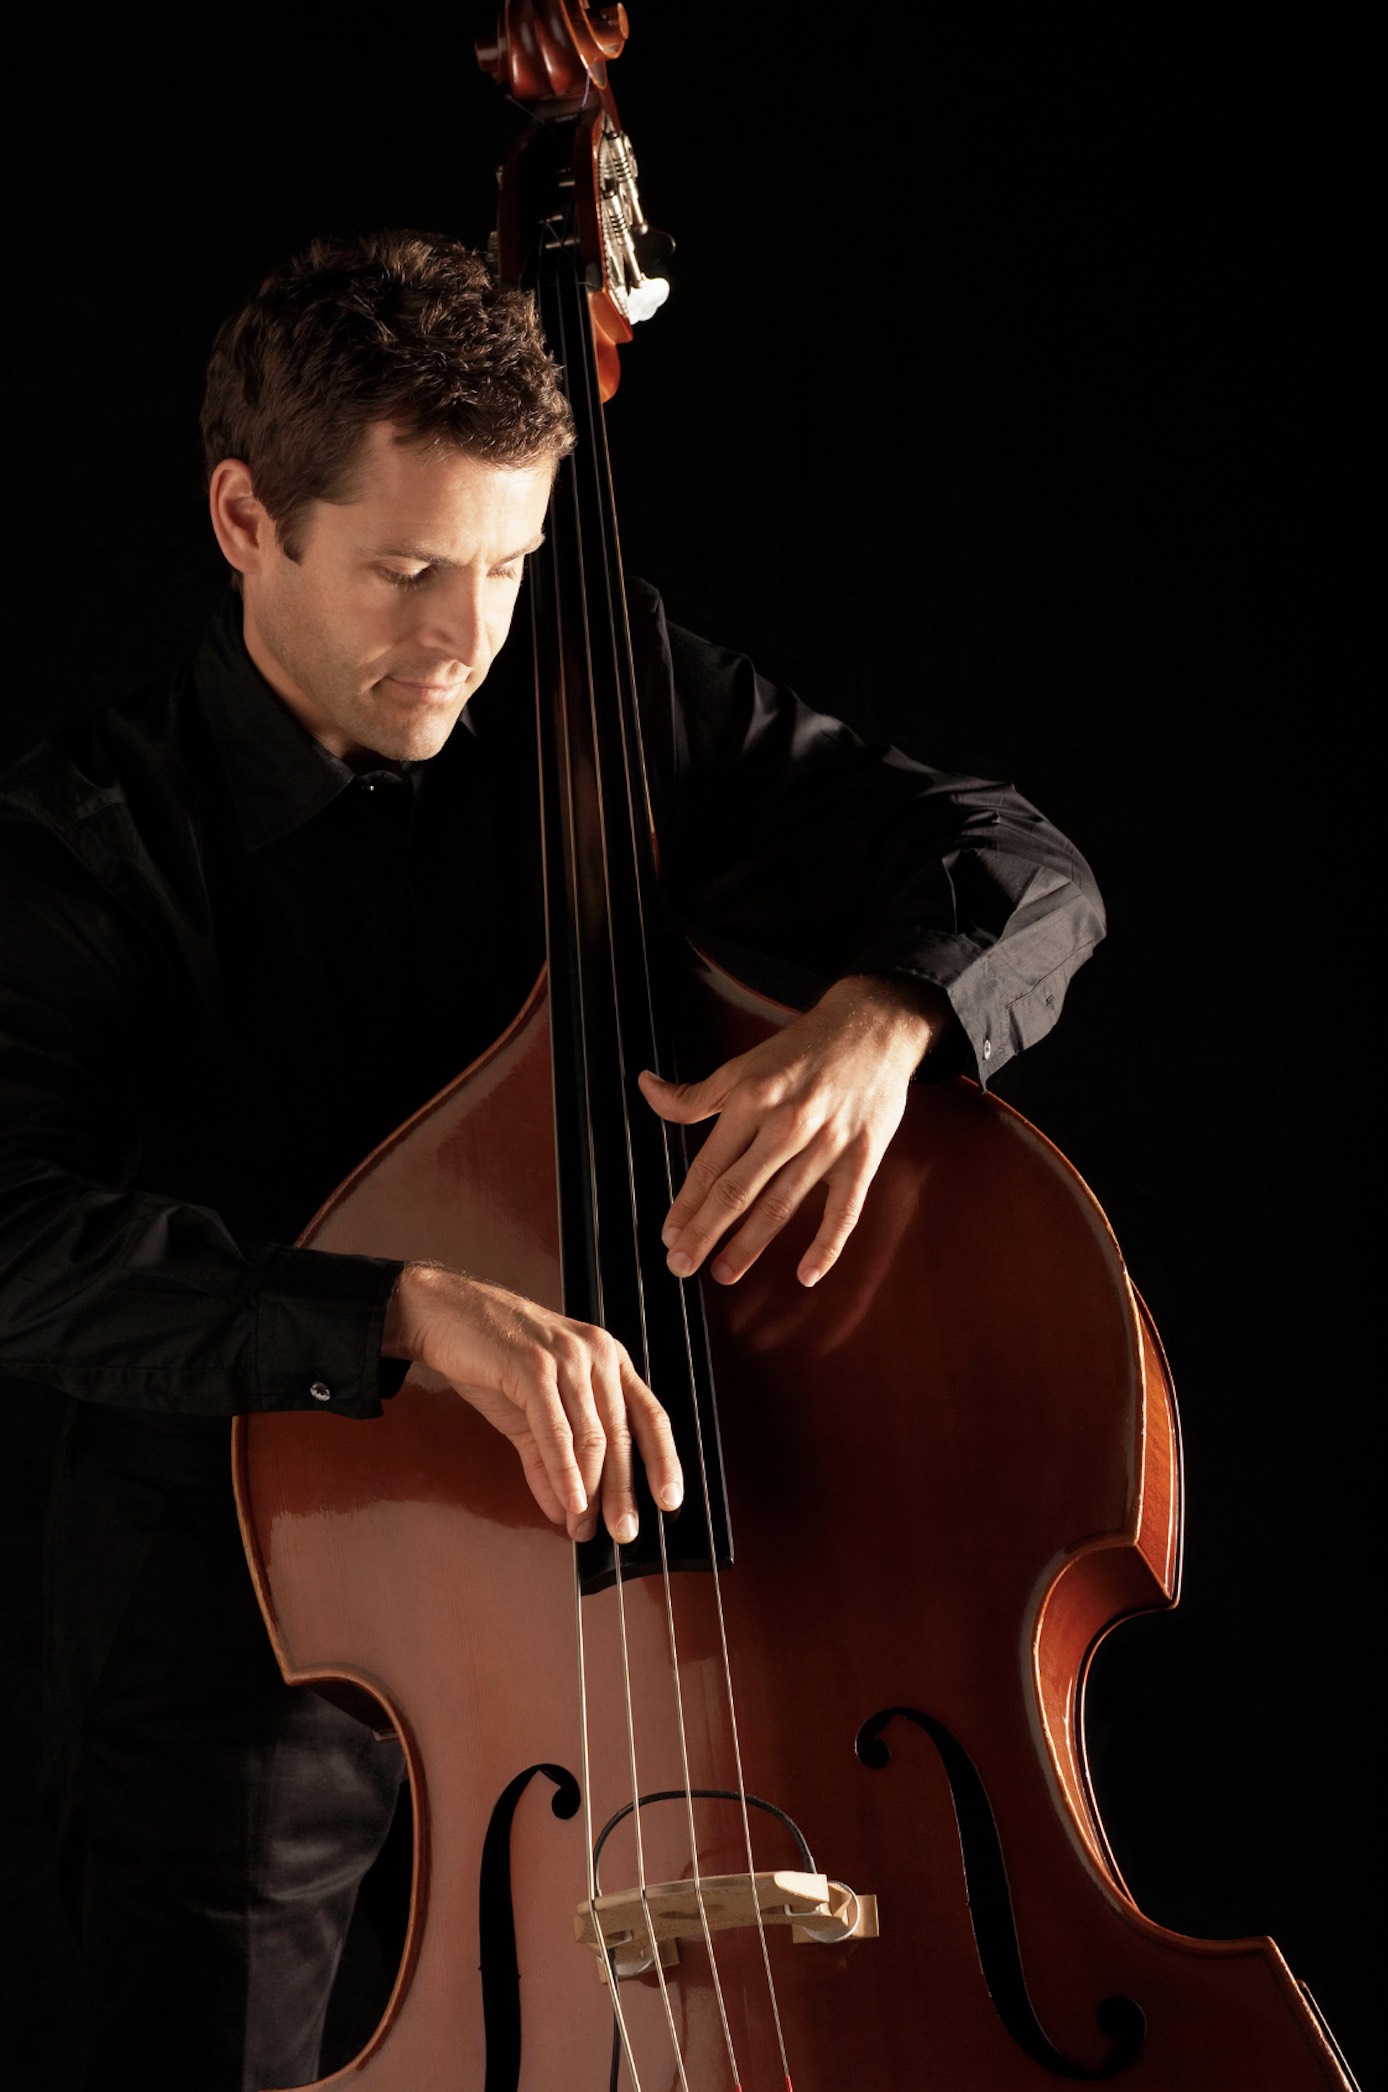 Today I want to show you an easy way to create what is one of the most recognisable sounds in Jazz, a walking bass line.
Walking bass lines are usually associated with the bass, but they can also be played on guitar. Not only will I demonstrate how to play a walking bass line in this article, but I will also teach you how to add chords to it, allowing you to play both the bass and chords simultaneously on one guitar!
You are going to love this sound!
Walking bass lines are not only pleasing to the ear, but they can also enhance your understanding of chord notes and progressions. This knowledge can enhance the quality of your solos by helping you make more melodic choices when selecting notes to play.
What Is A Walking Bass Line?
The purpose of a walking bass line is to create a feeling of forward motion in a song, hence the name walking bass. To create this forward moving motion, walking bass lines are typically played using quarter notes that fall on the beat (1, 2, 3, 4 etc).
A walking bass line serves two main purposes:
1. To outline the chord that is currently being played in the tune
2. To smoothly connect to the next chord in the tune
There are several approaches you can take when creating a walking bass line including:
• Chromatic approach
• Scale tone approach
• Arpeggiated approach
Exploring all three approaches is a vast topic that cannot be covered in a single article. However, I will guide you through the process of creating walking bass lines on your guitar, including playing the progression's chords, using the chromatic approach.
Walking Bass Line Progression
Here is the progression we will be creating our walking bass line around:

This is known as a II V I (2, 5, 1) chord progression and is the most common chord progression in the world of jazz.
Walking Bass Line Chords
Before I show you how to walk a bass line on your guitar through this progression, let’s look at the specific chord voicing’s you will use to play it, and include with your walking bass.
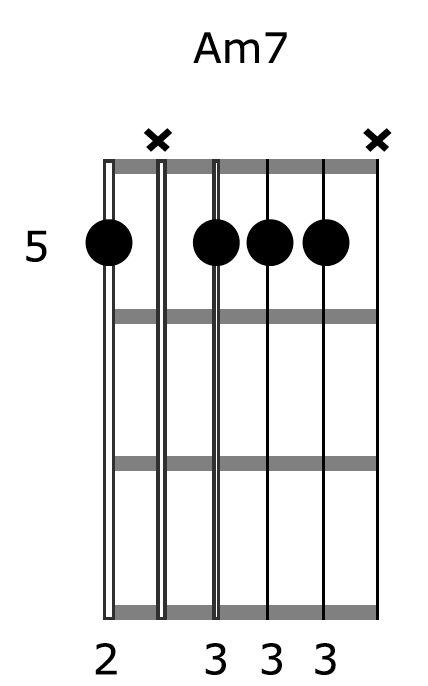
This is a very efficient way to play an Am7 as there are no duplicate notes in this particular voicing of the chord. It is used a lot in jazz and works well when playing a walking bass line around it, as you will see shortly.
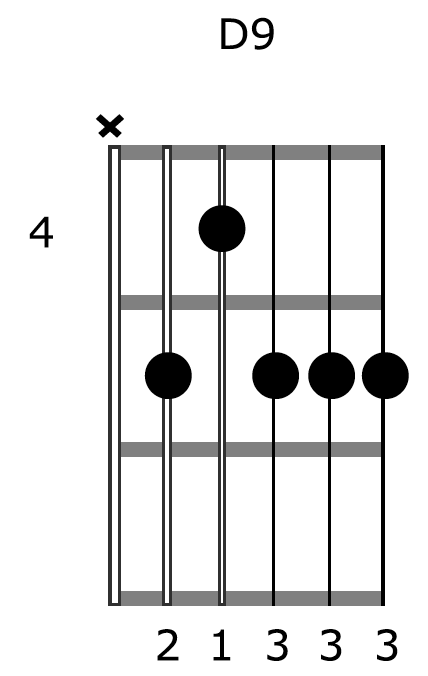
This is a common way to play a Dominant 9th chord in jazz and is very efficient as there are no duplicate notes.
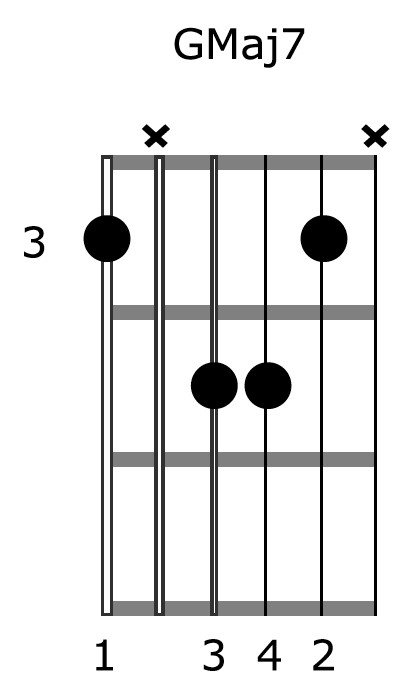
This is a common way to play a Major 7th chord in jazz and is very efficient as there are no duplicate notes.
Building The Walking Bass Line
If you're not familiar with the chord shapes shown above, don't worry. They are root 5 and 6 chord forms and should be easy to locate on the fretboard. As long as you can find bar chords on your guitar, you should have no trouble finding these chords
Here now are these chords spelling out our II V I progression from above:

From this we can extract the root note of each chord like so:

With the root notes extracted you now have the basic framework from which to create the walking bass line.
The Chromatic Approach
As I said earlier, we will focus on the chromatic half step approach for constructing the walking bass line in today’s lesson. It’s very simple.
Here is what you need to do beat by beat:
• Beat 1: Play the root of the current chord.
I will start by playing the root note of the Am7 chord on the 6th string/5th fret:
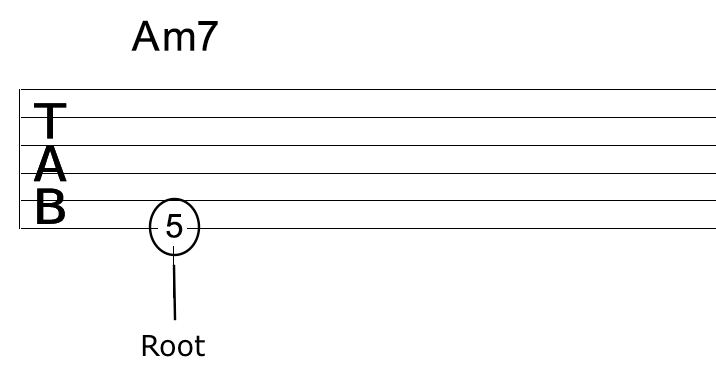
• Beat 2: Play one half step (one fret) above or below the root note.
I will play a half step (one fret) below the root note of the Am7 chord:
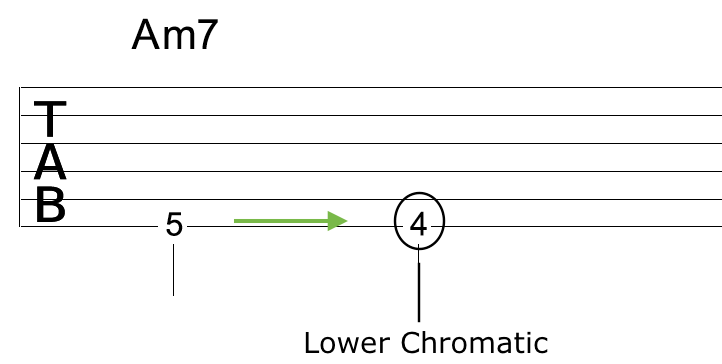
• Beat 3: Play the root of the chord.
Back to the root of the Am7 we go:
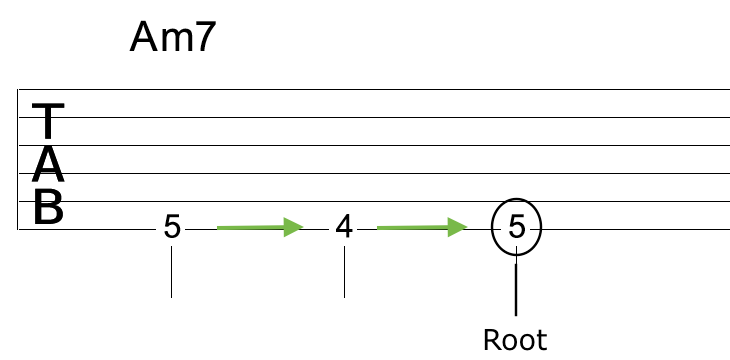
• Beat 4: Play one half step (one fret) above or below the root note of the next chord.
The next chord is D9, so I will play one half step (one fret) above the root note of this chord on the 5th string/6th fret:
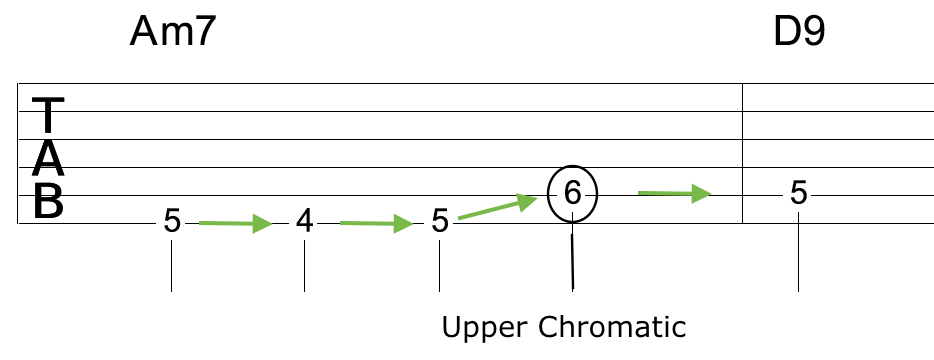
It is crucial to know the upcoming chord, as the note played on the fourth beat of the previous bar or any other beat before a chord change corresponds to the succeeding chord, not the current one. Similar to walking, with a walking bass line you need to be looking ahead to see where you are going.
You can then complete the bass line with the remainder of the progression, using our chromatic approach like so:

Because the duration of the GMaj7 chord is 2 bars, there is more space/beats to fill with the walking bass line.
To help fill this out, I elected to target the 5th of this chord, which is the D note on the 5th string/5th fret. This helps extend the line out without continually returning to the root note.
Adding Chords To Your Walking Bass
Next, simply add the appropriate chord shape from above on the first beat of each bar like so:

Now were getting somewhere!
The final step is to separate the root note from the chord like so:

This has the chord sounding in-between the notes of our walking bass line, just like a guitarist would typically do when comping chords along with the bass in jazz.
You may also choose to have more chord hits between the walking bass line if you wish:

For a step by step walkthrough (pardon the pun) tutorial on building and playing walking bass lines on guitar, as outlined int his article, check out the video below:
Learn more ways to create and play walking bass lines on guitar
How To Play Fast Fingerpicking Guitar Solos
by Simon Candy
 In this lesson, you learn how to generate fast fingerpicking guitar solos using a technique that features the open strings of your guitar and the pentatonic scale patterns. This technique lends itself very well to playing fast fingerpicking solos on your guitar, due to the consistency of what your picking hand is doing throughout.
The video below will help reinforce and further train the concepts taught in this article, so bookmark it to check out after working through this lesson:
Fast Fingerpicking Riffs
Playing fast fingerpicking guitar solos can be made easier using a technique that involves a consistent pattern of forward and backward banjo roll patterns with your picking hand. To make this technique even simpler, we can enhance the consistency of our fretting hand by using melodic sequences.
Sequences in music come in different types, and today we will be using melodic sequences, which means playing a repeating pattern of notes within the different pitch ranges of a scale. If you are not familiar with sequences, you will see what I mean in a moment.
For the sequences I present to you today, I will be using pattern 3 of the pentatonic scale in the key of G Major. Therefore you need to begin this pattern from the 5th fret on the 6th string to be in this key:
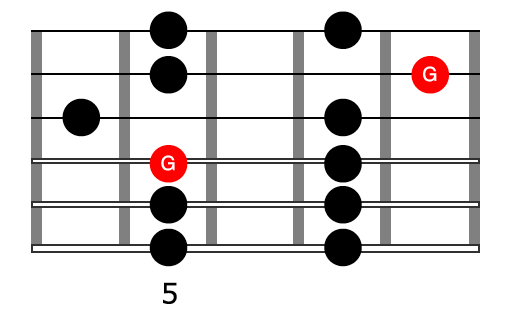
Fingerpicking Riff 1
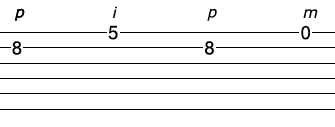
This first fingerpicking riff is a sequence that descends the pentatonic scale. Having said that, you could also ascend it too, to get more mileage from the riff.
Here is the sequence applied to the top two strings of the scale:
Once you have this in your fingers, you simply run it down the remaining pairs of strings in pattern 3 like so:
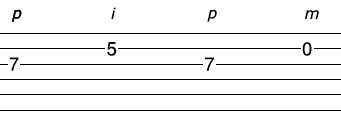
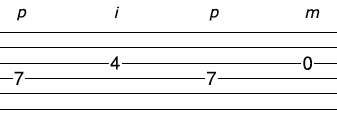
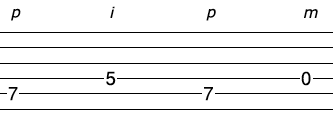
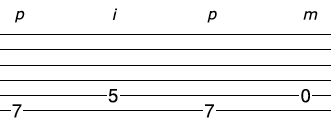
Here is the sequence descending all 6 strings of pattern 3:

This is the nature of a melodic sequence. It’s just a repeating pattern, using different notes in the scale. The consistency of what your fretting hand is now doing, combined with the consistent pattern your picking hand is doing, makes it much easier to generate fast fingerpicking guitar solos.
Another way you could take this same sequence, and apply it musically to generate fast riffs, is to move it horizontally up the fretboard on any 2 adjacent string sets.
Here is an example of that using strings 2 and 3:
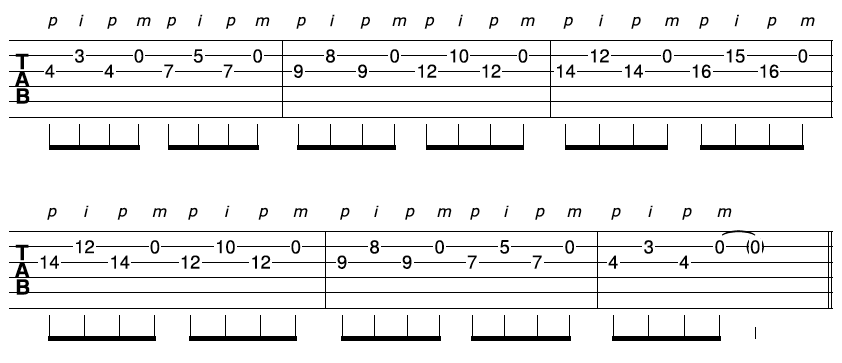
As I move up the fretboard, I’m making sure I stay in key by only using notes from the G major pentatonic scale.
Fingerpicking Riff 2
This next fingerpicking guitar riff is a 6 note sequence that ascends the scale.
Here is the sequence on the bottom three strings of pattern 3:
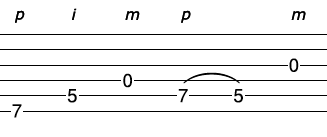
Once you have this in your fingers, you simply run it up the remaining strings sets of the scale like so:
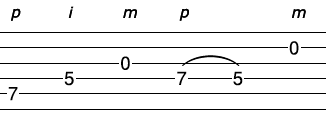
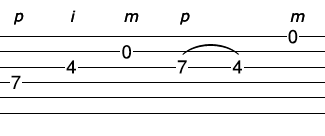
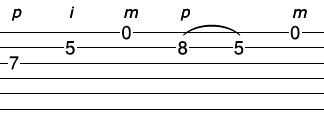
Here is the sequence ascending all 6 strings of pattern 3:

As with any sequence, you can both ascend and descend the scale, so here is the same sequence descending pattern 3:

Fingerpicking Riff 3
This third and final fingerpicking riff is a forward banjo roll pattern. This is what your picking hand has been doing for the most part throughout this article series, so we might as well play an actual banjo roll with it, like so:

Banjo rolls in themselves can create great fast fingerpicking riffs for your guitar playing.
The above example demonstrates a banjo roll played in a single position. When played in conjunction with a chord progression, it can produce a great sound. As the chords change in the progression, the notes within the banjo roll will relate differently to each chord, resulting in a unique sound with each change.
Another option is to take the banjo roll and run it up and down the fretboard.
Here is an example:
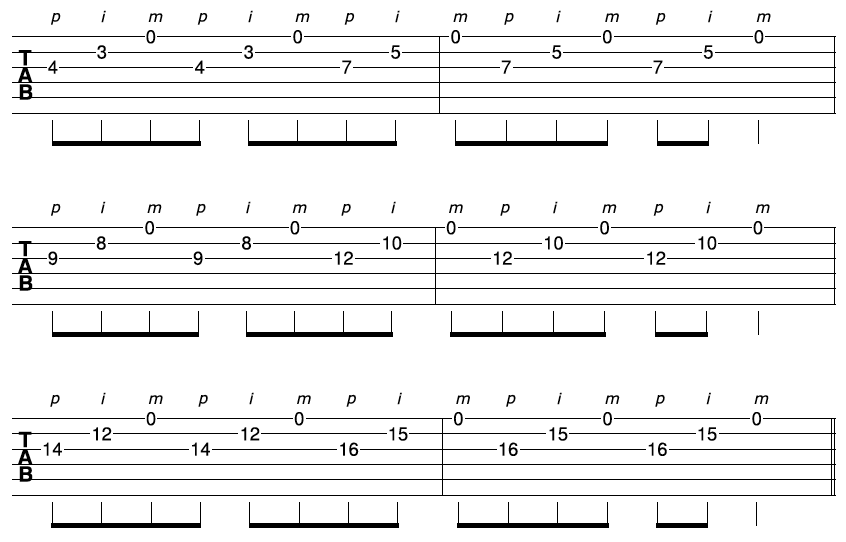
You could apply this idea with the banjo roll to other strings sets too, to get even more mileage out of it.
Watch the video below to discover how to apply this open string fingerpicking technique to the major scale to create even more possibilities for your playing:
Check out more open string fingerpicking riffs that make it easy to play fast on guitar
How To Create Unique Fingerpicking Blues Riffs On Guitar
By Simon Candy
 In this article, we will explore a unique approach to soloing in the context of blues music. The approach involves using a commonly used pattern on the guitar known as the horizontal pentatonic scale shape. This pattern is so named because it moves across the fretboard in a horizontal direction.
In addition, I will guide you through some actual blues riffs based on this pattern that you will be able to adapt to use in your own playing.
Keys that have a lot of open string notes in them are best suited for this way of playing, as we are specifically targeting open strings throughout this soloing approach. With that said, the key I’ll be using for these fingerpicking riffs is the key of Am:
A B C D E F G A
As you can see, the key of Am also has all the open string notes within it.
The video below will help reinforce and further train the concepts taught in this article, so bookmark it to check out after working through this lesson.
The Horizontal Pentatonic Scale pattern
Here is the pattern we will be using in today’s lesson:
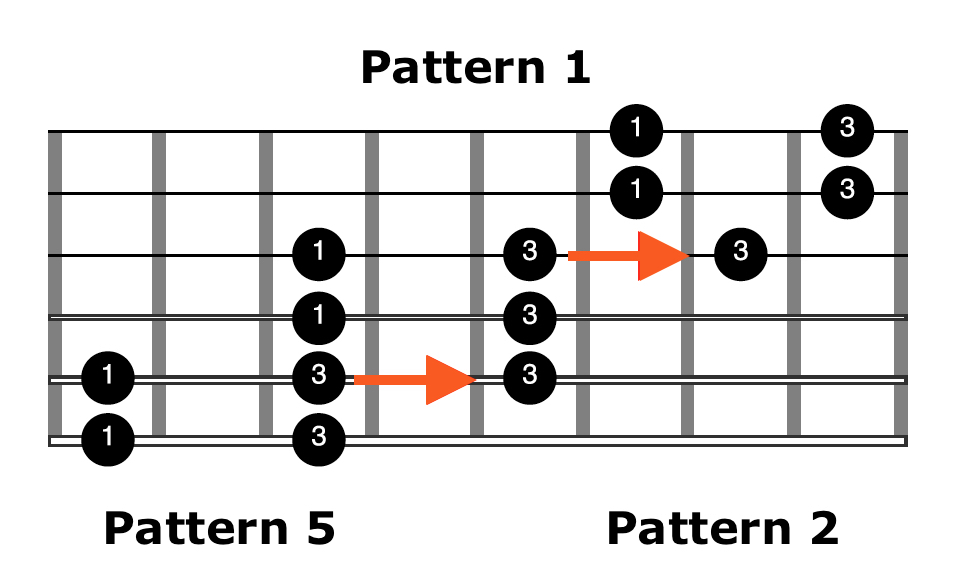
It is referred to by various names but is simply a combination of pentatonic scale patterns 5, 1, and 2.
I like to call it the horizontal pentatonic scale due to the nature of it moving horizontally across the fretboard.
We will be using this pattern in the key of Am, therefore we need to start it from the 3rd fret:

The Pattern
What we will do with this pattern now, is apply the open string acoustic guitar solo technique that I have outlined in a previous article lesson (check that out for more detail)
Starting from the 5th fret on the bottom string, we get the following sequence of notes from which to apply a forward banjo roll:

Next you need to shift position so your 3rd finger is aligned with the 7th fret of the 5th string to then play the next sequence:

Staying in this position, repeat the sequence, only this time from the 7th fret of the 4th string:

To finish ascending the scale, you need to make one more shift of position so your 2nd finger is now over the 9th fret of the 3rd string. From here, play one more forward banjo roll sequence like so:

You need to play this little sequence on the top 2 strings to allow for a smooth change over from ascending to descending the pattern:

From here you simply descend the pattern using a backward banjo roll.
• String set 1, 2, 3:

• String set 2, 3, 4:

• String set 3, 4, 5:

• String set 4, 5, 6:

Here now is our open string blues pentatonic scale pattern ascending and descending:
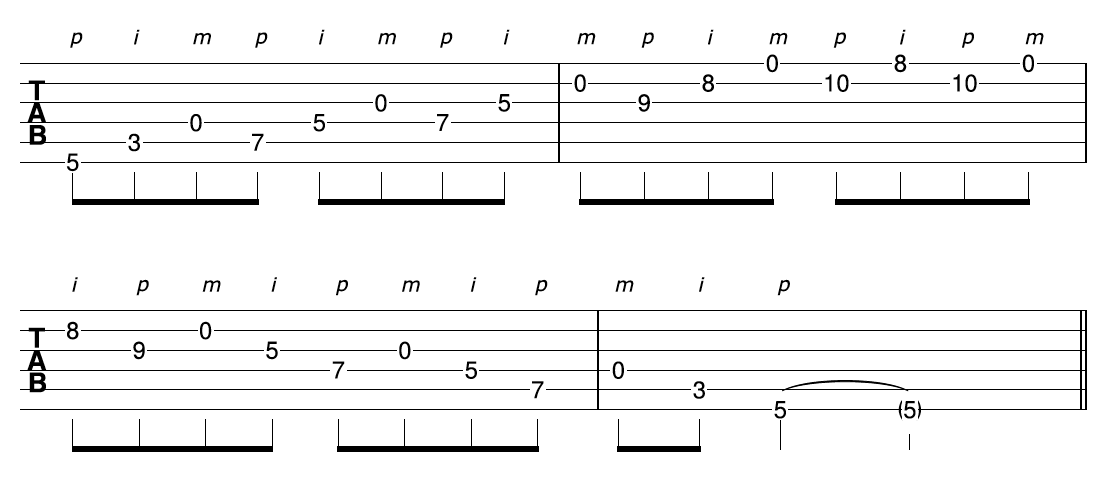
Notice the unique sound the open strings bring to this otherwise typical pattern for soloing on your guitar. Now it’s time to create some blues riffs utilising the open strings from this pattern.
Blues Fingerpicking Riffs
The following are 3 examples of blues riffs I have created from the open string scale pattern above.
Learn each riff, and then take the riff and apply it over a backing track.
• Fingerpicking Blues Riff 1:

This first riff targets the upper part of the scale pattern, and finishes within pattern 1 (the middle part of the scale). Notice the subtle hint of connecting this way of soloing on your guitar, with regular soloing with the 1/4 bend at the 5th fret, 3rd string.
• Fingerpicking Blues Riff 2:

This second riff also targets the upper and middle parts of our scale pattern. Notice the use of the blues note at the 8th fret on the 3rd string.
• Fingerpicking Blues Riff 3:

This final riff targets the lower part of the scale with a sequence, that in part repeats as it moves into the middle area of the shape (pattern 1 territory).
Watch the video below to learn how to take this open string soloing concept and apply it to melodies to create an incredibly beautiful arrangement of a song:
How To Create Unique Guitar Solos Using Open Strings And Pentatonic Scales
by Simon Candy
 In this lesson, you learn a unique approach to soloing that brings two common elements of guitar playing together:
1. The Pentatonic Scale
2. Open Strings
In today's article, we cover the basics of this soloing approach. You learn just how simple it is to marry up the pentatonic scale patterns with the open strings for a unique and amazing solo sound.
The video below will reinforce and further train the concepts taught in this article, so bookmark it to check out after working through this lesson:
The Banjo Roll Technique
There is a third element I have not mentioned that along with the pentatonic scale patterns and open strings, completes this unique solo guitar technique. That element is a banjo roll.
A banjo roll is simply a rotating/repeating fingerpicking pattern that uses your thumb (p), index (i), and middle (m) fingers across adjacent strings.
There are two kinds of banjo rolls, they are the forward roll and the backward roll.
Here is a forward banjo roll:

And here is a backward banjo roll:

We are not going to be playing banjo rolls per se, but we will take them and apply them to the pentatonic scale.
You will be using the forward banjo roll to ascend the pentatonic scale patterns. Let’s start with the pattern applied to open strings:

You will be using the backward banjo roll to descend the pentatonic scale patterns. Let’s start with this pattern applied to open strings too:

It's a good idea to start by practising each of the ascending and descending open string patterns in isolation.
Take it slow and don't rush.
Focus on maintaining accuracy over speed for now.
A Quick Note On Keys
Before we go deeper into this solo technique, a quick note to let you know this approach will work better in some keys than others. This is because we are using open strings. The more open string notes that exist within a key, the better that key is suited for soloing using this technique.
The key of E minor has all the open string notes in it:
E F# G A B C D E
* open string notes highlighted
Therefore E minor is a great key for this technique for soloing.
Another great key is A minor.
The Open String/Pentatonic Solo Technique
Now it’s time to apply our banjo roll patterns to the pentatonic scale to create the foundation for this solo guitar approach. I’m going to use pattern 3 in the key of E minor to run you through this technique.
So here is pattern 3 in E minor:
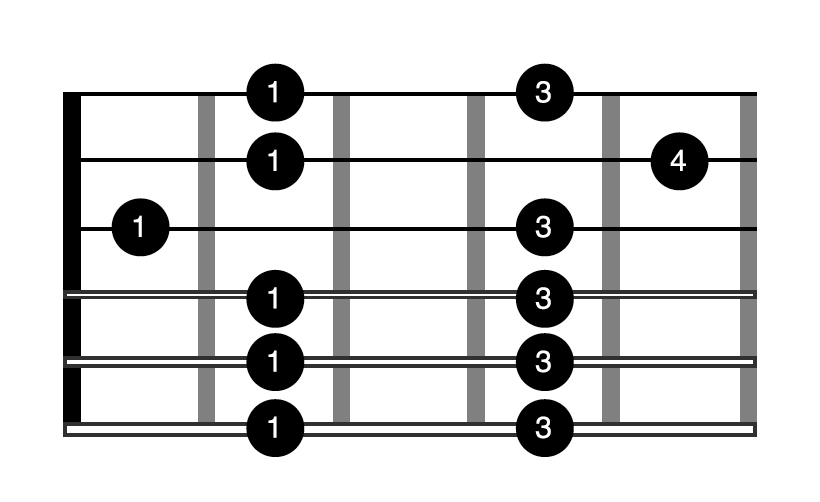
Nothing too unique here just yet.
However, if we apply our banjo roll pattern to this scale pattern, everything changes!
The great thing about this solo technique is that it is a consistent pattern. Once you get the first 3 notes down, it’s all repetition from there. The sequence is made up of playing 2 consecutive fretted notes on adjacent strings of the pattern, followed by an open string.
That’s it!
So to begin play the 2nd note of the pattern on the 6th string with your thumb (p), then the 1st note on the 5th string of the pattern with your index (i), followed by the open 4th string with your middle (m) finger. This completes one rotation of our forward roll banjo pattern:

From here you simply repeat this sequence of notes, only starting from the 5th string of the pattern:

And then the 4th string of the pattern:

And then the 3rd string of the pattern:

Here is pattern 3, ascending, in it’s entirety with our open string, banjo roll, guitar solo technique applied:

To descend the pattern you simply play what you have just done, only backward.
String set 1, 2, 3:

String set 2, 3, 4:

String set 3, 4, 5:

String set 4, 5, 6:

Here is pattern 3, descending, in it’s entirety with our open string, banjo roll, guitar solo technique applied:

Watch the video at the beginning of the article for a detailed demonstration of this open string solo technique.
Turning The Pattern Around
There is one thing left we need to do to make a smooth switch from ascending the pattern to descending. It’s very simple but makes all the difference.
When you arrive at the 2nd string ascending the scale, you will of course not have enough strings left to complete a rotation of the forward banjo roll. This is why we stopped at the 3, 2, 1 string set when ascending the pattern above.
Instead, play this sequence:

Playing the sequence above and then following it by immediately starting to descend the scale pattern will make for a smooth changeover from ascending to descending, like so:
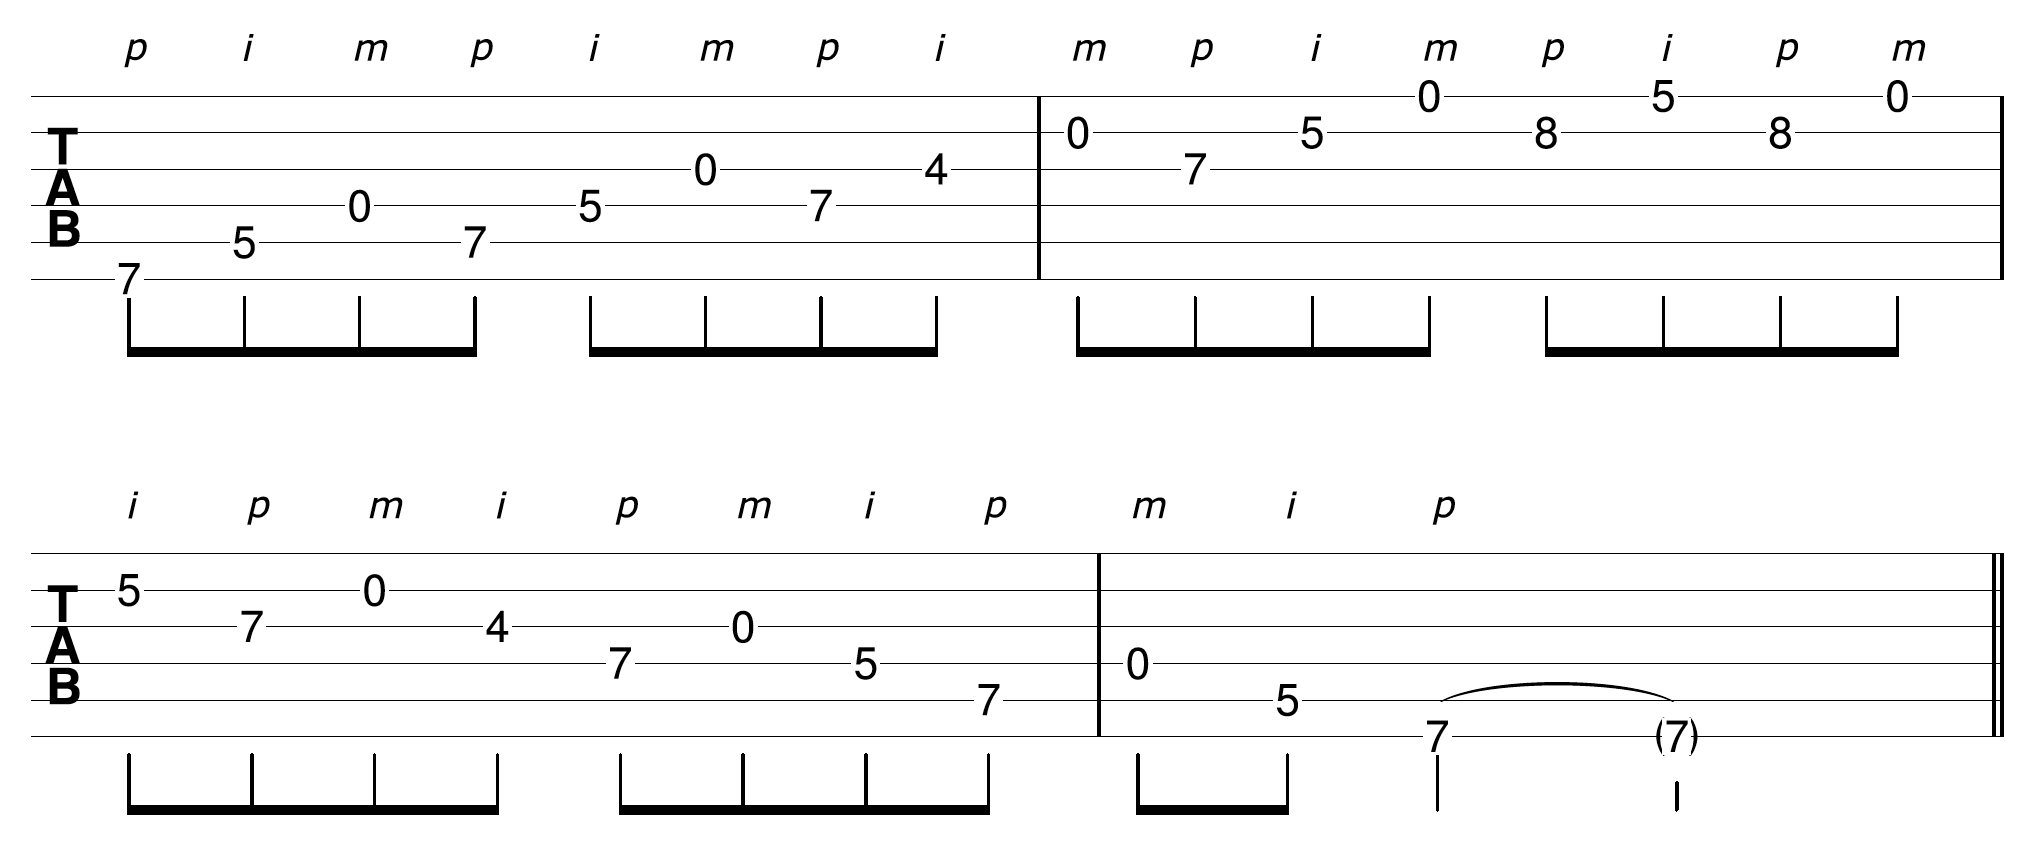
That’s it!
You now have the foundation for a very unique and creative solo technique.
I highly recommend finding a backing track in the key of E minor or G Major as it is relative to E minor and practice playing and creating with this soloing approach.
Check out the video below for some open string riff ideas you can use in your soloing. In it, I take you through some cool sounding riffs born from this technique.
You also learn how to create these kind of riffs yourself:
Learn more open string riffs and runs