The 7 Step Guitar Riff Workout Part 2 - How To Improve Your Guitar Solo And Improvisation Skills
by Simon Candy
 In part 1 of this lesson I took you through the first 3 steps of my 7 step guitar riff workout lesson.
Today we will complete the workout with the final 4 steps required to truly take the riffs you learn and have them become part of your guitar playing where you can draw upon them time and time again to create incredible music.
As you started to learn in part 1 of this lesson, there is much more than meets the eye regarding getting riffs into your guitar playing from which to then create and improvise your own music.
It requires a workout of sorts to achieve this, hence the 7 Step Guitar Riff Workout!
So let’s now continue that workout to more easily enable you to create music with the riffs you learn on your guitar.
4. Move The Riff
 A great way to open up the fretboard to understand and visualise it on a whole new level is to take a riff and learn to play it in multiple positions.
Why bother doing this?
Many reasons.
As already stated, being able to visualise and play a riff all over the neck of your guitar will deepen your understanding of the relationships the fretboard holds.
Playing riffs in multiple positions will result in you phrasing the riff differently.
This is because the notes of the riff tend to fall under your fingers differently in some positions compared to others.
Additionally, playing the riff in different positions will provide you with more opportunities to incorporate it into your playing, as there will be a version of it available no matter where you are on the fretboard.
Let’s apply this approach to our riff.
• Example 1
We will start by moving our riff to the higher octave within pattern 1 pentatonic scale, the original scale in which we created the riff:

Notice that moving the riff causes the notes to fall under our fingers differently.
When adding slides, hammer-ons, and pull-offs (which we will be doing shortly), you will have different phrasing possibilities that can make your riffs sound more musical and interesting.
• Example 2
In this example I am moving the riff back to the original octave, this time within pattern 5 pentatonic scale:

• Example 3
Next, let’s move our riff to the top of pentatonic scale pattern 2:

By moving the riff to the top of pattern 2 we are presented with a third possibility regarding how the notes fall under our fingers.
• Example 4
Here I will move our riff to the lower octave of pentatonic pattern 2:

With pattern 3, the riff remains in the same position as it did in pattern 1 before being moved.
• Example 5
Now let’s move the riff to the lower octave of pattern 3:

Notice with pattern 3 the riff falls under our fingers the same as it did in the original position within pattern 1, before we started moving it around the fretboard.
• Example 6
Here is our riff venturing into pattern 4 of the pentatonic scale:

This pattern throws up yet another possibility regarding how the notes of our riff fall under the fingers.
• Example 7
When placed in the lower octave of pattern 4 the riff once again falls under the fingers as it did in examples 1, 2, and 4:

• Example 8
Finally, let’s move our riff into pattern 5 of the pentatonic scale:

It is highly beneficial to learn the riff in each position mentioned above and practice switching between them at regular intervals. Doing so will improve your ability to shift between the different pentatonic scales and work within each shape rather than just on it.
5. Sing The Riff
 Developing your ear and the ability to play what you hear in your head on the guitar is an essential skill.
One great way to achieve this is by using your voice to sing the notes of the riff as you play them.
This technique can be applied to anything you play on guitar. You don't have to do it every time, but practising it regularly will help connect your voice to the guitar.
It's not about singing perfectly. Even if you can't carry a tune, this technique is still beneficial for you. It is all about developing the ability to play melodically on the guitar.
By pitching along with the riff as you play, you are essentially ingraining it into your ear, making it easier to recall when needed.
When first learning a riff, your fingers play a significant role in guiding your voice when you're singing.
They help you find the right notes.
However, with time and practice, this process changes, and your singing starts to guide your fingers.
This means that your playing will become more melodic and musical.
When you find yourself struggling to come up with new ideas while improvising, using your voice can help. It will enable you to play more melodically and naturally, and you'll be able to express what you're feeling more effectively.
Be patient with this as it may take a little getting used to, but with practice, you’ll start to resonate more and more with the riffs you play on guitar.
To learn more about singing along with your playing check out the video below:
6. Vary The Riff
 Taking the riffs you learn on guitar and creating variations of them is a great way to develop your improvisational skills. When soloing on guitar the riffs you play should relate to one another. They should tell a story. Playing one random riff after another, even in the same key, is called noodling and won’t sound like a cohesive/congruent solo.
Great solos have a lot of repetition with variation of riffs to create a theme from which to solo around. Just like a story or a movie, there needs to be a storyline, and then development of that story line leading to a climax.
There are two basic ways to create a variation of your riff:
1. Melodic
2. Rhythmic
Let’s take a look at each.
Melodic Riff Variation
To create a melodic variation of a riff, you need to tweak the pitch of the notes of the riff in some way. However, it's important to be careful as changing too much can result in a completely different riff. The variation should still be related to the original riff as it is essentially a modified version.
Let’s have a look at some example melodic variations of our riff.
• Example 1

• Example 2

• Example 3

Notice with each variation above I have kept the same rhythm as well as the same notes. All I have done is change the order of the notes. In doing so each melodic variation relates to the original riff.
Rhythmic Riff Variation
A rhythmic variation is all about changing the value/length of some or all of the notes of the riff, without changing the pitch.
• Rhythmic Variation 1
In this first example I have increased the length of the riff overall by giving some notes longer durations:

• Rhythmic Variation 2
Here I have added a triplet for a cool rhythmic variation of our riff:

• Rhythmic Variation 3
The variation in this third example is perhaps a little more subtle:

Although the new riff I created still uses all 8th notes, it starts on a different part of the bar compared to the original one.
As opposed to starting on the first beat of the bar like the original riff, I began this one on the off-beat of two.
Shifting the riff around the bar in this way results in interesting rhythmic variations.
Phrasing Variations
When it comes to creating variations in your guitar riffs, one effective approach is to experiment with different ways of playing the notes.
Instead of just deciding which notes to play, consider how you can phrase each note differently. This can significantly improve your guitar playing and enhance your overall sound. The way you approach playing each note is referred to as "phrasing" it.
Below are some different ways you could go about phrasing the riff to make it sound a lot more musical and far more expressive. These first two examples use a combination of slides, hammer on’s, and pull off’s, collectively known as legato playing, to bring more expression to our riff:
• Example 1

• Example 2

The result overall is a much smoother sounding riff.
Notice in the second example I finish the riff by sliding up to the 12th fret of the 5th string. I am finishing on the same note as I did in the first example, only on the string below for a cool effect.
In the next two examples, I use some double stops and open strings:
• Example 3

• Example 4

In example 3 the double stops bring a whole new texture to our riff which creates a nice contrast in sound against the single notes.
Example 4 sees the addition of open strings. The sound of open strings resonating against fretted notes outside of the open position of the guitar is a whole different ball game in itself.
To learn more about this way of playing guitar, check out the video below.
In it, you learn a great way to create amazing sounding riffs and runs on guitar using open strings:
7. Integrate The Riff
 Connecting the riff you are learning to your guitar playing is a crucial step in our guitar riff workout that many players tend to miss.
Just because you can play something great in isolation, it doesn't mean you can perform it when it counts, such as when you are soloing or playing with other musicians.
To be able to naturally connect your riffs in real-time while soloing or improvising on the guitar is essential. It helps you to integrate your riffs into the larger context of your playing and enhances your overall musicianship. There are many levels to doing this, however, let’s look at connecting in and out of our riff whilst playing other riffs on guitar.
To do this, I first need to introduce to you several different riffs that we will be using for this.
Here they are:
• Integration Riff 1

• Integration Riff 2

• Integration Riff 3

To connect our riff to others, we will use the riffs mentioned above.
These riffs are the ones that you should already be familiar with.
In other words, when attempting this exercise, you should use riffs 1, 2, and 3 as the ones you already know. The aim is not to learn new riffs but to link a riff with three others that are already a part of your playing.
With that said, the following is an example of how this would play out:
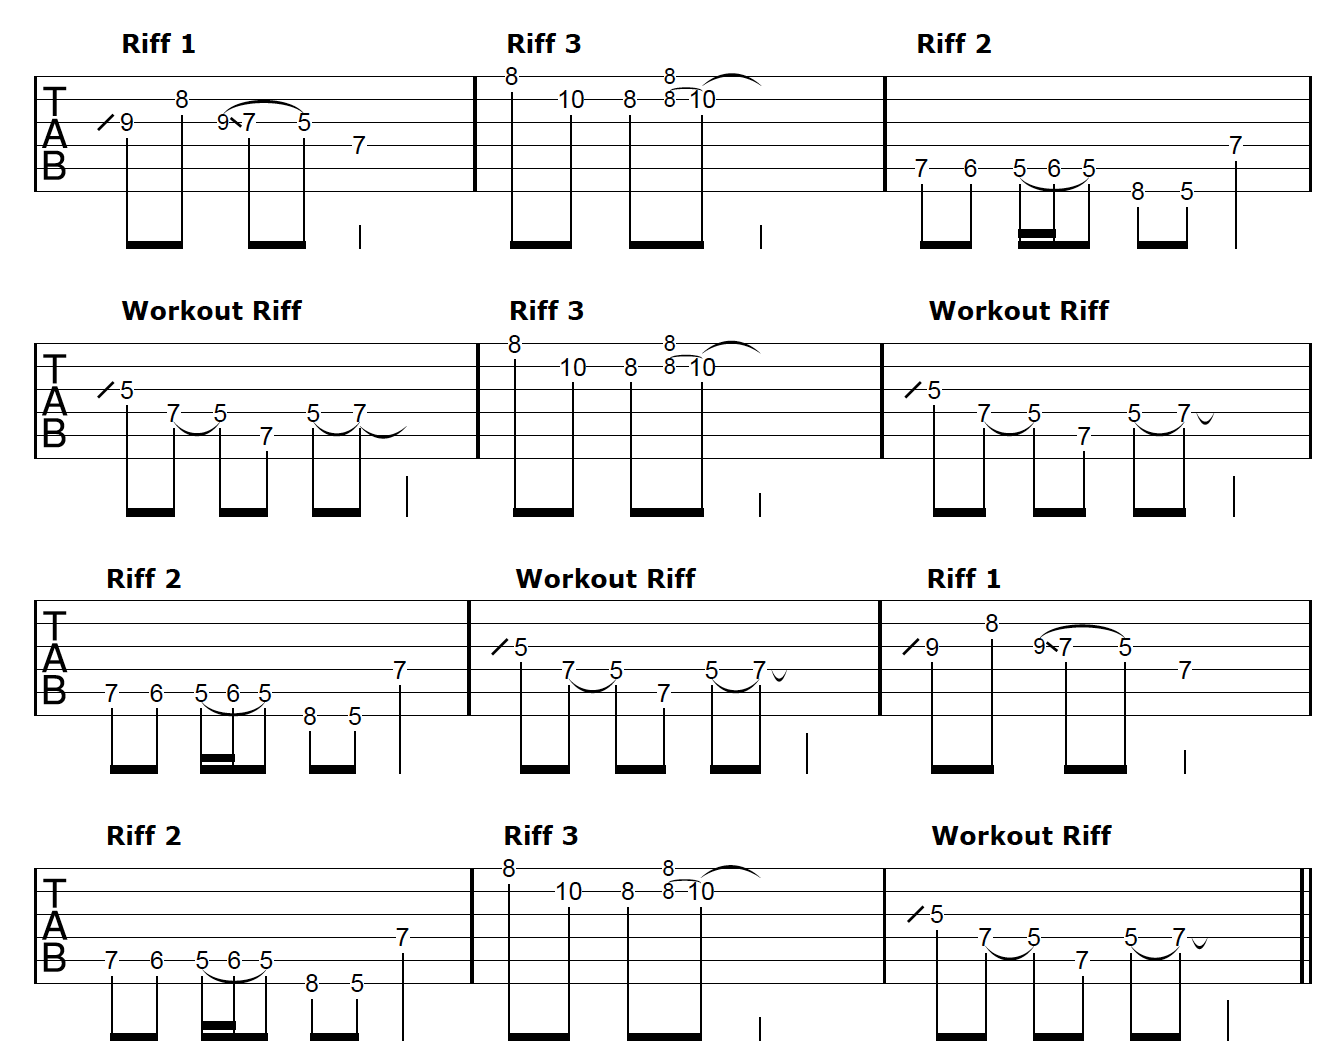
The idea in the example above is to connect in and out of the riff with the other 3 riffs. It’s like you are introducing the new riff to the other riffs you already know.
When you listen to the example above you will notice there is no gap between each riff as I play it. Once I finish one riff I immediately start playing the next one.
Musically this sounds awkward at best. However, we are not trying to be musical here at all. This is a training drill to easily and effortlessly connect your riff to your guitar playing. Giving yourself no time to do so helps train the brain to quickly make the connection.
So there you have it, the 7 step guitar riff workout.
Here is a summary for you:
1. Learning The Riff
2. Applying The Riff
3. Connect The Riff
4. Move The Riff
5. Pitch The Riff
6. Vary The Riff
7. Integrating The Riff
Discover more ways to create great sounding guitar solos using arpeggios