The 7 Step Guitar Riff Workout Part 1 - How To Improve Your Guitar Solo And Improvisational Skills
by Simon Candy
 Have you ever spent countless hours learning guitar riffs of your favourite players, only to feel frustrated when you couldn't replicate them in your own solos?
Have you ever watched someone effortlessly improvise on the guitar and wished you could do the same?
Have you attempted to write or improvise guitar solos but struggled to make it sound good?
At various points in my time of learning and playing guitar, the answers to these questions were a big and very frustrating YES!
When I played guitar solos, they never sounded as good as the solos played by my favourite guitarists. They just sounded like I was repeating the same riffs I had learned and lacked the creativity and musicality of my favourite players.
At the time, I didn't know that there are additional steps to take if you want to truly integrate the riffs you've learned into your guitar playing. It's not enough to simply remember them; you should also be able to create variations of the riff and improvise off of it when soloing in real time.
The following are the first 3 steps of a 7 step guitar riff workout I have designed for you, that will get any riff you like into your guitar playing in a meaningful and musical way, for good.
The remaining 4 steps of the workout will follow in the 7 step guitar riff workout part 2 article lesson
Going through this guitar riff workout below will also develop and improve other crucial areas of your guitar playing including:
• Aural Skills (Ear)
• Fretboard Knowledge (visualising scales, arpeggios, chord shapes etc)
• Overall Improvisation And Soloing/Phrasing Skills
If you want to play guitar like your heroes, solo effortlessly using their riffs, and truly enjoy the process, then keep reading.
The 7 Step Guitar Riff Workout
 Simply learning a riff in isolation won't make it a part of your guitar playing. Just like learning a phrase in another language won't make you fluent in that language.
To truly master a riff, you need to put it into different contexts and gain the ability to create awesome music with it. This workout is designed to help you use the riffs you learn effortlessly in your guitar playing and to improve your guitar solo and improvisation skills every time you take a riff through this workout.
For today's lesson, I am going to use a very simple riff. I want you to stay focused on the process, not so much on the riff.
Once familiar with the workout you can take more involved riffs through it.
1. Learn The Riff
The first step of our workout is kind of obvious but important.
Here is the riff we will be using today:

Spend time getting this riff onto your guitar and into your fingers, although it shouldn’t take you long as it is short and simple.
2. Apply The Riff
Once you have the riff in your fingers it’s time to apply it to a musical context. This helps you hear the potential of how the riff can sound and is great for training your ears too.
Here is our riff over a chord progression in A Minor:
The basic idea is to play the riff over the chord progression and see how it sounds. Once you have tried this, you can start to improvise with the riff if you wish. With practice, you will become more comfortable with improvisation and be able to do it more often.
However, only applying a single riff in one way is a huge waste!
This is because a single riff will work and can be played in more than one musical context.
Great players don’t focus on learning many riffs. Rather, great players focus on applying a few riffs in many different ways.
THIS is how to have your riffs multiply, instantly.
For example, listen to our riff played over a chord progression in C Major:
How about the same riff now played over a 12 Bar Blues in A:
On the surface you thought you only had one riff when in fact you have at least 3! There are more ways you could apply this riff, multiplying it again, however it’s beyond the scope of this article to go any further here. Just know for now that applying the riffs you learn musically is important to do, and that there is always more than one way to do this.
To learn how to improvise on guitar, watch the video below. You will learn how to use scales, as well as other methods for improvisation.
3. Connect The Riff
A great way to get a riff into your playing so you can connect to it easily, as well as create variations of it is to:
1. Know the scale/key the riff comes from
2. Connect the riff to the specific scale shape it is coming from on the fretboard of your guitar
The first point above is to simply know the type of scale the riff comes from and the key.
Our riff above comes from a pentatonic scale.
They key is Am.
The second point is all about connecting the riff to the specific Am pentatonic scale it is coming from on the fretboard.
In this case our riff is derived from Pattern 1 Pentatonic Scale in Am starting from the 5th fret/6th string:
Pattern 1 Pentatonic Scale here
Knowing this is not enough though. We must be able to smoothly connect in and out of the riff from this scale effortlessly.
Here is an extremely effective drill doing just that:

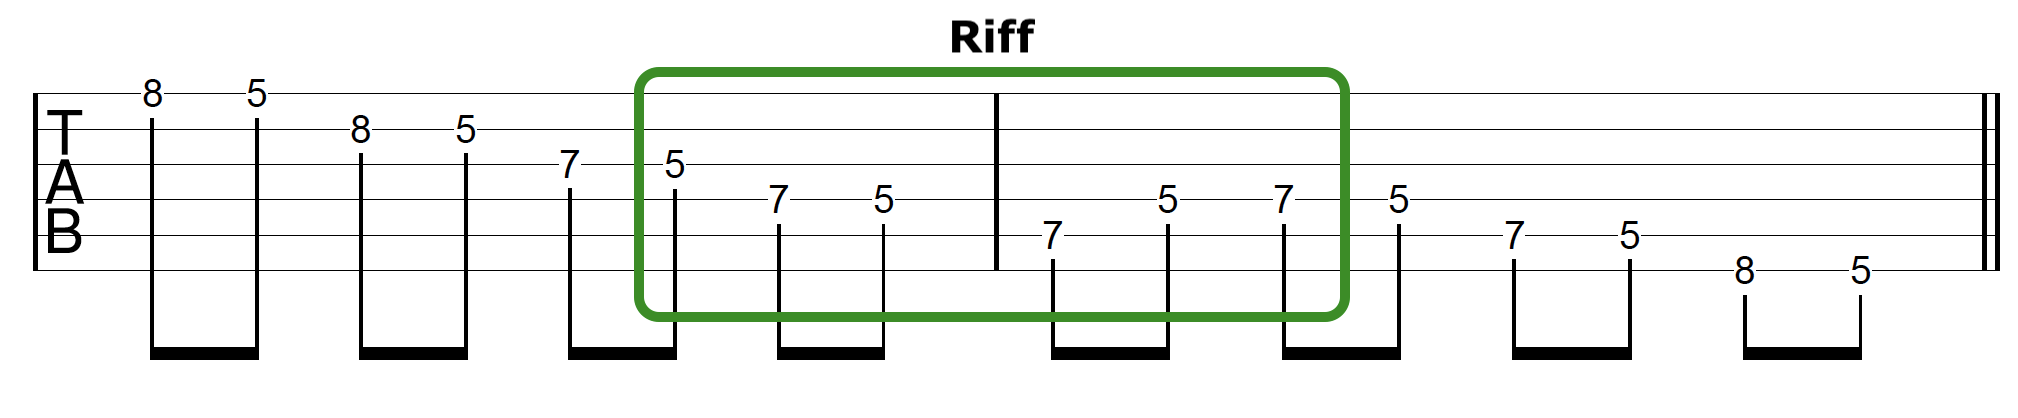
In the drill above I am simply ascending up the first pattern of the pentatonic scale.
When I arrive at the first note of the riff, I divert from ascending the scale and play the riff.
Once I have completed playing the riff, I continue ascending the scale from the last note of the riff until I reach the top note of the scale.
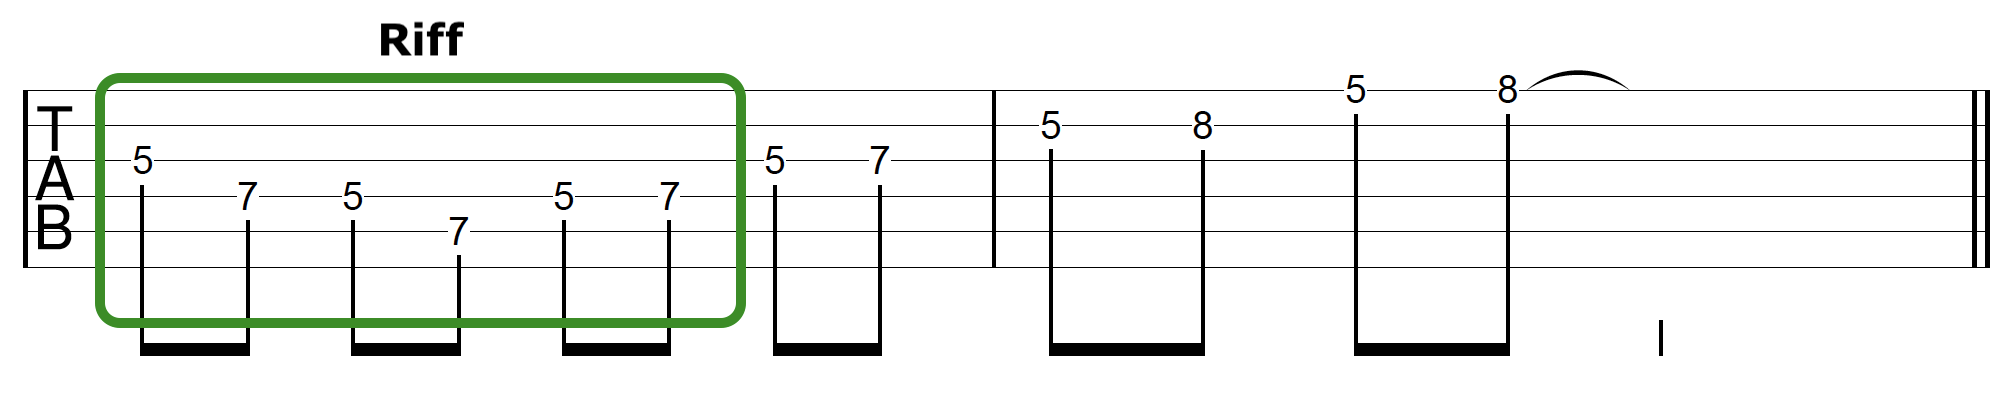
It is the same when descending the scale:
Above I descend the scale until I reach the first note of the riff. When I do, I once again divert from descending the scale, and play the riff.
Once I have completed playing the riff, I continue descending the scale from the last note of the riff until I reach the bottom note of the scale.
This drill helps give you context to the riff regarding how it fits in the current position on the fretboard. It makes it easy for you to create variations as you will be aware of notes around that can be used in the riff. This is something we will be doing in part 2 of this article.
A variation of this drill is to play the riff first and then continue ascending the scale from the last note of the riff like so:
And then play the riff again, this time descending the scale from the last note of the riff:

You are creating points of connection regarding getting in and out of the riff. So when improvising within pentatonic scale pattern 1 you will be able to smoothly connect to the riff easily and effortlessly.
In part 2 of this article, I will take you through the remaining 4 steps of our guitar riff workout including:
• Creating variations of the riffs you learn, so one riff can become many
• Using riffs to open up the entire fretboard to you, enabling you to solo all over the neck of your guitar without limitation
• Getting the riffs you learn into your ear so you can create your own riffs quickly and easily, on the spot
For now, use the provided sample riff or create your own and complete the first 3 steps of the guitar riff workout.
For additional riff ideas, check out the video below. In it, you learn several double stop riffs that will bring a great sound to your soloing on guitar:
Learn how to create unique sounding solos on your guitar using open strings