How To Play Percussive Guitar
By Simon Candy
 Unless you have been living under a rock, you will no doubt have been exposed to percussive guitar playing. It has become an increasingly popular style of playing acoustic guitar over the years, and while it’s not to everyone’s tastes, a little ability in this area of playing can go a long way.
In today's article, you learn some simple percussive guitar techniques you can get into your playing right away. After learning these techniques you will then combine them to create some cool sounding beats and grooves on the body of your guitar.
We will also integrate these beats and grooves into a chord progression, in which you will play both the percussive part as well as the chords, all at the same time!
The video below will reinforce and further train the concepts taught in this article, so bookmark it to check out after working through this lesson:
Percussive Guitar Techniques
Before we start, it's crucial to analyze each percussive guitar technique we'll be discussing today separately.
It's essential to do this to understand the importance of each one.
You can't expect to play a rhythm or a beat that consists of multiple percussive elements while simultaneously playing a chord progression on your guitar without breaking things down first.
• Muted Slap (M.S.)
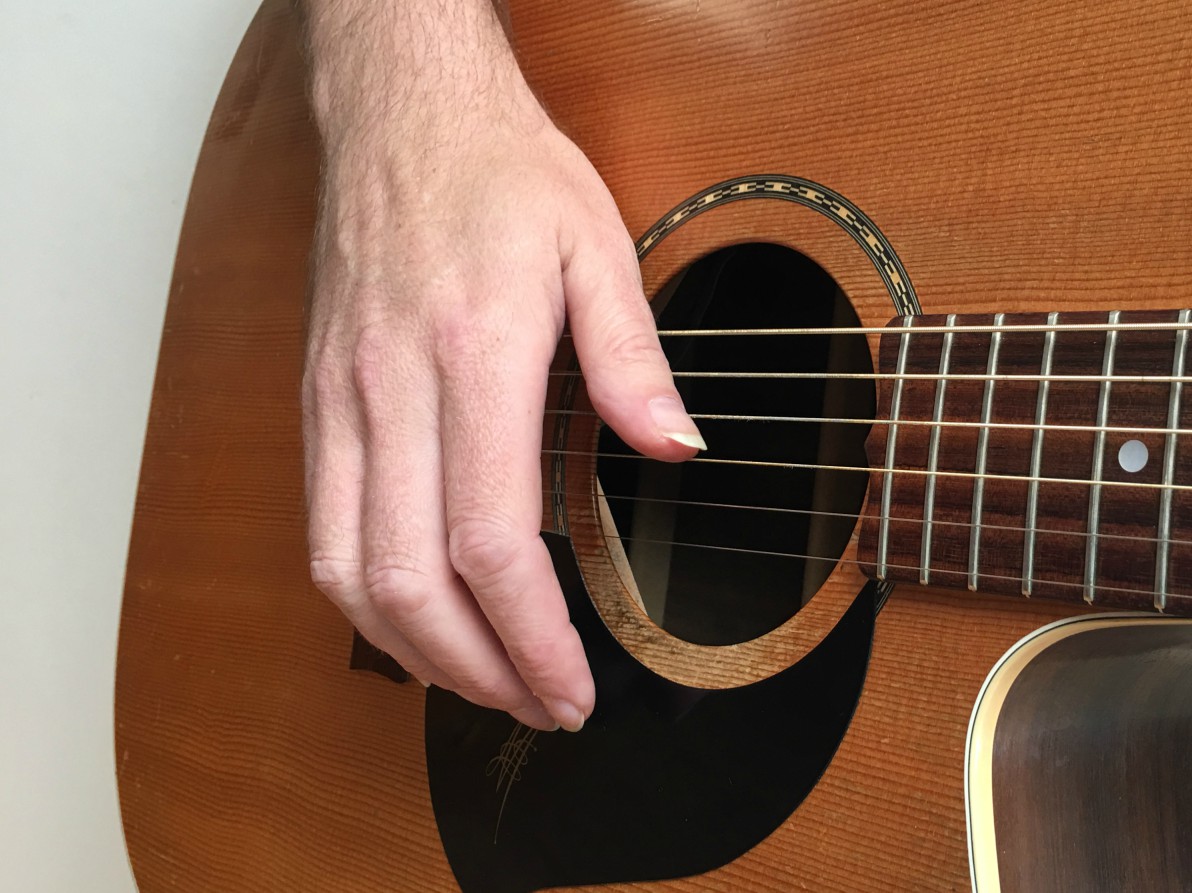 This first percussive technique, known as a muted slap, is going to be achieved by slapping your strings, rather than the body of your acoustic guitar. You do this by simply using the side of your picking hand thumb to slap the lower strings of your guitar (indicated with an “x” in the tablature.)

Even though the “x” only appears on the lower string in the tab, you will end up hitting several strings. This is fine. It is the sound this makes that we are after, not how many strings we do or don't hit.
Listen carefully to the example above and check the picture for reference.
Things to keep in mind:
• A relaxed hand, wrist, and arm
• The movement is generated by a flick of your wrist, so make sure you aren’t trying to hammer down on the strings generating the movement from your elbow only
• Bass Drum Hit With Thumb (B.T.)
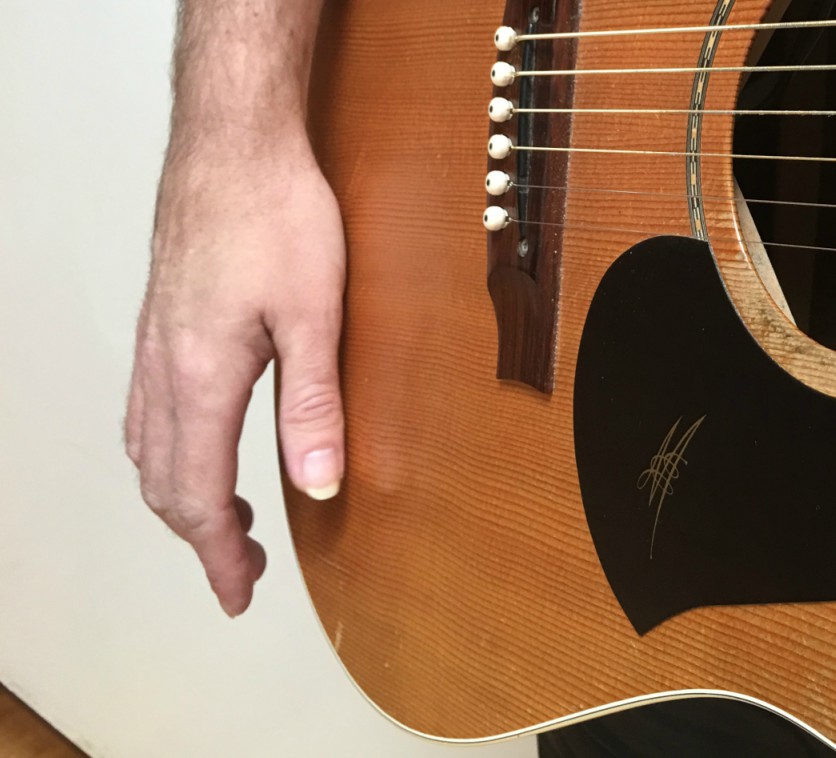 We are going to be looking at two kinds of bass drum hits. The first is sounded once again by using the thumb of your picking hand. It is the same motion explained for the muted slap above, only here you are slapping the lower area of the soundboard on the front of your guitar.
This percussive technique is notated in the first space of the musical stave and referenced with B.T. (bass drum hit with the thumb)

Be sure to check the picture for reference.
Things to keep in mind:
• A relaxed hand, wrist, and arm
• Flicking your wrist to generate the movement as you did with the muted slap
• Bass Drum Hit With Heel Of Hand (B.H.)
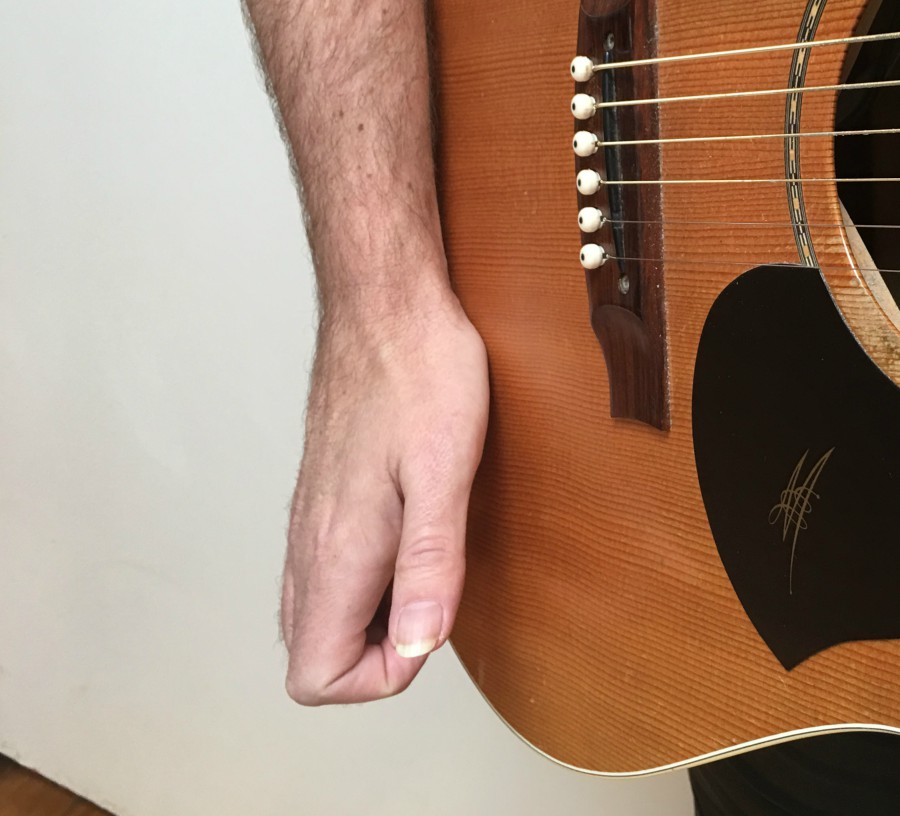 The second of the bass drum hits will involve the heel of your picking hand hitting the lower area of the soundboard of your guitar. This will create more of a “thud” type sound compared to the bass drum hit with your thumb.
This percussive technique is also notated in the first space of the musical stave, like the first one, but referenced with B.H. (bass drum hit with heel of your hand)

Things to keep in mind:
• Connecting the heel of your hand with the body of your guitar
• Not damaging your guitar by hitting it too hard
• Snare Hit (S)
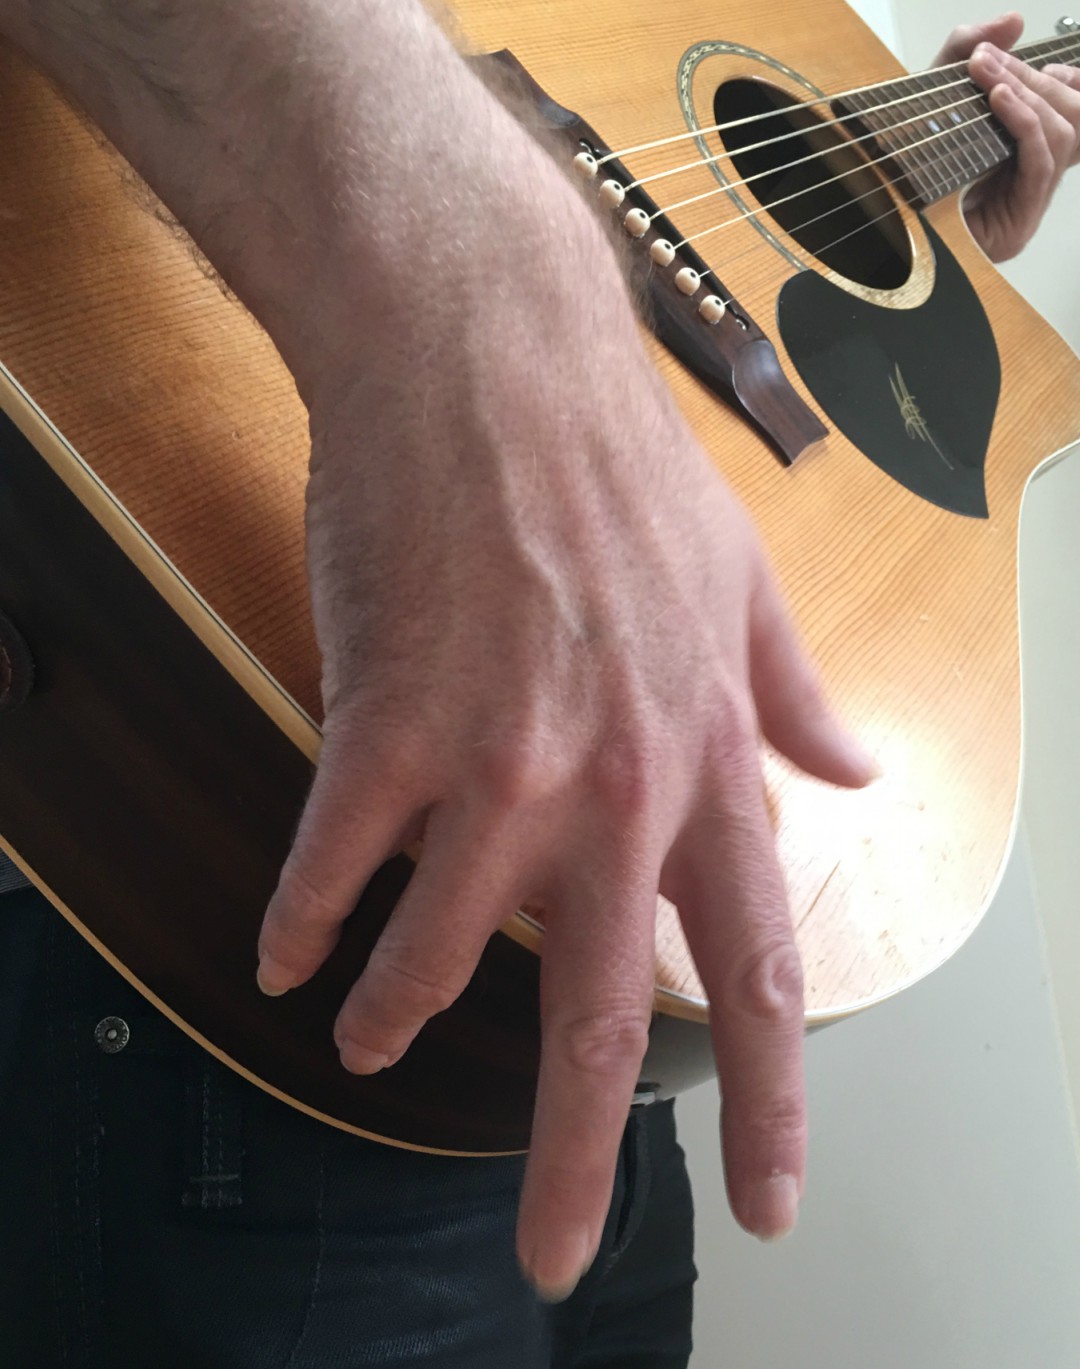 For a great snare/rim shot sound, tap/rap your fingers on the side of the body of your guitar. It’s best to use two fingers when doing this. Personally I like to use my ring and pinky fingers, but you might like to use a different combination.
This percussive technique is notated in the third space of the musical stave and referenced with “S” (snare)

Be sure to listen to the audio example and refer to the picture to achieve this high-pitched popping sound, similar to a snare or rimshot.
Things to keep in mind:
• As always a nice and relaxed hand, wrist, and arm
• Aim to connect with the base of the two fingers you are using to rap/tap the side of the body of your guitar, rather than higher up the fingers. This will give you the high end popping sound you are after
• Again, this technique is generated by a flick of the wrist
• Fret hand Hit (F.H.)
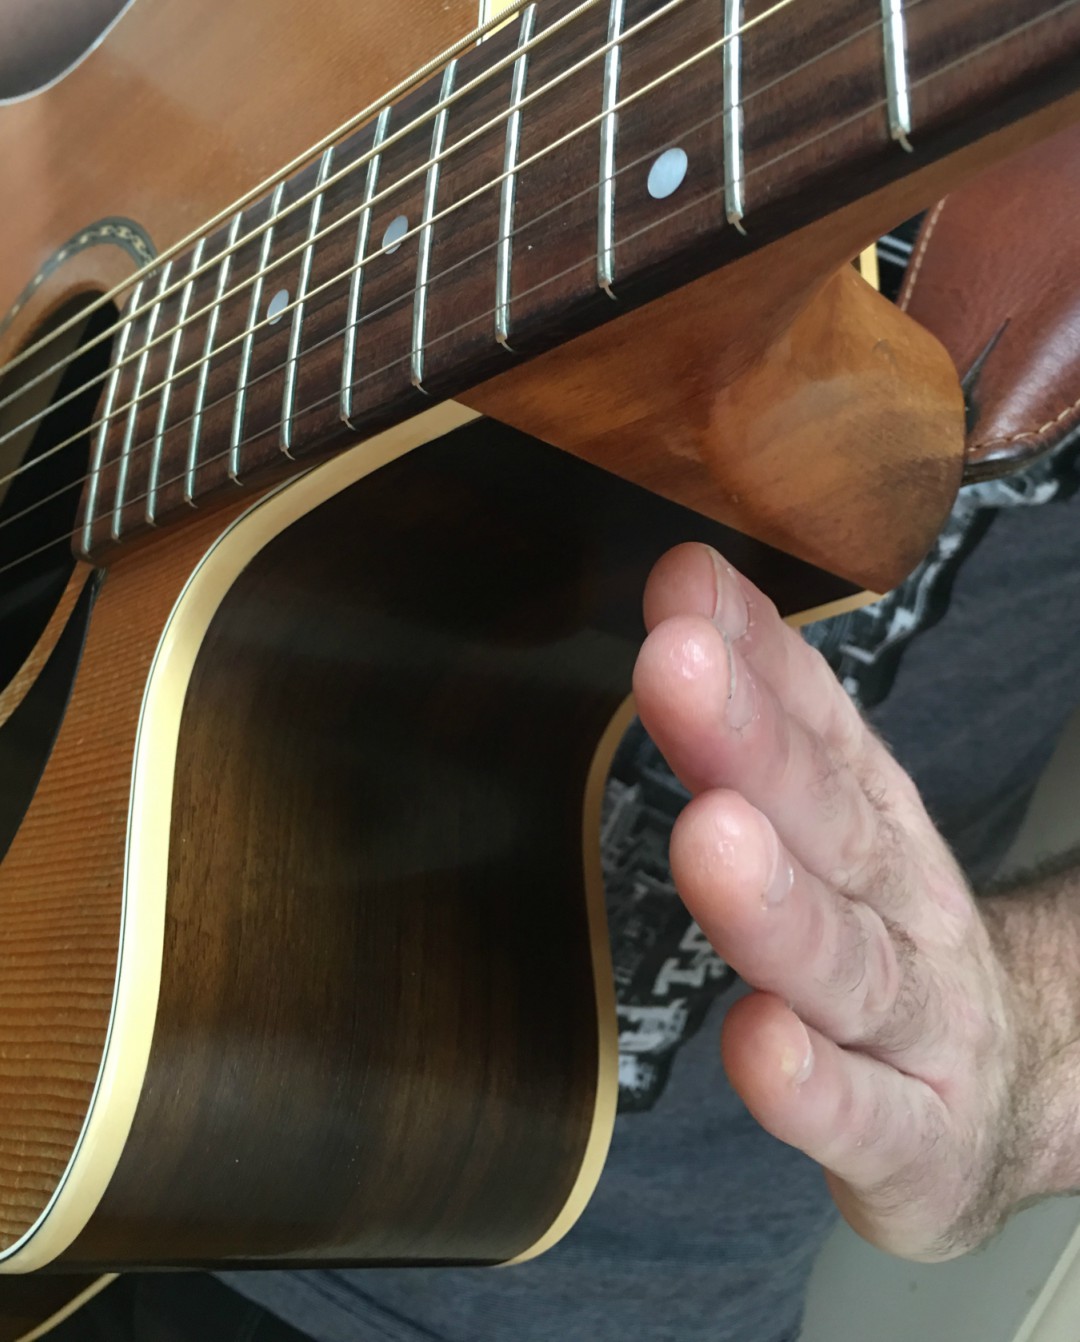 Another snare type sound can be achieved by using your fretting hand to tap the side of your guitar just below the neck. You may also tap the front of the guitar just below the fretboard instead, if you prefer.
This percussive technique is also notated in the third space of the musical stave and referenced with “F.H.” (fret hand snare hit)

Again listen to the example above as well as check the relevant picture for reference.
Things to keep in mind:
• Dare I say, a relaxed hand, wrist, and arm :)
• Getting your fretting hand out in front of the guitar, no thumb behind the neck, executing the technique, and then getting your hand back in position ready to continue playing
• The Slap
An additional percussive skill is the slap technique. This is when you sound notes by slapping them with the side of your thumb as opposed to picking or plucking them.
This approach brings a very cool groove to your playing.
You can learn all about this technique in the video below:
Combining Percussive Techniques
The next step is to combine these percussive techniques to create beats and grooves on your guitar.
Here are some possibilities:
• Percussive Guitar Beat 1

This is a simple rock groove with bass drum hits on 1 and 3 and snare hits on 2 and 4
• Percussive Guitar Beat 2
Here is another beat/groove combining some of our percussive techniques. Here I am applying bass drum hits (B.H.) on beats 1 and 3, a snare/rimshot (S) on 2 and 4, as well as thumb hits on the body of the guitar (B.T.) on the offbeats of 1 and 3:

• Percussive Guitar Beat 3
This third beat is the same as the previous one, only with a fret hand (F.H.) hit added on the offbeats of 2 and 4:

Integrating Percussive Techniques
Now it’s time to go for it!
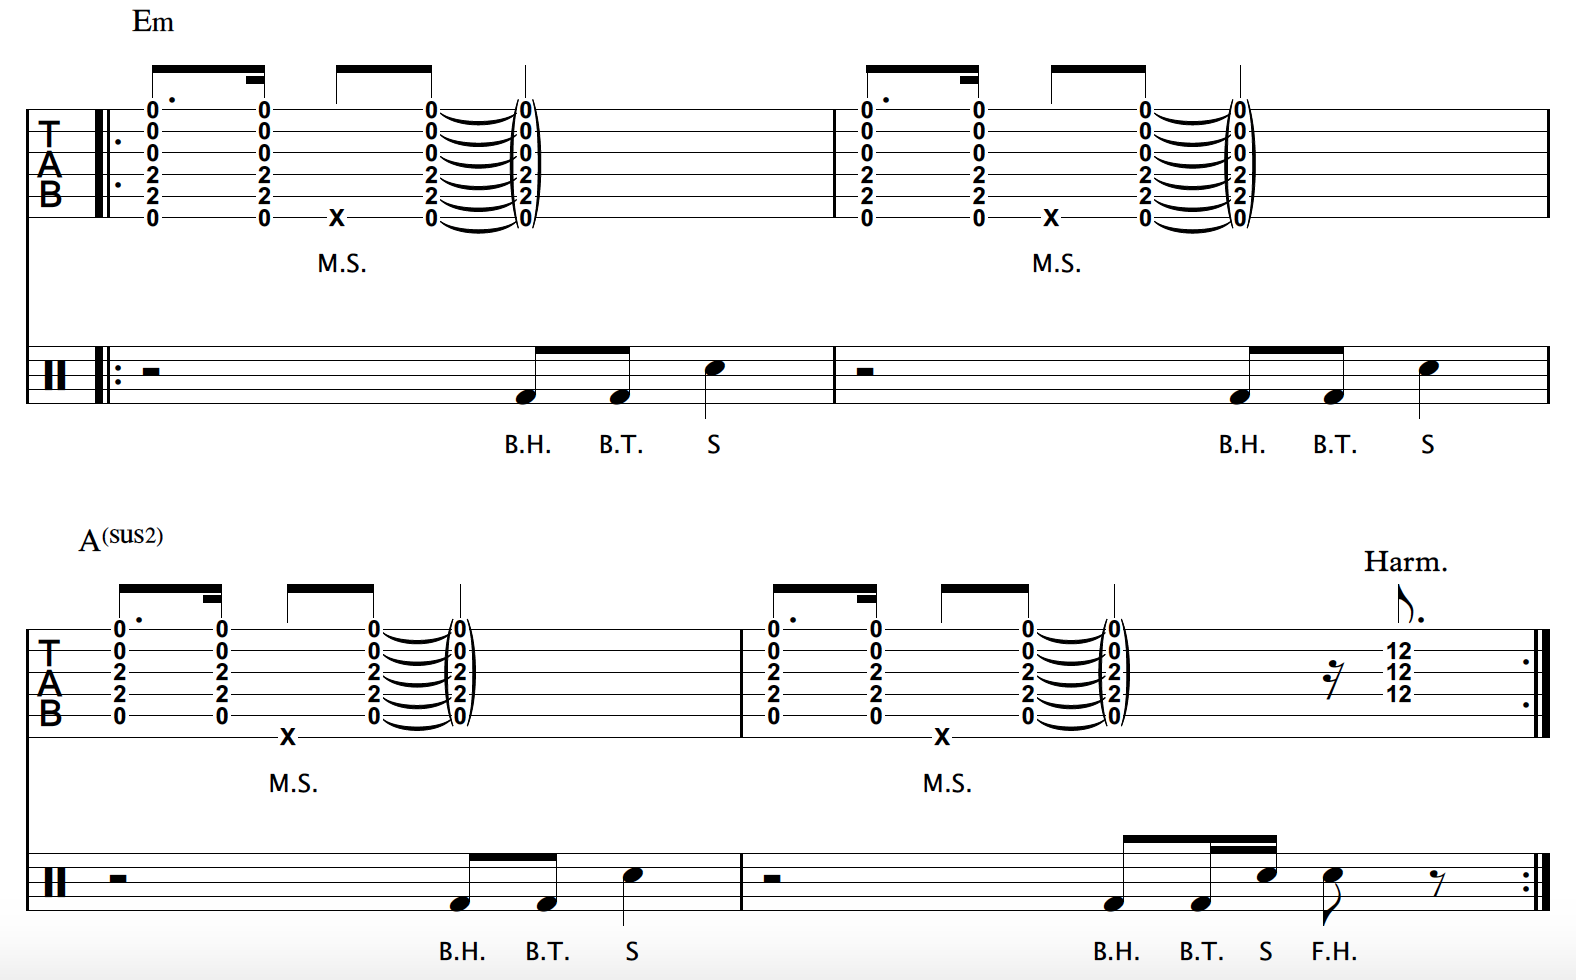
This example will include not just the percussive techniques you have learned, but a two chord vamp to integrate them with.
Here it is:
Things To Focus On:
 • Play SLOWLY and break things up into smaller pieces to work on. You MUST go slow enough so that you can ENGAGE your brain with EVERY move you make
• Isolate the strumming and string slapping part from the body percussion hits. Working on both parts separately is a much more effective way to get this down
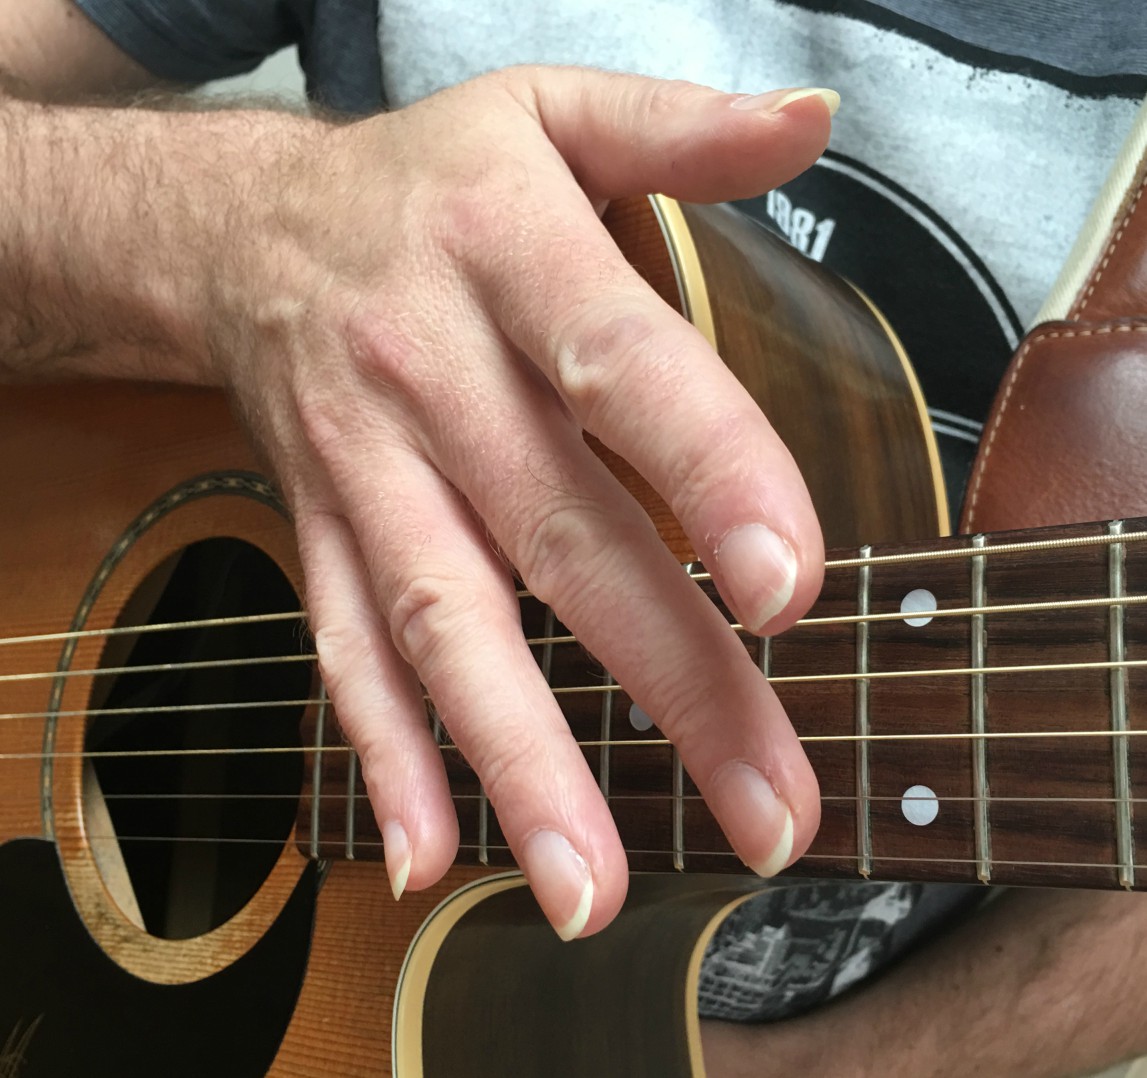
• Pay particular attention to the second half of the last bar. There are four body percussion hits to be played together with a harmonic slap at the 12th fret. The harmonic slap is achieved by slapping the middle finger of your picking hand over the top of the 12th fret, producing a chime-like sound (refer to the picture for guidance, and ensure that your middle finger bounces off the strings instead of resting on the fretboard).
• Keep your picking hand relaxed when performing both string slapping techniques and body percussion hits. The movement is generated from the wrist
7 Crippling Mistakes To Avoid When Creating And Playing Chord/Melody Arrangements On Guitar - Part 2
by Simon Candy
 In part 1 of this article lesson, I laid out 3 key mistakes guitar players make when creating chord/melody arrangements.
By avoiding these common mistakes, playing and creating chord/melody arrangements becomes so much easier to do, even if you consider yourself to have only basic playing skills in this area of guitar.
In part 2, I am going to present a further 4 critical mistakes made when attempting to play the chords and melody to a tune at the same time on one guitar. By avoiding these common mistakes, playing and creating chord/melody arrangements becomes so much easier to do, even if you consider yourself to have only basic playing skills in this area of guitar.
4. Not Considering The Key When Creating Your Arrangement
 As a general rule, you want the melody of the tune you are arranging to fall on the top 2 or 3 strings of your guitar. If the melody falls on the lower 3 strings it will get in the way of the bass and chords that are harmonising it.
Depending on the tune, there will be a select group of keys that it will work best in. Don’t simply choose one by default just because it may be a key you are more familiar with.
Certain keys may offer more favourable open chord shapes to use compared to others. It could be that you favour the mellowness of the melody in one key, or perhaps the range of the melody (from the highest to lowest note) suits the guitar better in one key over another.
How To Avoid This Mistake:
• Before creating your arrangement, take the time to determine which key fits the melody best on the guitar. This will save you headaches later on.
• Find the lowest note of the melody and the highest note of the melody and make sure they can all be played on the top 2/3 strings of the guitar within a suitable range/position. There can be a note or two that doesn’t fall on these strings, but the vast majority of the melody must.
5. Not Having Any Creative Ways To Harmonise The Melody
 The whole point of creating chord/melody pieces is to develop ways of playing the chords and melody of a tune on one guitar simultaneously, much like a pianist might go about arranging/playing a piece.
However often the melody is treated as an afterthought, and even if everything is technically correct, it can still sound dull and uninteresting. You need to develop ways to express the melody with depth, emotion, and sophistication.
How To Avoid This Mistake:
• Adding an alternate bass/travis picking approach to your arrangements can result in a more rhythmic and syncopated melody line as a kind of flow on effect.
• Playing a melody line using harp harmonics will add a whole new dimension to your chord/melody piece, not too mention seriously impress anyone who hears you play them.
• Adding the droning of open strings to your melody when you are NOT in the open position, will bring another unique sound to your arrangement.
• Punctuating the space between the melody phrases of the tune with chords, as oppose to playing chord and melody at the exact same time, gives you more room/space to express the melody using legato, bends, slides.
• You can also add your own unique touch by varying the melody. Be careful though, you want to stay true to the melody if/when doing this.
Check out the video below to learn a very unique way of harmonising melody using quartal harmony:
6. Not Looking At What Has Come Before To Gain Insights, Ideas, And Inspiration
 It is common for guitar players to purposely avoid looking at what others have done before them, in an attempt to not end up being a clone of someone else with their chosen style/genre. This is flawed logic to say the least.
By observing, studying, and analyzing the techniques of other musicians in chord/melody playing, you can improve your own creativity by gaining inspiration from their ideas and incorporating them into your own unique arrangements.
You will not find a guitar great out there who has not been influenced heavily by others who have come before them.
How To Avoid This Mistake:
• Discover different approaches to arranging and harmonizing melodies, by learning a variety of existing chord/melody arrangements from different players. By doing so, you'll find many creative ways to approach your guitar playing and be more inspired than ever before!
7. Beginning At The End Instead Of The Beginning
 Creating a chord/melody arrangement of a tune by trying to do everything at once, that is starting with the finished product, does not work. The same is true when learning exisiting chord/melody arrangements on your guitar.
This is because a completed chord/melody arrangement can look very complicated. However, if you know how to break an arrangement down, it reveals its structure and simplicity, and will also give you a great insight into how to build your own arrangements.
How To Avoid This Mistake:
• Divide your arrangement into 3 parts (bass, harmony, melody) and develop each part in isolation before putting them together
For a detailed breakdown of how to go about dong this checkout the video below where I go through the process if creating a chord/melody arrangement of a tune step by step:
Check out the 5 easy steps to creating your own chord melody arrangements on guitar ebook/audio, to see and hear concepts and approaches covered in this article, applied to an actual song.
How To Master The Travis Picking Pattern Allowing You To Play Thousands Of Songs With Ease
by Simon Candy
 This is an extension of a previous lesson on the number one fingerpicking pattern for guitar.
I recommend checking this out first if you are new to travis picking. However, once you have the basic pattern in your fingers, it is important to learn variations of the travis picking pattern as there are subtle differences in how it is played each time when used in songs. Although these differences are subtle, they are also very important.
Once you have mastered variations of the travis picking pattern you will be able to improvise with it on the spot, similar to strumming, allowing you to apply the technique to your playing instantly, without prior preparation.
The video below will reinforce and further train the concepts taught in this article, so bookmark it to check out after working through this lesson:
Travis Picking Pattern Variations
Let's explore some variations of the travis picking pattern so you can apply it to your playing and recognize it in music.
• Travis Picking Pattern Variation 1
One variation of this pattern is to pluck two notes out of the chord at the same time. For example, you can pluck both a bass note and a higher note in the chord together. We can refer to this as “pinching” notes:

In the example above I am pinching the root note in the bass and the octave of this note on the 2nd string on the first beat of the bar before continuing with the travis picking pattern.
You can also pinch notes together on different beats, such as the second beat like so:

• Travis Picking Pattern Variation 2
For this Fingerpicking variation, we will combine the pinching of notes with the more involved bass pattern of 5 4 6 4 on the C open chord like so:

• Travis Picking Pattern Variation 3
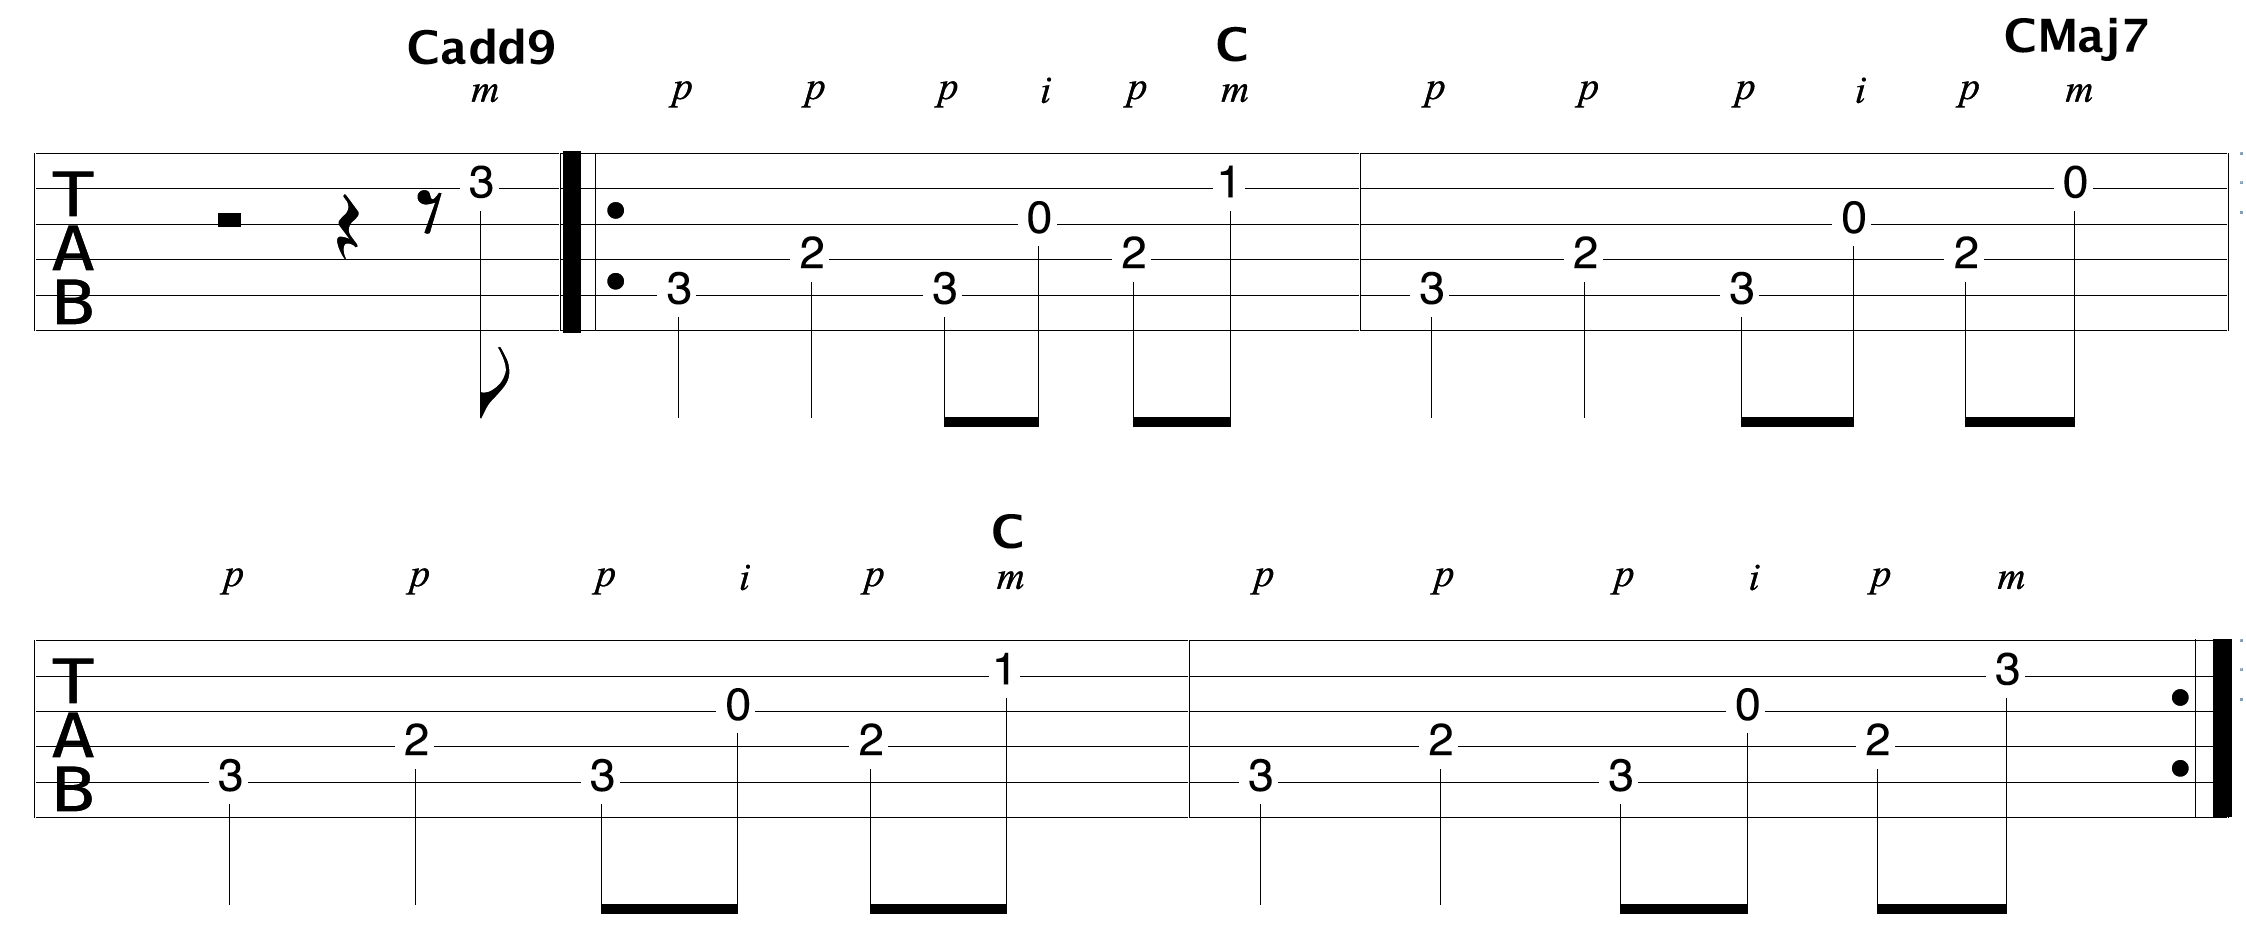
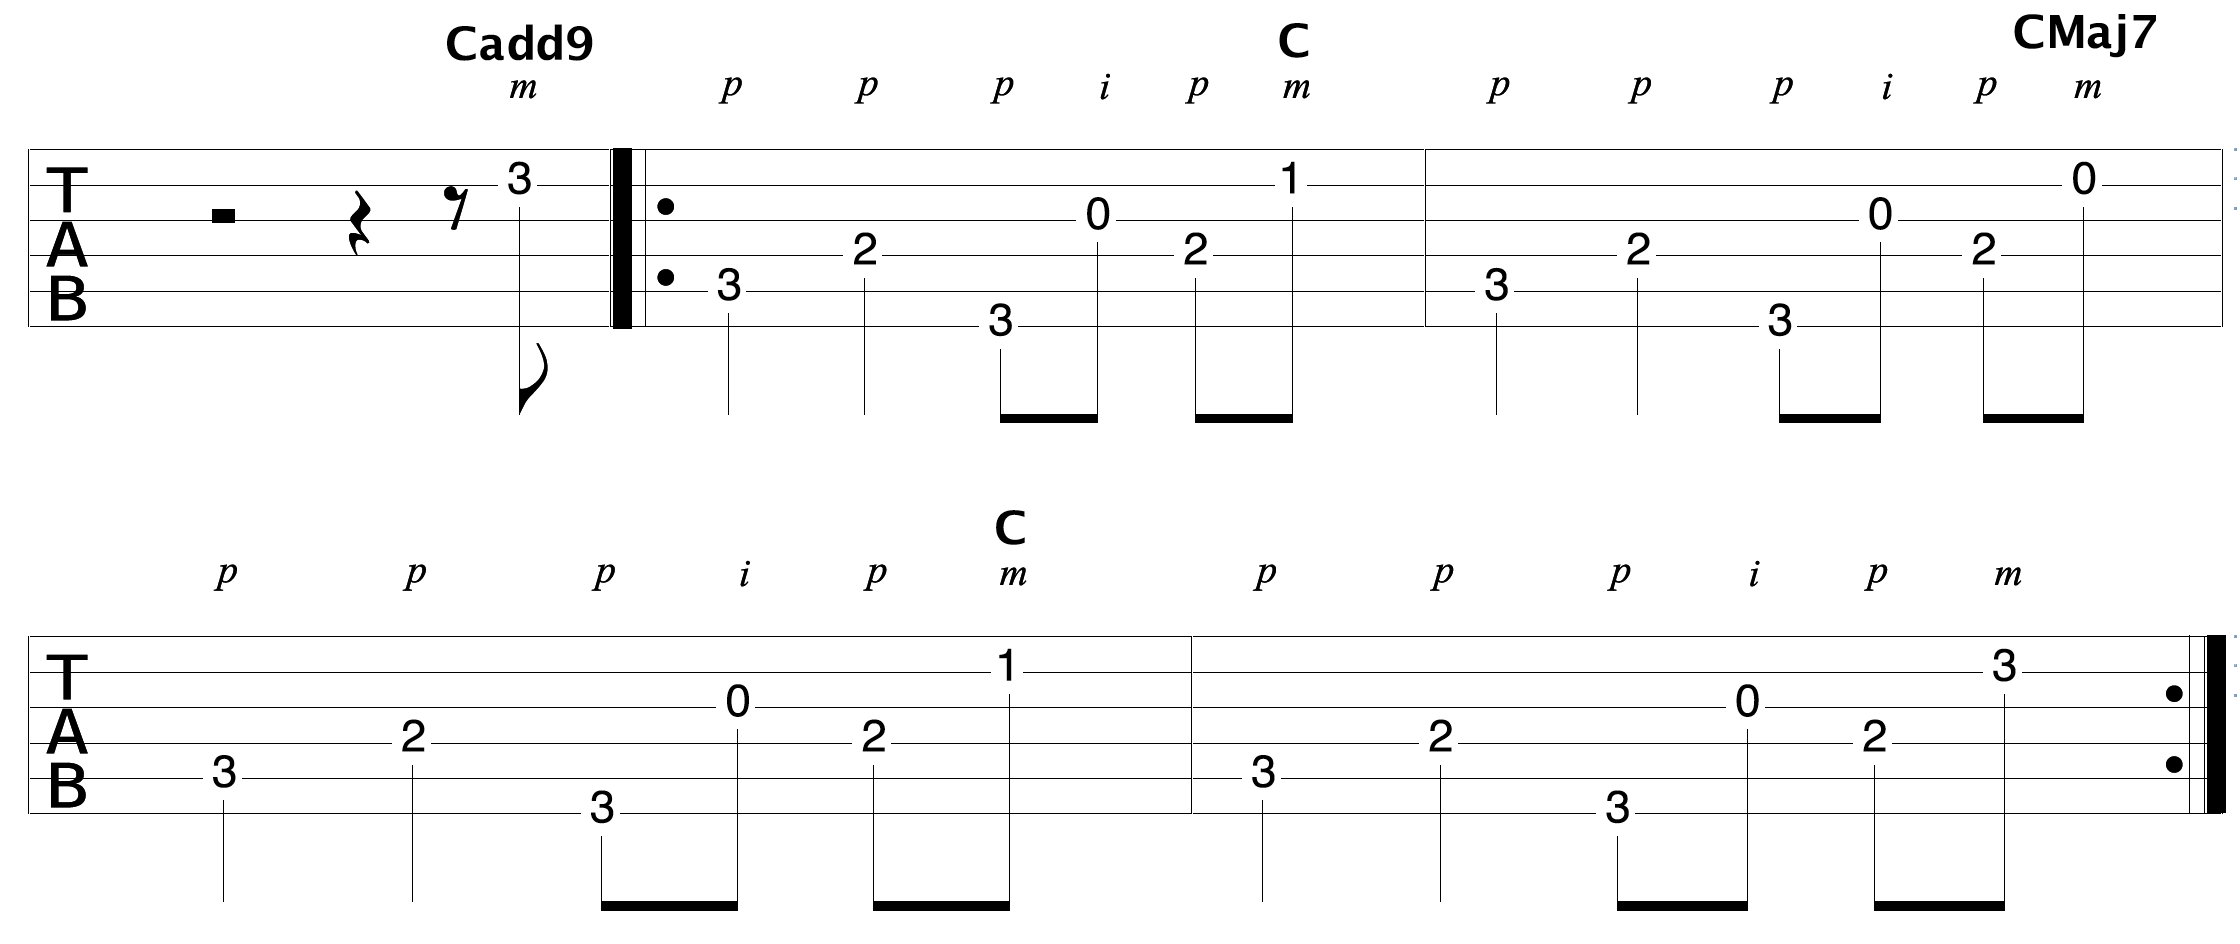
Another approach you can take with the travis picking pattern is to add extensions to the chords you are applying the pattern to. This brings in a melody component and adds much interest and sophistication to the sound of your fingerpicking.
Here is an example of adding extensions to a C chord using a 5 4 5 4 bass pattern:
And the same thing with a 5 4 6 4 bass pattern:
• Travis Picking Pattern Variation 4
Yet another variation is to change the order in which you pluck the higher strings of the chords. Instead of plucking the 3rd, 2nd, then back to 3rd string combination I have been doing throughout, I will now pluck the 2nd, 1st, then 3rd strings of the chord in-between my bass notes, like so:

Here is the same pattern with a 5 4 6 4 bass pattern:

• Travis Picking Pattern Variation 5
The final variation sees a straight 8th note rhythm with a higher note in the chord plucked on the off beat of 1 which I have not done in any previous example.

And with a 5 4 6 4 bass pattern:

As you can both see and hear, you can choose any combination of the higher strings between your bass notes with the travis picking pattern. With practice, you'll be able to decide on the strings to pick in the moment effortlessly.
The bass pattern remains consistent throughout, falling on the beat. This is an important reference point for you and the driving force behind the travis picking pattern.
How To Mix Travis Picking Pattern Variations Together
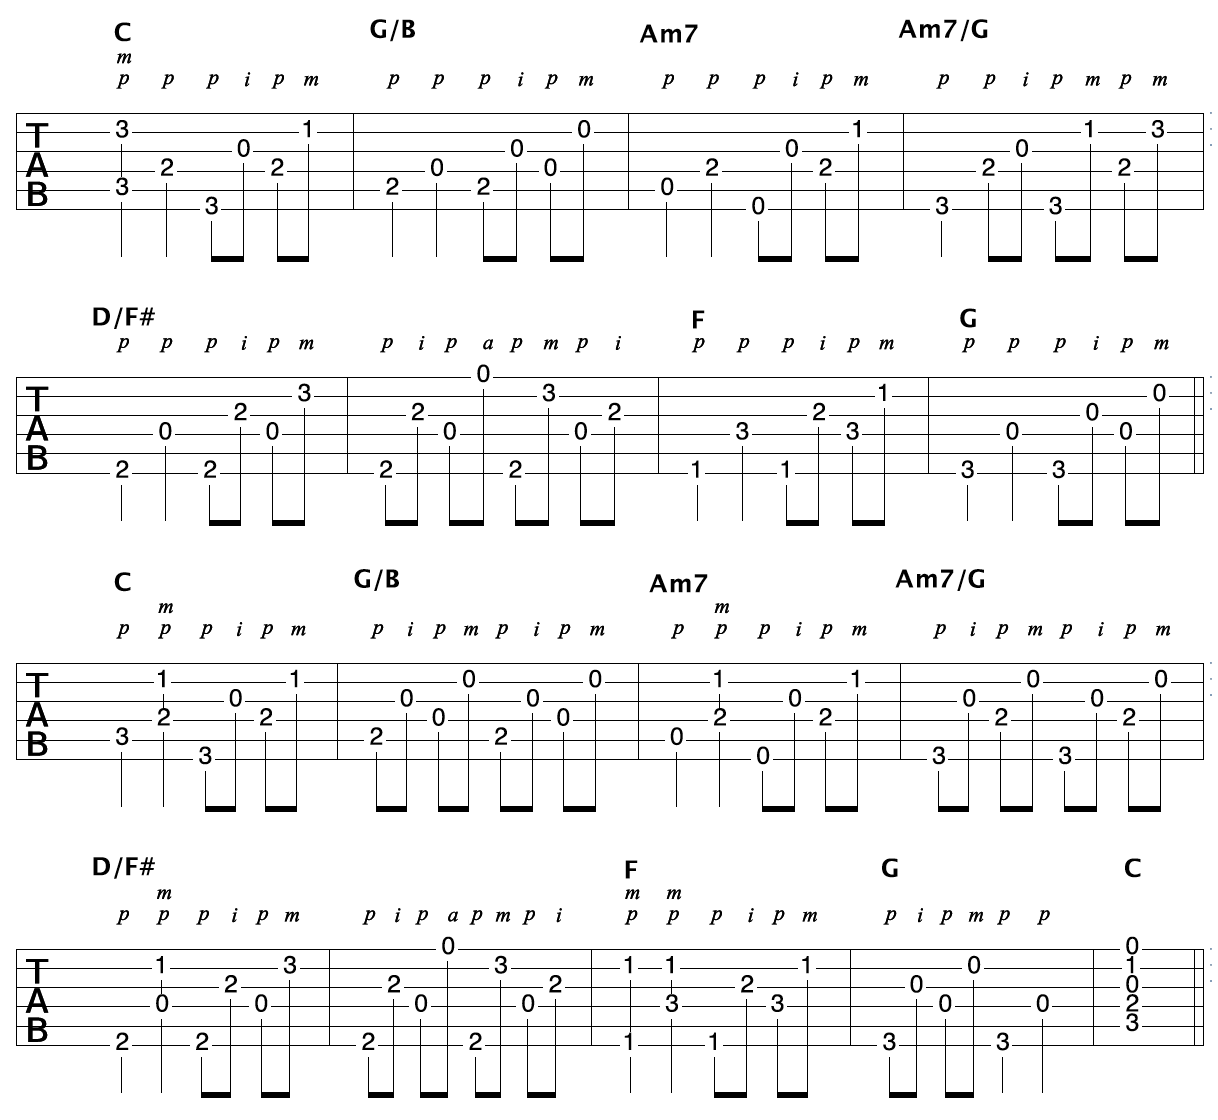
Once you have worked through each of the variations above in isolation, you want to be able to mix and match them. The exercise below is designed for doing exactly that.
Integrating variations of the travis picking pattern is essential if you are to master it.
The travis picking is just one element of the overall style of travis picking on guitar. To learn how to travis pick beyond the pattern, checkout the video below.
In this lesson, you learn how to travis pick in 3 simple steps:
Level up your fingerpicking with 10 pro melodic fingerstyle patterns you can learn in 10 minutes
7 Crippling Mistakes To Avoid When Creating And Playing Chord/Melody Arrangements On Guitar - Part 1
by Simon Candy
 Chord/melody is a general term used to describe the act of playing both the chords and the melody of a tune, on one guitar, at the same time. While this kind of playing can sound very impressive, it can also look really difficult to do, and even harder to come up with your own chord/melody arrangements. However it doesn’t have to be, if approached in a strategic, methodical, and logical manner.
A lot of guitar players often feel discouraged when attempting to create their own arrangements due to a lack of understanding of where to start. Others who attempt chord/melody playing often make the mistake of starting at the end, trying to play a finished product without knowing how it was created.
In part 1 of this article, I present to you 3 critical mistakes guitar players make when trying to arrange chord/melody pieces on their instrument.
I will go into some detail for each and provide you with solutions so you can either stop making these mistakes, or better yet, avoid them altogether.
In part 2, I will present to you a further 4 critical mistakes guitar players make when creating chord/melody arrangements. Once you are aware of these errors, you can easily avoid them.
So let’s get to it!
1. Not Knowing The Chords And Melody Of The Tune In Isolation
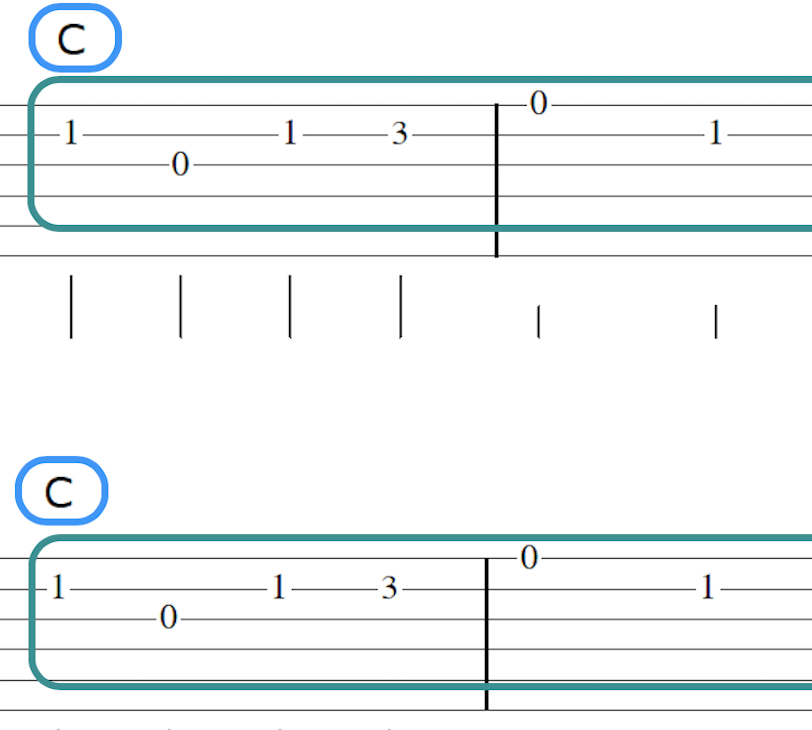 This point may seem obvious to you, however, many players make this mistake nonetheless. Too often the melody becomes an afterthought and can get lost in the arrangement, or worse yet become non existent. The melody is the most important part, without it you don’t have a chord/melody piece.
You must know both the melody and the chords in isolation as well as how they relate to each other. At any point within the tune, you should be aware of the chord that is being played and the melody phrase it corresponds with.
How To Avoid This Mistake:
• Before trying to put the chords and melody together on your guitar, internalise the melody by humming it while playing the chords of the tune. This is a great way to hear how both parts relate to each other. If there are lyrics to the tune you are arranging, it may help to learn these too.
• Commit the tune to memory. Avoid depending on having to look at a piece of paper while playing and focus on memorizing the music. You can also practice visualizing the chords and melody in your mind, which can be done anywhere and anytime without your guitar.
• Knowing how to play the chords and melody in more than one position on your guitar will make it more accessible to you, and present you with more possibilities when creating your arrangement. It will then be more likely there is a chord always nearby wherever you decide to play the melody.
2. Trying To Include Too Much In Your Arrangement
 I’m sure you are familiar with the saying “can’t see the forest for the trees”. This typically means that one is focused too much on the details (the trees) at the expense of seeing the bigger picture (the forest).
This is often the case when trying to arrange a chord/melody piece. A common trap is to focus too much on the specific parts of an arrangement you are creating (ie. the trees), only to step back and see that it doesn't work in the context of the piece as a whole (ie. the forest).
Often you find yourself trying to include too much, getting stuck in the detail, and as a result, the melody gets lost, maybe to the point where it is no longer recognisable.
When arranging chords and melodies, it is not necessary to include every element in every stage. You can omit certain chords and bass lines, and your ears will fill in the missing pieces based on what is being played. This creates an "aural" illusion of sorts where the implied or suggested parts appear to be present, even if not explicitly played.
Furthermore, trying to include everything, all the time, leaves you nowhere to go. A chord/melody arrangement needs to be built, just like a song or a guitar solo. There needs to be light and shade, and contrast within the piece for it to work, and to get the listener emotionally invested in what you are playing.
How To Avoid This Mistake:
• Strip things right back and start from the beginning, not the end, with just the melody and bass/root notes of the chords. You’ll be amazed how just this alone can create full sounding acoustic instrumental arrangements on your guitar.
For a step by step strategy on how to create your own chord/melody arrangements on guitar check out the video below.
In this lesson, you learn how to isolate the bass, harmony, and melody parts of a tune before putting them back together to create great sounding arrangements on your guitar:
3. Having A Limited Chord Vocabulary
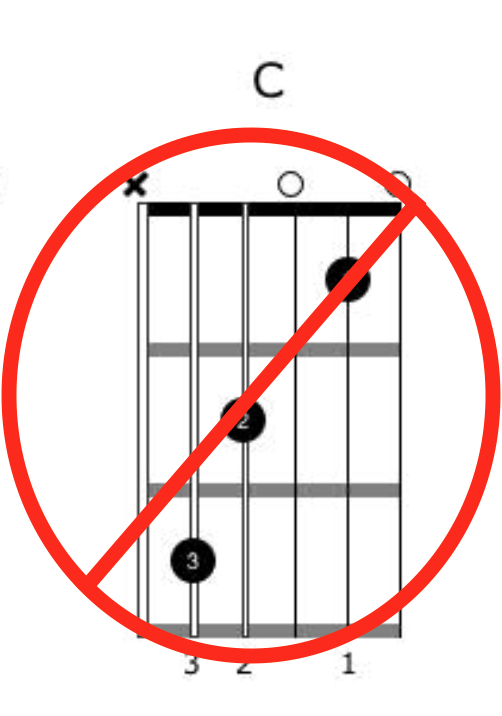 Expanding your chord vocabulary, which means learning multiple ways to play a single chord on your guitar in various positions, can greatly enhance your ability to create impressive chord/melody arrangements. Relying solely on open and bar chords can be limiting. While it is possible to create chord/melody pieces with these chords, having a wider range of chords at your disposal will allow you to create more complex and captivating arrangements.
Knowing some chord theory is very helpful too. If you don’t know how to spell chords (ie. name the notes that make up any one single chord), you won’t know how notes and chords relate to each other and, in turn, all the possibilities of harmonising a melody.
How To Avoid This Mistake:
• Invest time into learning the fundamentals of music theory (keys, chords etc). A little knowledge applied, will go a long way!
• Increase your chord vocabulary on the guitar. There are many ways to go about this, however buying a chord encyclopaedia and working through it page by page, is not one of them.
• How do the chords you learn relate to what you already know/can visualise on the fretboard? This will ensure the shapes you learn stick and become part of your vocabulary that you can use in your arrangements whenever you wish.
A great place to begin to expand your chord vocabulary is with triads.
Triads are the foundation of all chords and will not only help you truly understand how they work but also allow you to play chords all over the fretboard.
Watch the video below for a systematic way of learning triads on guitar:
Learn a step by step strategy for creating your own chord/melody arrangements on guitar