How To Learn And Create Music With Block Chords On Guitar
by Simon Candy
 Are you sick of playing the same old chords on guitar? Open chords and bar chords while useful, will only get you so far.
Today, you learn some chords that sound advanced but are quite easy to play. These chords can be played in multiple positions on the fretboard, covering the entire range, and can be used in both a rhythm and soloing context.
Additionally, it is easy to switch between the three main chord types used in music, that being major, minor, and dominant.
So, what are they?
Well, they tend to go by several different names, but I like to call them block chords.
Today's article will focus on the visualisation and application of these chords on your guitar without going into any theory. You don’t need to know the theory behind these chords to be able to use them in your playing.
Watch the video below to learn more about visualising block chords on guitar.
What I present to you in the video will support and reinforce what you learn in the article:
How To Visualise Block Chords
Learning block chords can be challenging, but understanding the relationship between chords and how they relate to each other on the fretboard is key to making them easier to access and remember.
Simply memorizing chords from a chord encyclopedia page by page is not an efficient way to learn. While these books can be a great reference, it's important to focus on how the chords are related to one another on the guitar, as this will make them more useful to you.
Ultimately, it's essential that chords are easy to access on your guitar, and this can only be achieved by building a strong foundation of understanding how they relate to each other on the fretboard.
Let’s look at our first block chord shape to illustrate this point. The following is a major 7th block chord in root position:
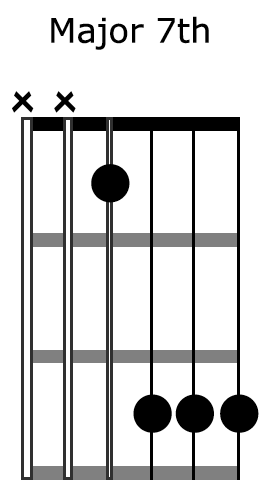
Now, if we want to make this a dominant 7th chord we only need to alter one note. This is because there is only one note difference between a major 7th and dominant 7th chord.
Here is the dominant 7th in root position:
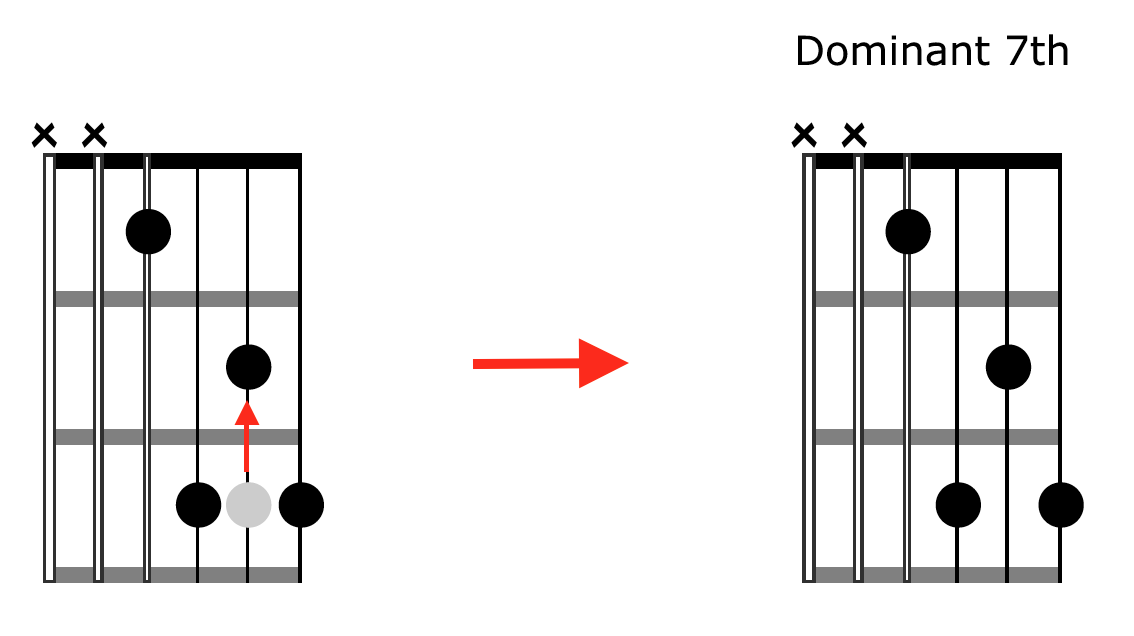
Notice all we had to do was move the note on the 2nd string of the major 7th chord down one fret.
Further to this, it’s easy to create a minor 7th chord from the dominant form, again by altering just one note.
Here is the minor 7th in root position:
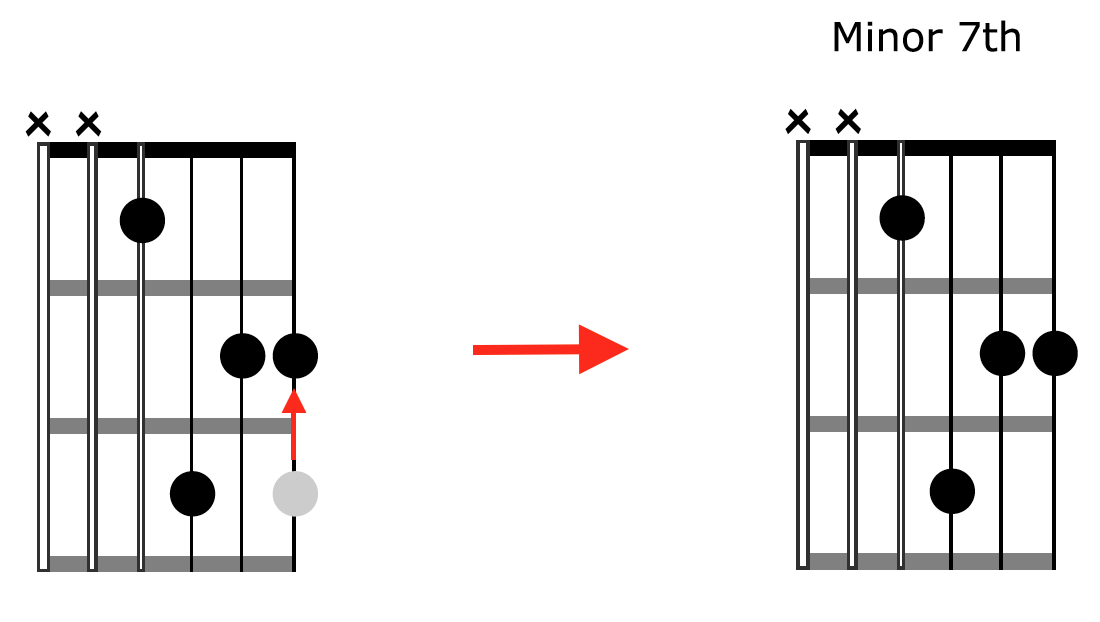
Notice all we had to do was move the note on the 1st string of the dominant 7th chord down one fret.
This is how to learn and visualise your block chords on the guitar. It’s all about how they relate to each other.
How To Open Up The Fretboard Using Block Chords
To be able to play block chords up and down the fretboard, you need to not only learn them in root position but also their inversions.
With that said, here are the Major 7th shapes for our block chord from root position through to 3rd inversion as they appear in relation to each other on the fretboard:
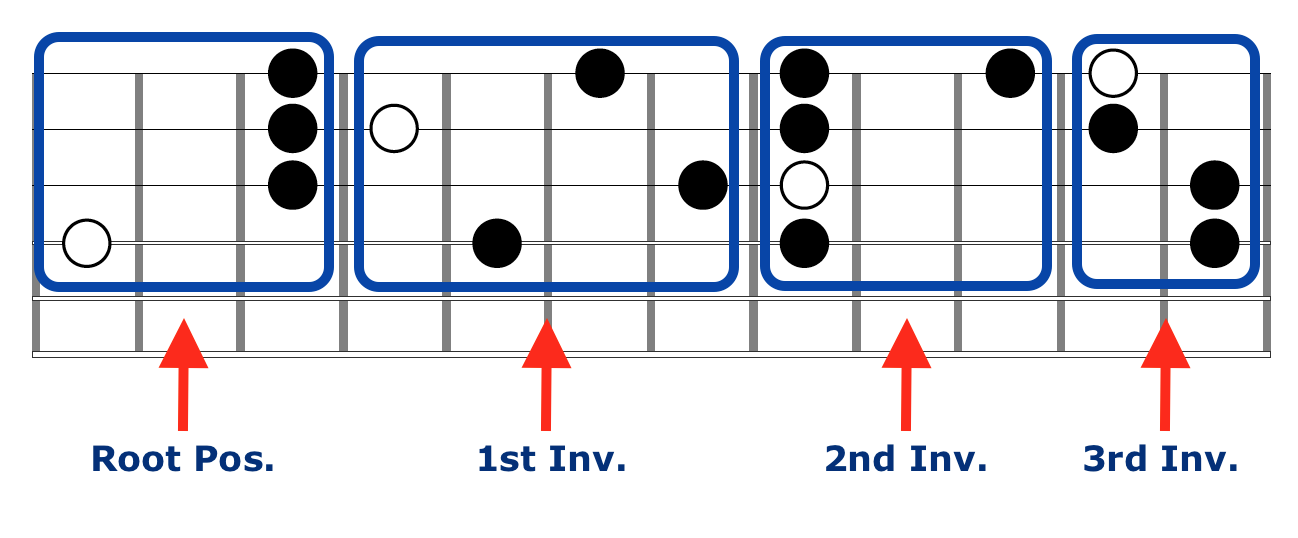
These four block chord shapes run right up the fretboard. After the 3rd inversion you would be back at the root position shape again, only this time it would be an octave higher on the guitar.
In each shape I have highlighted the root note. Knowing where the root note is in relation to the shape of a chord helps one find the particular chord they are after.
From these shapes evolve the dominant and minor 7th chords by changing just one note, as we did earlier with the root position form:
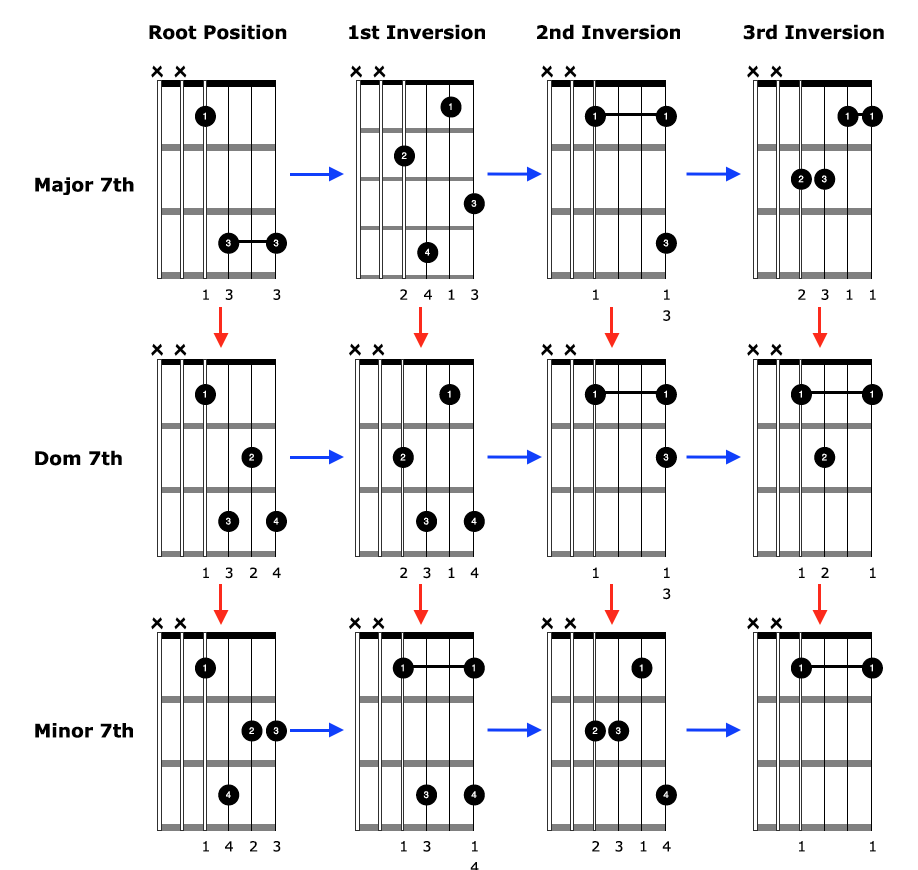
There are two ways you should practice the shapes above:
1. Horizontally, one row at a time. This will get you playing each of the 4 positions for the one type of chord (Follow the blue arrows)
2. Vertically, one column at a time. This will help you see the relationship between each chord shape, and just how similar they are (Follow the red arrows)
Notice there is only ever one note difference between each chord shape when following the red arrows.
How To Create Music Using Block Chords
Now you have a bunch of block chords running up and down the neck of your acoustic guitar, what do you do with them?
The answer is plenty!
You have four positions for each of the three main chord types you will come across in music; major, minor, and dominant.
A great progression to begin with is what’s known as a II V I. This progression pulls the II V and I chords out of the key giving you one of each chord type, major, minor, and dominant.
Here is a II V I progression in the key of G major:

And here is one way you could go about applying your block chords to this progression:
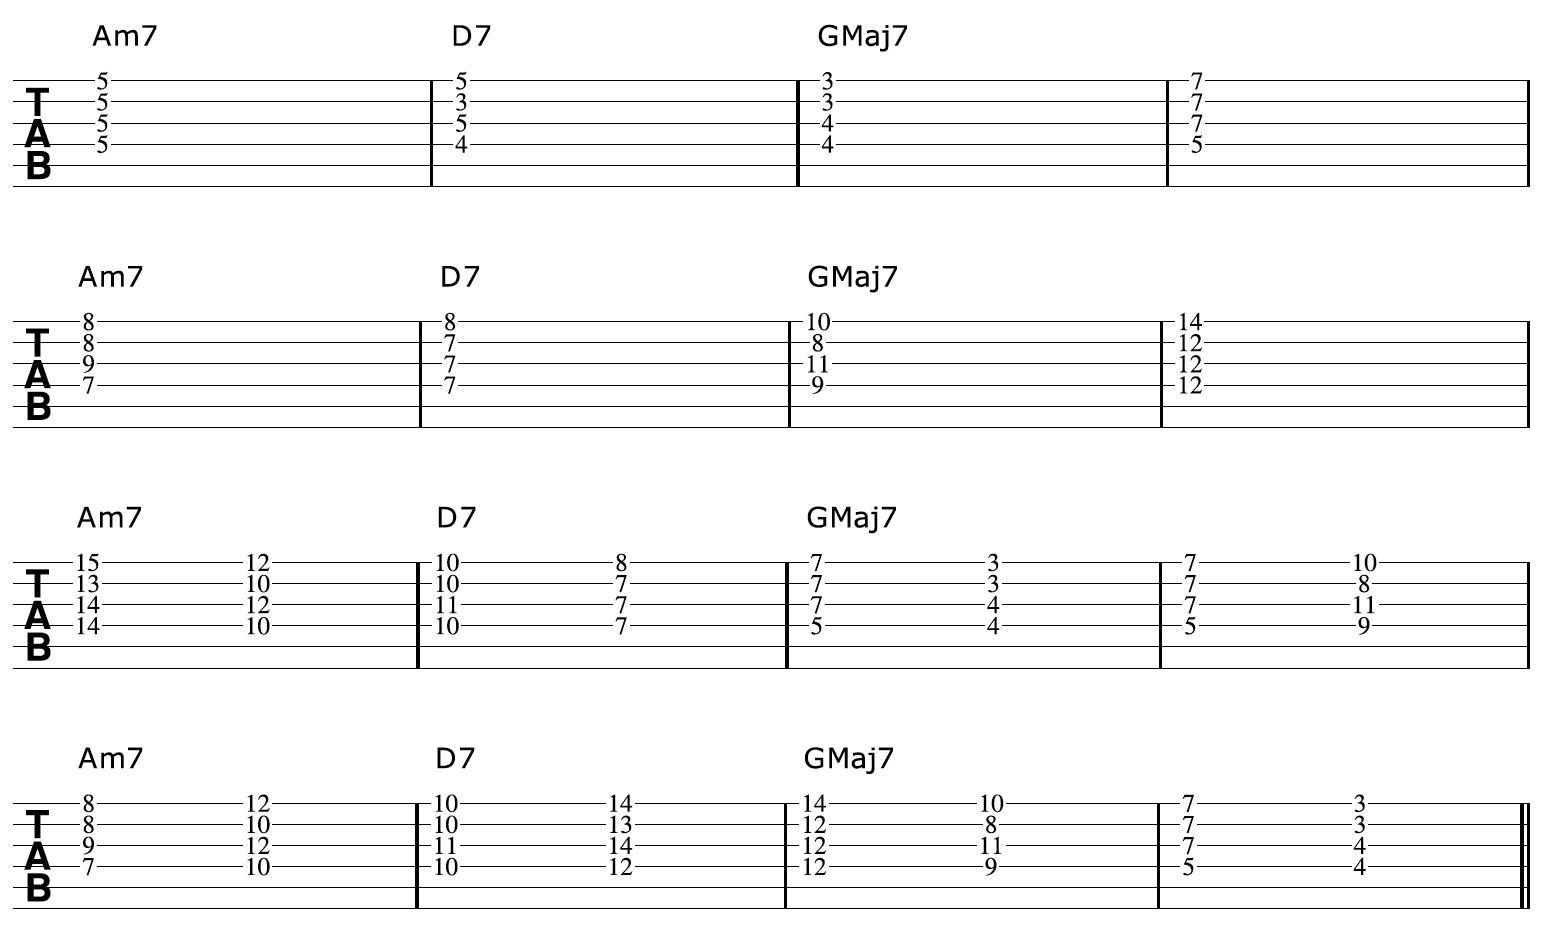
In the above example, I have used a variety of block chord forms over the progression. I have purposely kept more or less to the same area of the guitar for each rotation of the progression so that you can see how each chord relates, and that there are indeed common notes shared between each shape.
For the last two rotations of the progression, I am moving between different block chord forms over the static chord. This sounds great moving between different forms when the progression itself has not changed chord.
For my ways to apply block chords, check out the video below.
In it, you learn 3 specific ways to use block chords in your playing:
Discover 5 ways to significantly improve your rhythm guitar playing
How To Play Harp Harmonics On Guitar
By Simon Candy
Playing harp harmonics on an acoustic guitar creates a magical and mesmerizing sound. Also known as cascading harmonics, this technique will dramatically increase the dynamics and range of the instrument. The technique of playing harp harmonics on a guitar is so called because the resulting sound is reminiscent of that of a harp.
In this lesson, I will guide you through the process of creating these beautiful harmonics in your guitar playing. With a little practice, you will be able to master this breathtaking technique.
The video below will reinforce and further train harp harmonics, so bookmark it to check out after working through this lesson:
The Harp Harmonic Technique
The technique for harp harmonics will be quite unlike anything you have done with your guitar playing before. While a picture may be worth a thousand words, a video is worth even more, so be sure to watch the video above to see this technique demonstrated for you in great detail, and reinforce what we are about to cover now.
There are 3 ways you can approach playing harp harmonics. I use all 3 depending on the context in which I am using harp harmonics. The following is a brief rundown of each approach.
• Bare Thumb
Using your fingers is perhaps the most natural way to play harp harmonics. Your bare thumb will be used to pluck the string. It is a slightly different sound compared to using a plectrum or thumb pick, with the harmonics not quite having the same sustain or resonance but still sounding great all the same.
• Flat Pick (Plectrum)
Using a plectrum is another option for playing harp harmonics. However, to play the harmonics, you need to free up your index finger, which means holding the plectrum between your thumb and middle finger.
This leaves you with only your ring and pinky fingers to play regular notes.
Using the bare thumb approach allows you to use your middle finger to play regular notes in addition to your ring and pinky fingers.
• Thumb Pick
A thumb pick gives you the best of both worlds. You get the sustain of the harmonic from the pick, as well as the use of your middle, ring, and pinky fingers for the regular notes.
The Harmonic
To get the harmonic sound you will be using the index finger of your picking hand. We will start with the natural open string harmonics situated at the 12th fret, so you can give all your focus to the picking hand without having to fret anything for now.
Simply take the index finger, of your picking hand, and place the tip of it directly over the 12th fret of the bottom string of your guitar. Don’t place it in between the frets as you do when playing regular notes, it needs to be directly over the top of the fret itself.
You only need to touch the string. It is the lightest of light touches, any more and the harmonic will sound suffocated.
Once in this position, use the thumb of your picking hand to pluck the string the index finger is touching, from behind. The resulting sound should be a bell like harmonic.
When performing this part of the harp harmonic technique focus on the following:
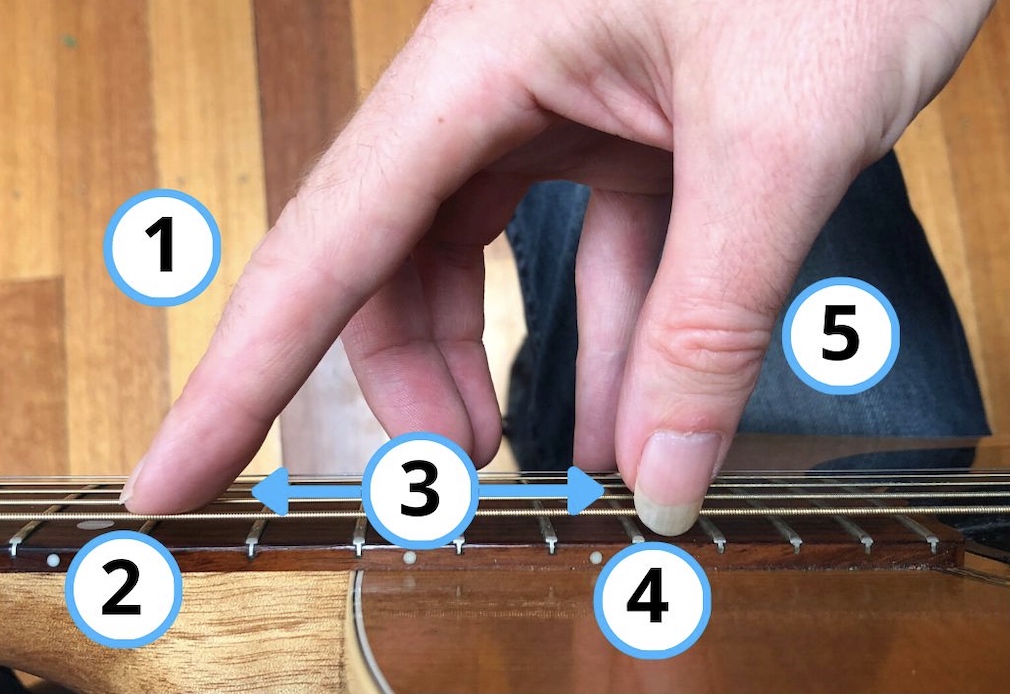 1. Keep the index finger straight.
2. The tip of the index finger lightly touches directly above the fret.
3. Keep a good distance between the index finger and thumb.
4. Pluck the string with your thumb to sound the harmonic.
5. Keep your thumb straight.
Practice your harmonics by running them up and down the six strings of your guitar at the 12th fret. Be patient, it will take a little getting use to this technique:

* Notes that are to be played as harmonics are indicated with a colon (:) symbol next to them. For now, all notes are played as harmonics, however, shortly we will be adding regular notes.
Fretted Note Harmonics
Now that we have learned the basics of sounding harmonics, we can take it to the next level and apply them to fretted notes instead of just open strings. This will greatly enhance your ability to use this technique.
When you apply harmonics to fretted notes, it is important to maintain a 12-fret distance between the note you are fretting and the harmonic that your index finger is sounding. This is why we were able to sound the harmonics of the open strings at the 12th fret, and not the 13th or 11th frets, as we were exactly 12 frets above the open strings.
Let’s look at an example.
Start by barring all six strings at the 3rd fret of your guitar. This is a Gm11 chord:
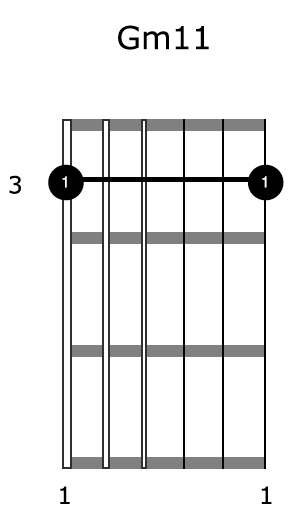
To sound the harmonics of this chord, simply place your index finger directly over the 15th fret, which is exactly 12 frets above where you are fretting your notes.
Here are the harmonics ascending and descending the strings of the Gm11 chord:

Remember to keep a very light touch, and to pluck the string from behind with your thumb as described earlier.
We can extend this approach by outlining other chord shapes with our harmonic technique. Take this C9 chord for example:
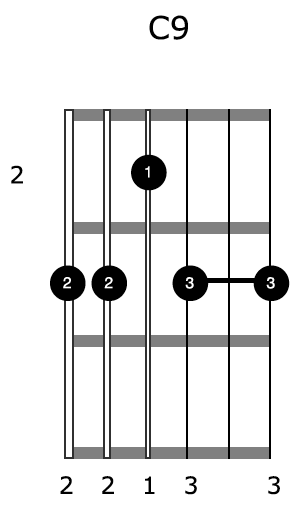
To extend the harmonics, I am including the 6th string in this chord. However, it’s more common to fret this shape from the 5th string
To apply our harmonics to this chord we simply visualise and track the shape of the chord 12 frets above from where we are fretting it:

Notice we have to adjust where we play our harmonic on the 4th string to stay true to the shape of the C9 chord we are fretting. This harmonic is sounded by placing our index finger directly over the 14th fret, with the others located at the 15th fret.
Here is another example, this time tracking the shape of an FMaj13 chord which contains both fretted and open notes.
Here is the chord shape:
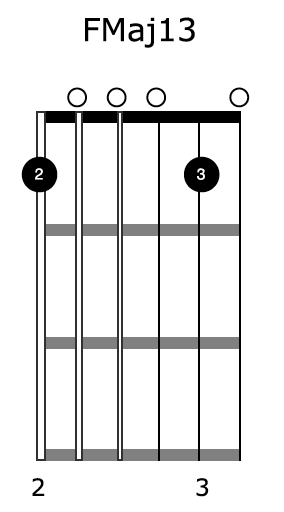
And here are our harmonics being applied to it:

Harp Harmonic Patterns
Now for the magic!
While our harmonics already sound great, adding regular notes into the mix can create a cascading harp-like sound on our acoustic guitar.
To achieve this, we will alternate between playing harmonic notes and regular notes. You will play the harmonic notes using the thumb and index finger technique while using the ring finger of your picking hand to pluck the regular notes.
Here is one of several common harp arpeggio patterns that alternates harmonics at the 12th fret with regular open string notes:

If you have the position of your thumb and index finger correct, you will find that your ring finger will be in the perfect position to pluck the open strings.
However, it is important to take your time and be patient as this may feel unfamiliar to your picking hand at first, especially since it has never done this before. So, don't worry if it feels awkward for a little while.
Once you have the hang of this harp harmonic arpeggio pattern, you can really go to town with it by applying it to any chord shape you are fretting. Just remember to:
1. Always maintain 12 frets between your fretted note and harmonic note
2. Track or trace the exact shape of the chord you are fretting regarding the harmonic notes you are playing. You need to visualise the shape of the chord 12 frets above your fretting hand
Here is our harmonic arpeggio pattern applied to the Gm11 chord:

Here it is applied to the C9 chord:

And finally to the FMaj13 chord:

In each of the examples given above, the picking hand follows the same pattern for both the harmonic and regular notes. The only difference is the location of the harmonics, which are always 12 frets above the fretted note.
This produces a different shape for the picking hand to follow, depending on the chord that is being fretted.
Connecting all 3 chords we have looked at creates an awesome sounding harp harmonic progression:
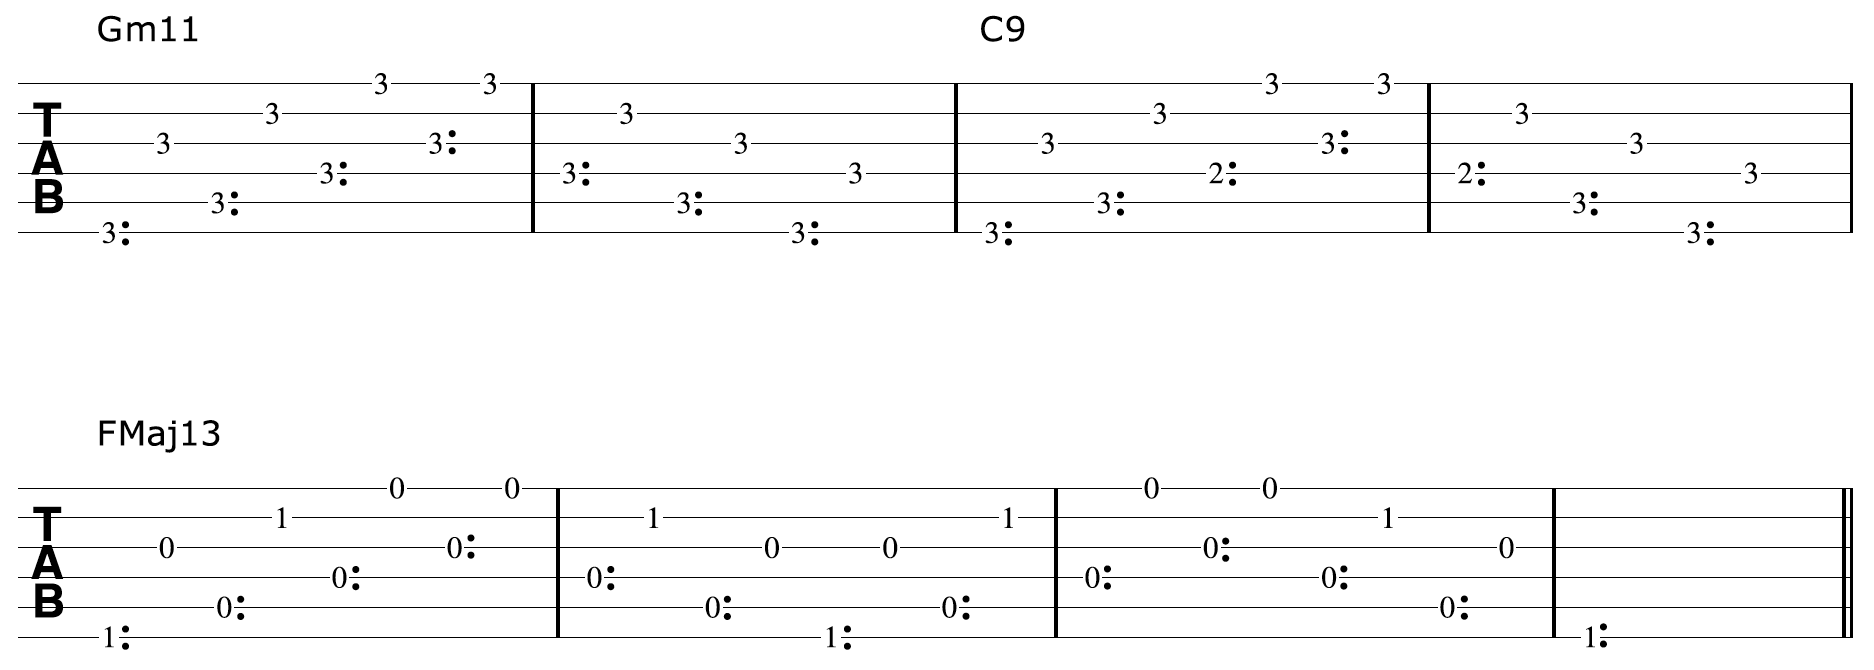
To further work with harp harmonic patterns check out the video below. In it, you learn more common harp harmonic patterns:
Learn 5 beautiful, breathtaking harp harmonic chord progressions
5 Reasons Why You Should Play Guitar In Open Tunings
by Simon Candy
 Exploring open tunings on the acoustic guitar can unlock new levels of creativity and fun in your playing. Unfortunately, some people shy away from them, thinking they'll have to start from scratch or that it's too difficult. However, this is far from the truth.
In this article, I want to show you how easy and cool it is to incorporate open tunings into your playing, so you can sound great using them right away!
First a brief explanation. Open tunings refer to the act of modifying the tuning of specific strings on your guitar to produce a particular chord when all the strings are played open.
To illustrate, if I change the tuning of my guitar's 6th, 5th, and 1st strings to D, G, and D notes respectively, I would achieve an Open G tuning. This is because all the open strings will now produce notes from a G chord.
G chord = G B D
Open G tuning (low to high) = D G D G B D
* Bolded notes are the strings that have been altered from standard tuning
There are other types of tunings in addition to open including modal, instrumental, and dropped tunings. These all fall under the banner of “alternate tunings” for your guitar playing.
Let me share with you 5 things you must know about open tunings so you don’t miss out on the great sounds and nuances the acoustic guitar has to offer, and your playing has to benefit from, big time!
1. Open Tunings Does Not Equal Having To Learn How To Play Your Guitar All Over Again
 I used to avoid playing the guitar in open tunings for a very long time.
Why?
Because I believed that it was difficult enough to learn how to play guitar in standard tuning, and making adjustments to the strings would render everything I had learned useless. It felt like too much work, and I thought I would have to start from scratch again.
However, don't make the same mistake I did!
Learning guitar in a new tuning doesn't mean that the guitar techniques you have developed over time will disappear. It's not like starting from scratch.
Furthermore, many guitar tunings, like Open G, are closely tied to standard tuning. Specifically, in Open G, the 2nd, 3rd, and 4th strings retain their standard tuning positions:
Standard Tuning - E A D G B E
Open G Tuning - D G D G B D
This means a lot of the fretboard will still be familiar to you in an Open G tuning. In fact 50% of it remains unchanged.
Open tunings actually make a lot of things EASIER to play than if you were try them in standard tuning. They are designed to your advantage and without them, you are only realising a very small percentage of the guitar's potential.
For example, to play a bar chord in an open G tuning, you simply bar a single fret:
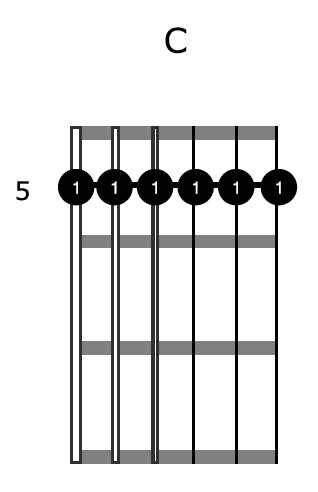
This single fret C bar chord allows you to do a blues shuffle pattern that would be quite awkward to do in standard tuning:

There is also the possibility of adding embellishments to your bar chords that would be at least very hard to do in standard tuning, if not impossible. Here is an example:

For more ways to play chords in One G tuning on guitar, see the video below. These chords are easy to play, often simpler than those in standard tuning, and produce a beautiful sound:
2. Playing In One Open Tuning Makes It Easier To Play In Other Open Tunings
Not only do open tunings often relate closely to standard tuning, they can also relate very closely to each other. This means by becoming familiar with one open tuning, you can also become fluent in another open tuning by making very minor and very simple adjustments.
For example check out how closely Open D tuning relates to DADGAD tuning:
Open D Tuning - D A D F# A D
DADGAD Tuning - D A D G A D
* DADGAD tuning is also known as Dsus4 tuning
These are 2 of the most commonly used open tunings on guitar and there is only one string/note difference between them. So anything you learn in an Open D tuning can very easily be adjusted and used in DADGAD tuning.
Take the following chords in Open D tuning for example:
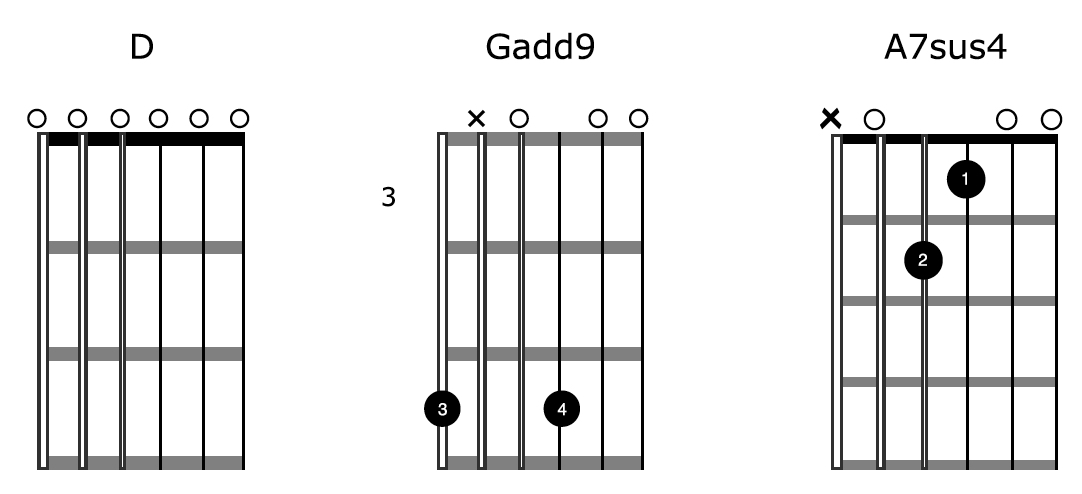
To play these chords in DADGAD tuning you only have to change a single note in each chord:
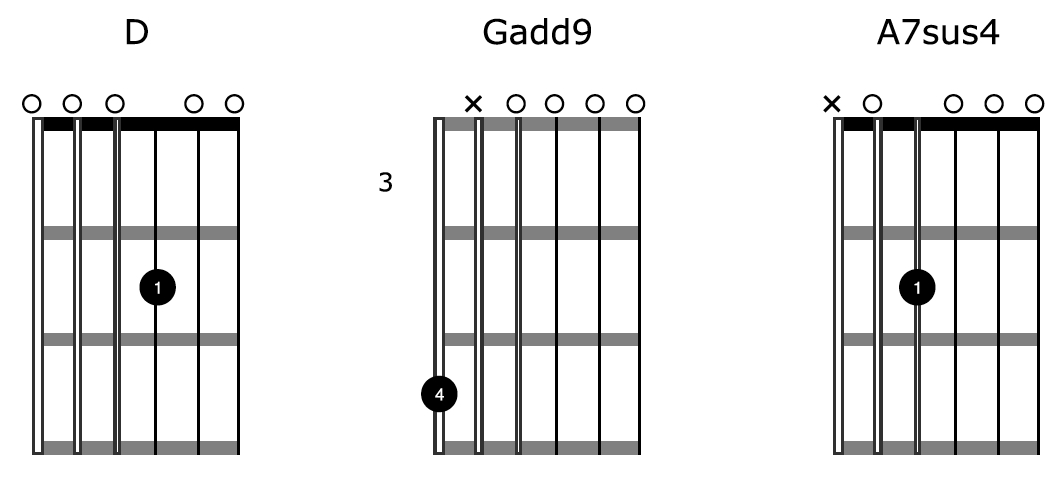
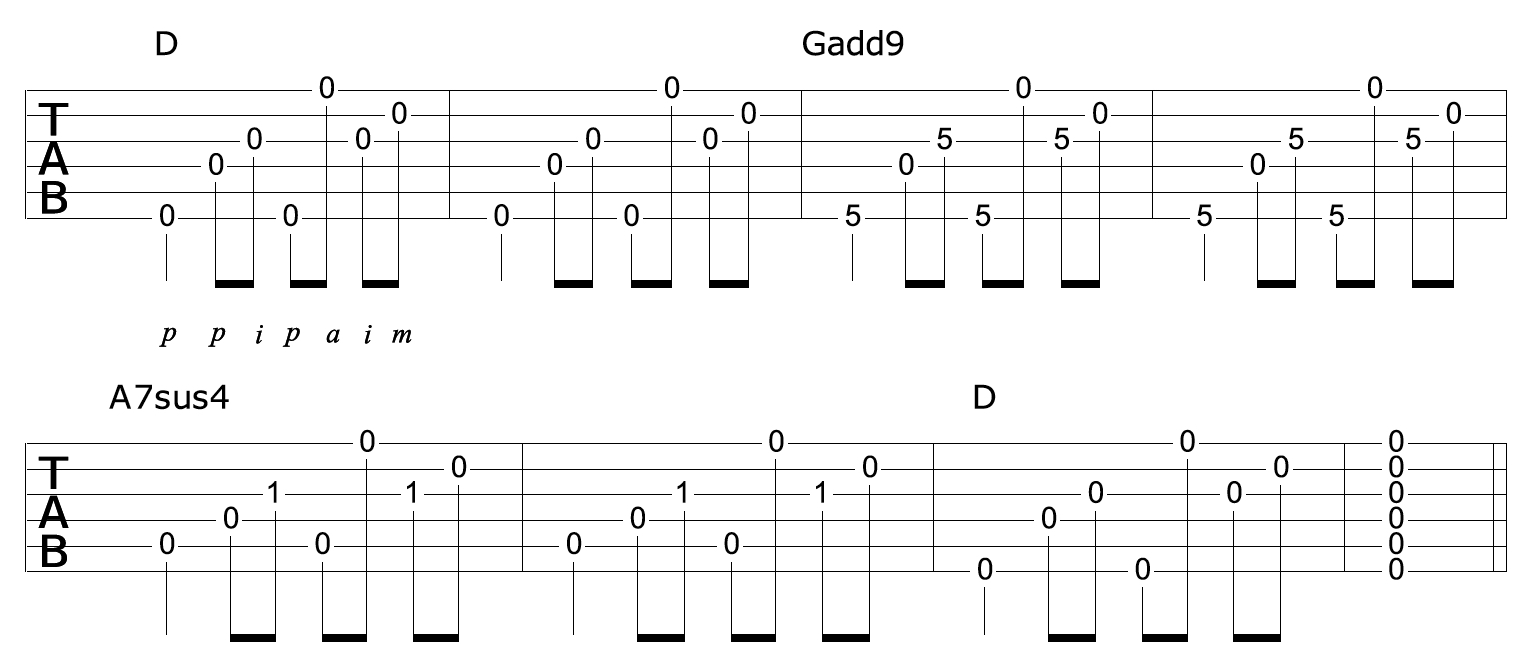
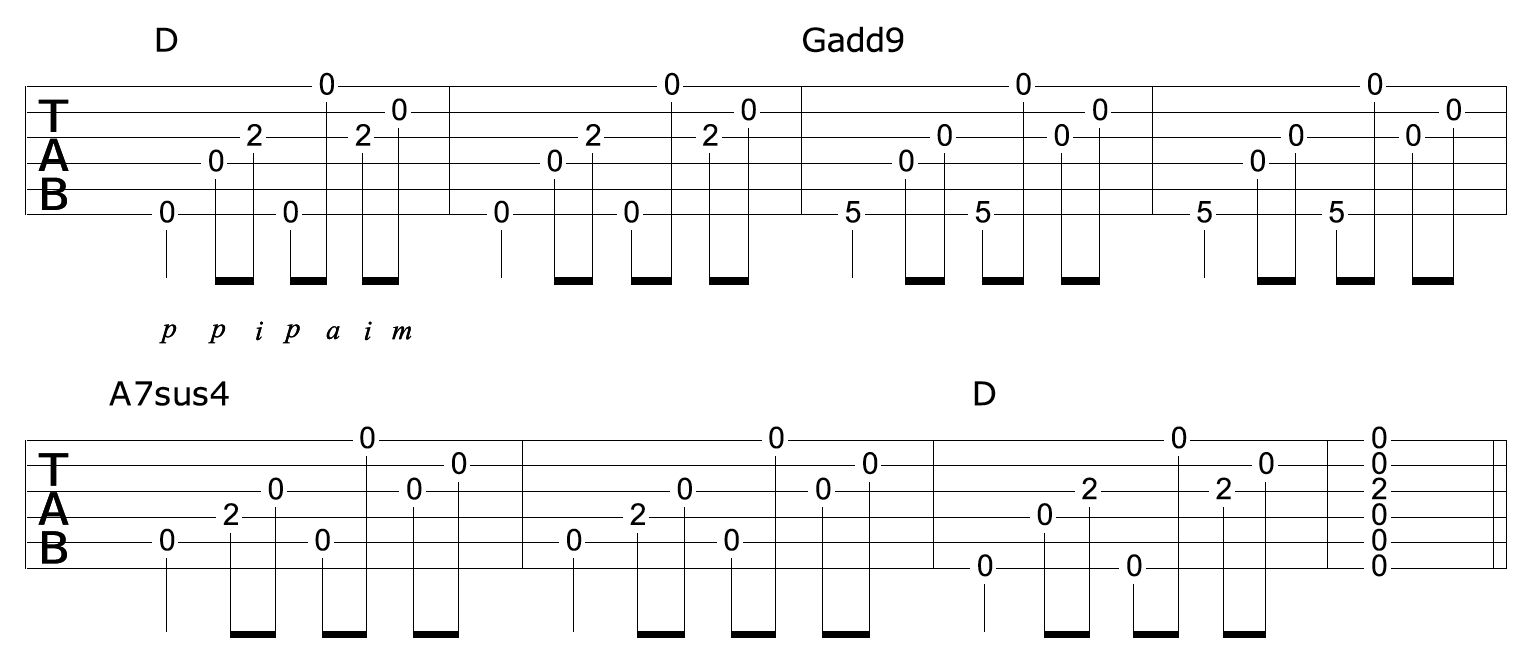
This transfers across nicely when applying these chords in a progression. Compare the two progressions below to see how similar two open tunings can be.
• Open D tuning:
• DADGAD tuning:
3. You Can Sound Great Straight Away In Open Tunings! Let Me Show You How
As has already been stated, learning a bunch of different open tunings is not like having to learn your guitar all over again. This is an important point to make as it turns many people off even trying to play in open tunings, like it did to me.
On the contrary, if you have been playing guitar for a little while and have basic techniques down such as strumming, chord changes, etc., open tunings are often easier to play than standard tuning.
Open tunings are all about adjusting the tuning of your guitar to make it EASIER to play certain things, not harder.
How easy?
Well, let’s take DADGAD tuning as an example. Check this out:

The example above is very simple to play with a droning low D string throughout while playing a simple melody on the top string. You could easily improvise using this idea. Natural harmonics sound great in DADGAD tuning too as you can hear at the end of this example.
Watch the video below to discover three different ways to play your guitar in DADGAD Tuning. The video will teach you how to play both chords and melodies in this tuning, as well as some unique and impressive tricks that are only possible with DADGAD Tuning:
4. Learning Dropped D Tunings Makes It Easier To Learn Open Tunings
Drop D tuning is a type of alternate tuning for your guitar. It involves dropping either your low, bottom E string down to a D note, or your top E string to a D. While dropping your 6th string down is the more common of the two, they both serve as a very effective way to ease into open tunings.
Notice that Open G, Open D, and DADGAD tuning, 3 of the most commonly used tunings on guitar, all have D notes on the 6th and 1st strings. By becoming familiar with drop D tunings, you would then only need to make slight adjustments when moving to any of these 3 tunings.
So, if you prefer, experiment with these drop tunings first and you will find it even easier to make the transition across to open tunings.
If you're serious about playing in open tunings on guitar, check out the video below.
Following a specific order can greatly simplify the process and make it easier to navigate the world of open tunings:
5. Open Tunings Can Be Symmetrical, Making Things Very Easy To Play
While we have focused on Open G, Open D, and DADGAD tuning for this article, there are many other open tunings to consider when it comes to your acoustic guitar playing.
Many of these tunings make things like scale runs and licks very symmetrical, and thus very easy to play.
Take Open C tuning for example:
Csus2 Tuning - CGCGCD
As you can see, this is a particularly symmetrical tuning, as lot of open tunings are.
Scale runs become particularly easy to not only to play but improvise with in tunings like this. Here are a couple of ideas for you to get started with:


Play around with these ideas and see for yourself how easy it really is to create stuff with them on the spot and sound great! Using a backing track in C would be a good idea while doing so, to give you some context.
By disregarding open tunings, as a guitar player, you are missing out on a lot of potential. Contrary to popular belief, they are not difficult or intimidating to learn. You can choose to incorporate a few tunings in your playing or explore a variety of them extensively.
The choice is yours!
Check out this free downloadable ebook/audio and learn on a much deeper level how to play your guitar in DADGAD tuning and take your playing to the next level.
3 Ways To Transform Your Blues Rhythm Guitar Playing On Acoustic Guitar
By Simon Candy
 Blues is a universal language amongst musicians, and as an acoustic guitar player, you need to be well versed in this language, even if you don’t consider yourself to be a blues guitarist. You could be anywhere in the world, I know I have been, and find yourself in a situation where you are knocking out a blues with someone you’ve just met. It’s great fun and a great feeling to be able to do.
Right about now you might be thinking, ok so I need to get my improvisation skills up, and I need to work on my solo technique. Yes, this is all good, however, it’s on the rhythm side of the guitar that most people fall down. It’s not unusual to see a guitarist rip out an absolute killer blues solo, only to suck when it’s their turn to play the rhythm part.
The fact is, as a guitar player, most of your time is spent playing rhythm guitar, yet many of us struggle when it comes to this. It’s almost an afterthought as we strum out the same old chords, with the same old strum patterns, padding out the time until we next take a solo.
So let’s fix this by looking at 3 blues guitar rhythm techniques and approaches you can use when playing the most common form of the blues, the 12 bar.
Throughout this article, I will link to relevant videos on my YouTube channel that relates to the content of this article.
If any one of these videos appeals to you, check them out, or you may prefer to consume this article first and bookmark the videos for later.
It’s up to you.
However, don’t get overwhelmed by the amount of information here.
The goal is to move the needle on your blues rhythm guitar playing. If you learn one single new approach and apply it to your playing, then you have succeeded and are already winning!
One foot in front of the other, as they say :)
The Basic Blues Form
If you have played guitar for at least a little while you should be familiar with the basic 12 bar blues progression. If not here it is in the key of G:
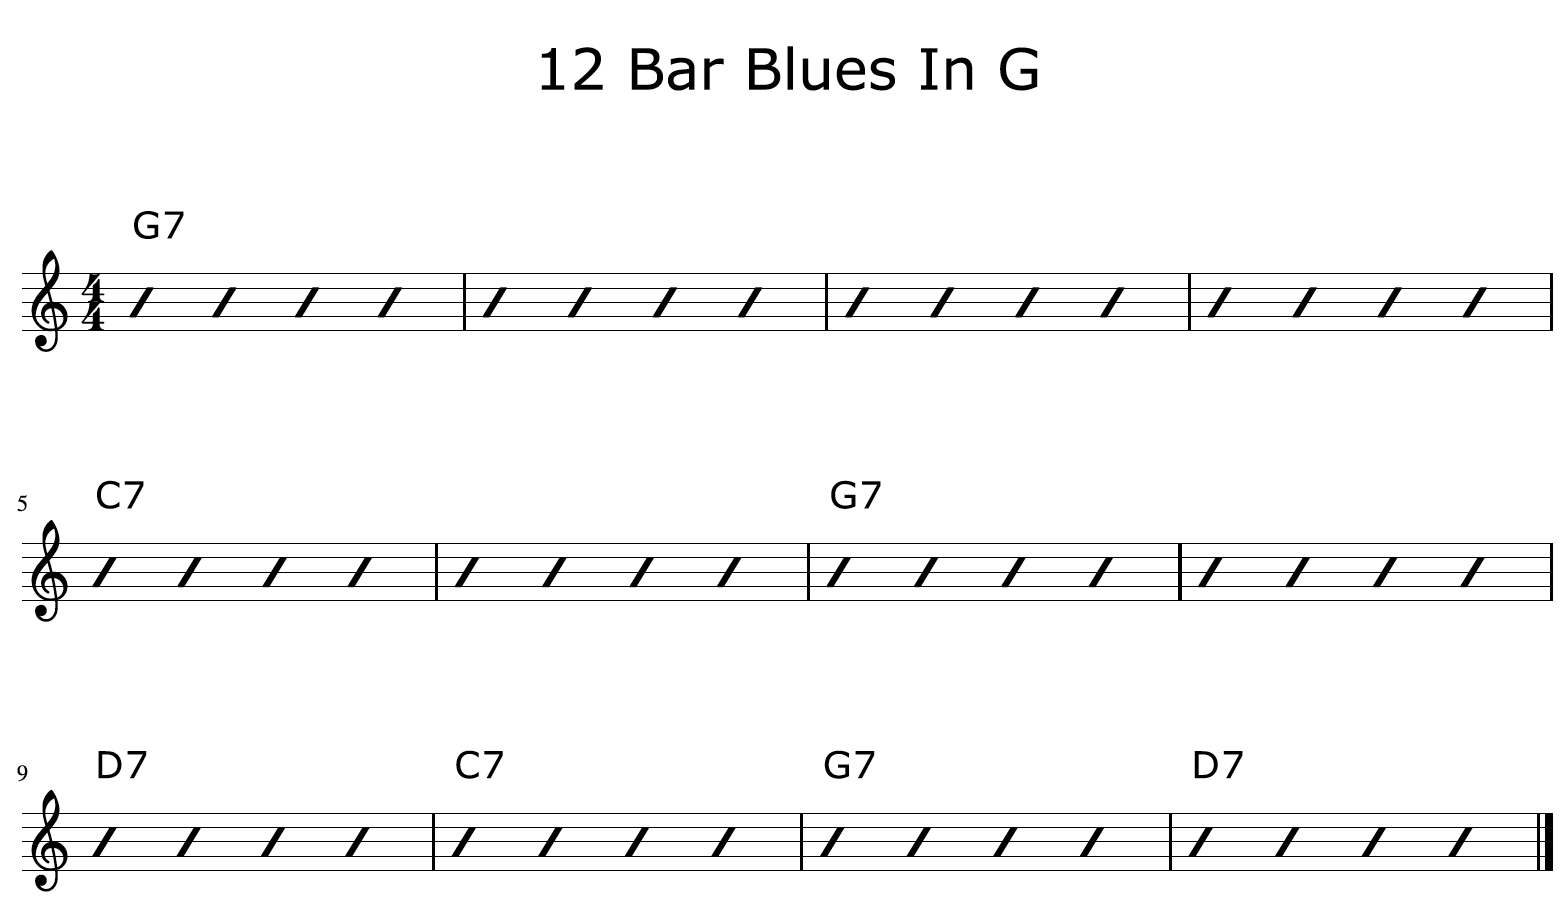
Now, a lot of guitar players, even those who have played for many years, never get beyond this point. That is, when playing blues rhythm guitar, they will look at this chart and play stock standard open and bar chords.
There is nothing wrong with this, but it does get monotonous and boring after a while, and certainly won’t inspire whoever is soloing over it. There is so much more you could be doing when it’s your turn to play rhythm blues guitar parts in a jam, gig situation, or when composing a blues tune.
It’s not just yourself that will benefit greatly from having variety in your blue rhythm playing, but the people playing with you too. For example, when taking a solo, there’s nothing quite like having great rhythm playing to solo over. I guess we could say it’s a two way street when it comes to playing blues, yes you need to solo well, but you also need to support the other people soloing with great blues rhythm guitar playing.
1. Blues Rhythm Riffs
In this first example, we are going to use a cool blues rhythm riff to spice up our 12 bar progression. Rhythm riffs are a great alternative to playing chords and will add interest to your rhythm parts, not just in blues but in any style of music.
Here it is:
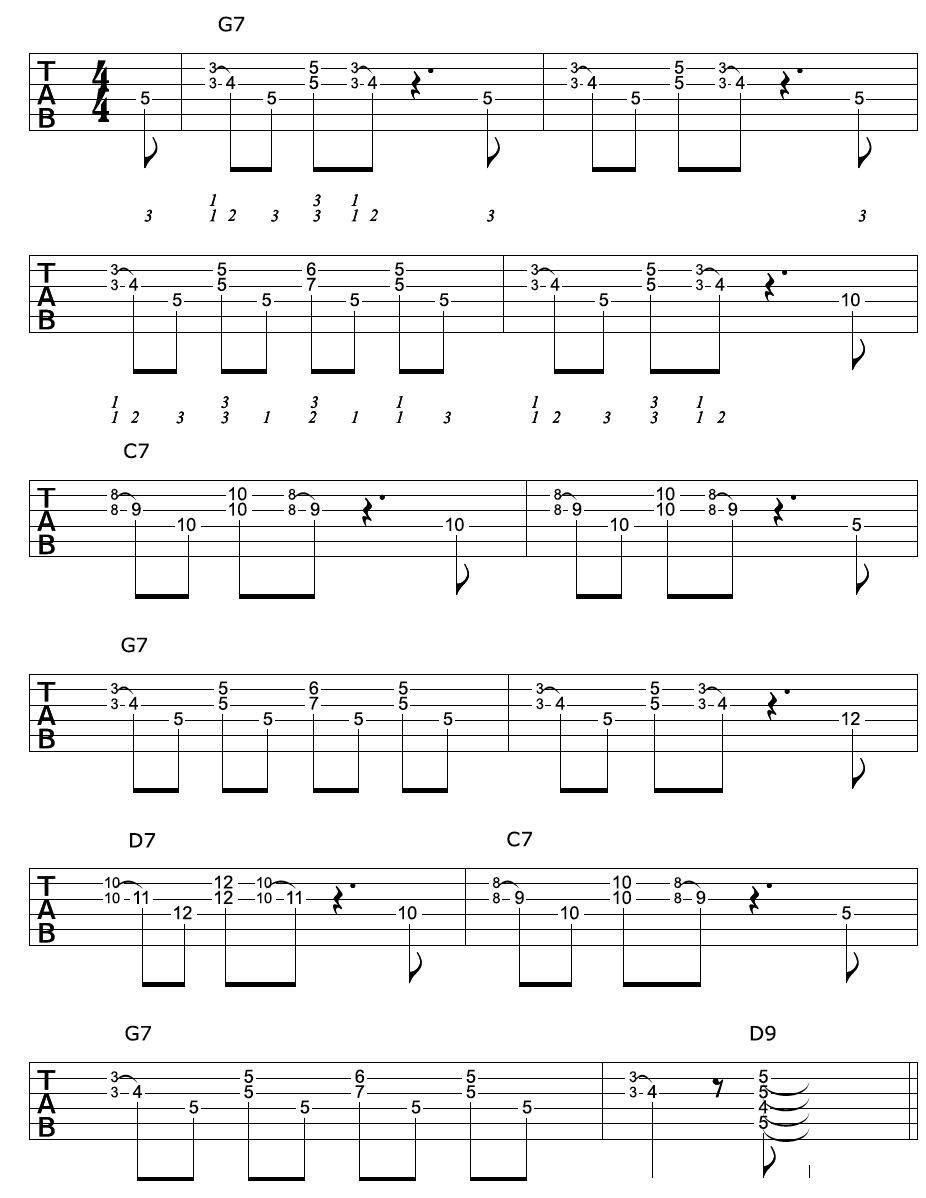
In the example above I am applying the same riff throughout the 12 bar, adapting it to the changes of the progression as they happen. This rhythm riff is targeting the 3rd of each chord and is one of literally thousands of riffs you could use in your blues and general acoustic rhythm guitar playing.
If you like the idea of using riffs in your rhythm guitar playing, check out the video below.
In it, I show you how to play riffs in-between chord changes in the style of Jimi Hendrix, Stevie Ray Vaughan, and John Mayer.
Rhythm fills, or chord fills, as they are known, sound great punctuating the chord progressions you play on guitar.
It’s a great way to add interest to your rhythm guitar playing be it blues or any other style of music:
2. Jazzing Up The Blues
Another great way to play a blues and provide the soloist with some cool variety in the rhythm guitar parts is to jazz it up! I personally love doing this myself as it’s not only a lot of fun to play, but a lot of fun to solo over too.
Here is what’s considered to be a stock standard blues in the jazz world:
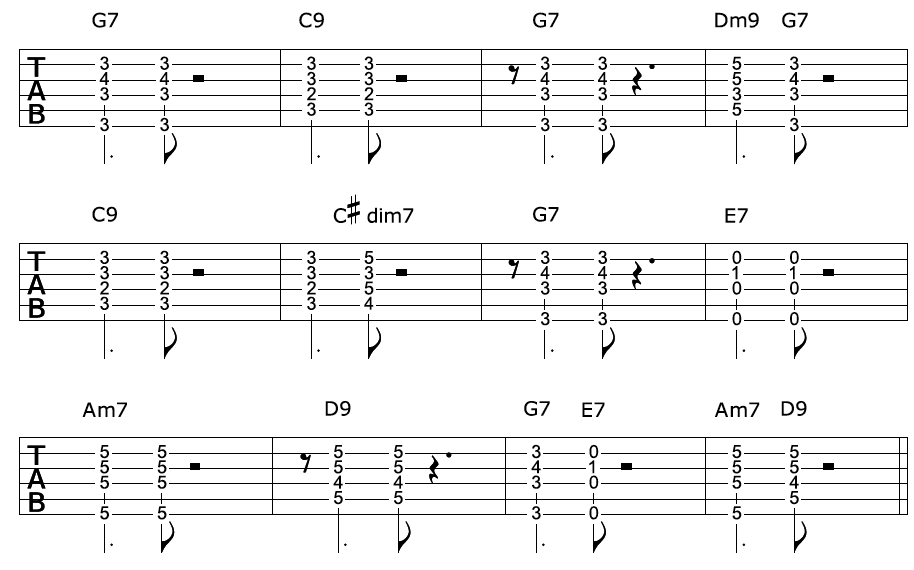
The first thing you might notice about the blues example above is that there are more chords. This is because in jazz it’s common to substitute chords in for, and in addition to, other chords in the progression.
While it’s beyond the scope of this article to go into chord substitution and all that it entails, I highly recommend you play through this example for two reasons:
- It will open up your ears to other possibilities when it comes to playing the rhythm part of a blues. Don’t focus on trying to understand so much about what is going on. Let your ears learn the sounds.
- To gain additional chord voicing’s/shapes you can use, not just in blues, but in your playing in general. While this example is in the style of jazz, you can take the chord shapes and use them in any style of blues for your rhythm playing.
The rhythm used in this example is known as the Charleston pattern. This is a very popular rhythm pattern used in jazz, inspired by the Charleston dance of the 1920s. The rhythm patterns you use in your blues rhythm guitar parts will also add variety and interest to what you do and is well worth considering too.
For a detailed breakdown of how to create a jazz blues on guitar, check out the video below.
In it, I convert a standard 12 bar blues into a jazz blues, piece by piece, one step at a time. You learn exactly how a jazz blues is constructed so you can add it to your ever growing repertoire of acoustic guitar blues playing:
3. Using Block Chords For Your Blues Rhythm Part
In this example I am using what I like to call “block chords”. These are simply chords fretted on the top four strings of your guitar. They are also sometimes referred to as 4, 3, 2, 1 voicing's.
Whatever you want to call them, they are great for providing variety to your rhythm parts. Here are the four block chord shapes I am using in the example below:
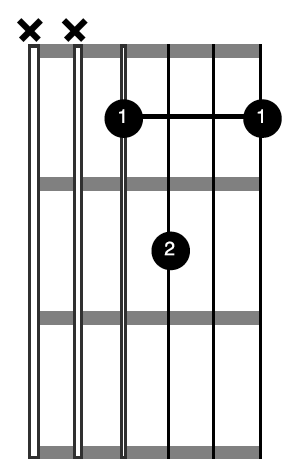
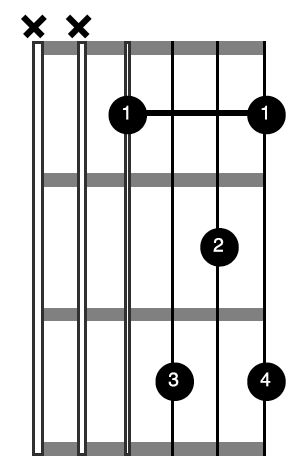
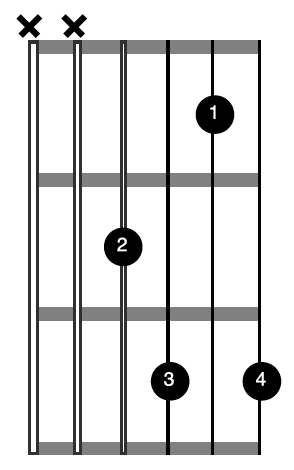
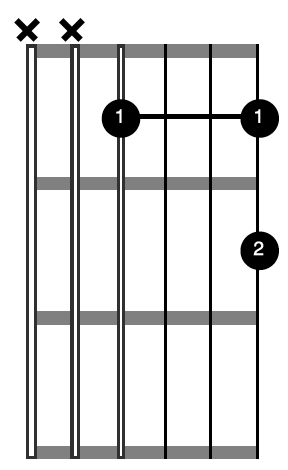
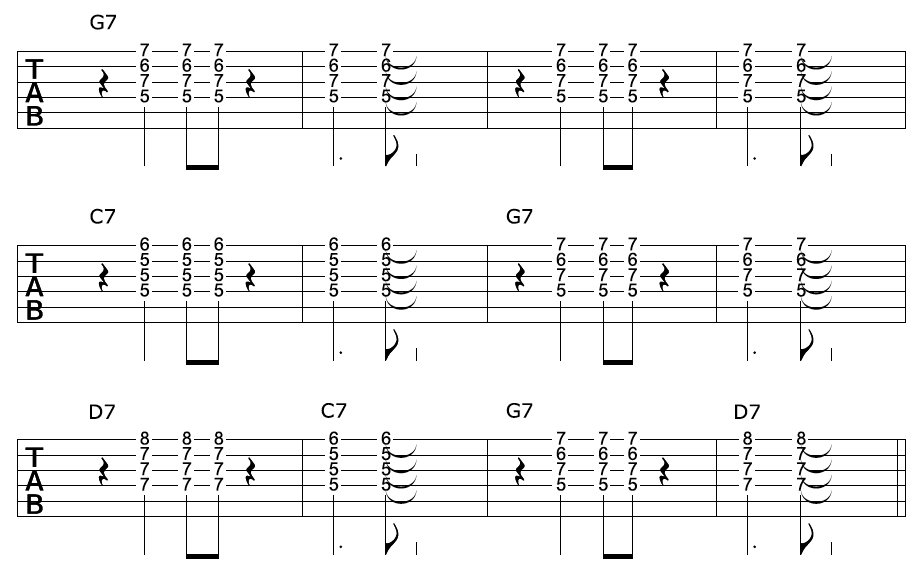
And here they are being used to create a nice blues rhythm part.
Chorus 1:
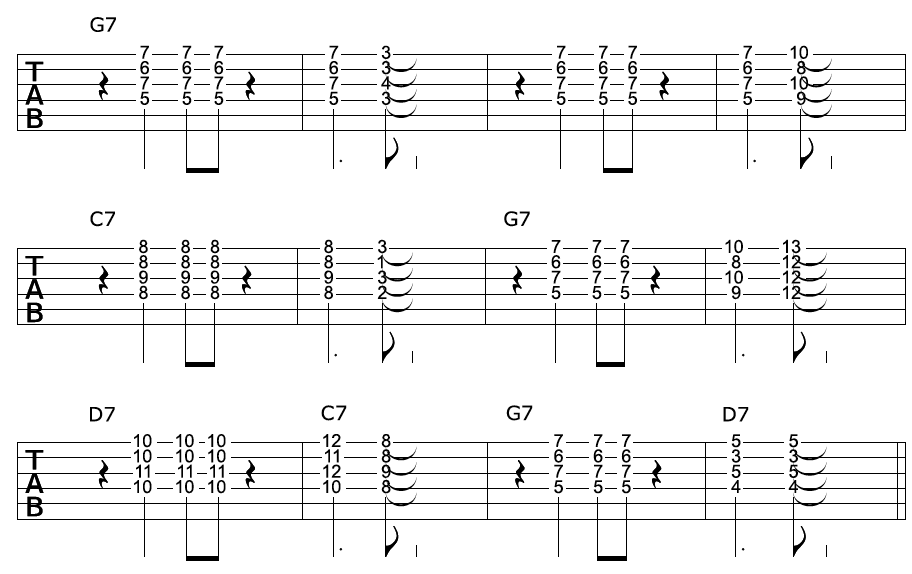
Chorus 2:
I still remember first discovering these types of chords. I loved them and immediately started applying them to everything and anything I could. They were my first real venture away from the stock standard open and bar chords.
I have included two choruses’ of our 12 bar blues in this example. In the first chorus, I am staying on the one block chord shape per change. In the second chorus, however, I am moving between the 4 block chord shapes per change, creating movement across the static chord.
This starts to reveal to you the possibilities when using block chords in your blues rhythm playing. You are adding a melody component to your rhythm part via the top note in each chord. The great news is, this is just the tip of the iceberg when it comes to these guys!
If you like the sound of block chords, check out the video below.
In it, I break down the block chord for you and show you how to get them into your playing.
Block chords are a great “next step” after getting open and bar chords down on guitar and can be used in any style of music:
Learn how to make the most boring and mundane of chord progressions sound unique and amazing every time you play them with these awesome acoustic rhythm techniques for your guitar playing