How Studying The Style And Techniques Of Chet Atkins Will Make You A Better Guitar Player
by Simon Candy
In this article, we break down some of the key aspects of the guitar playing style of Chet Atkins. Studying the styles and techniques of other guitar players is a fantastic way to improve your own playing skills as well as your overall understanding of the instrument.
Chet’s underlying style was country, however, he was fluent in many other styles of guitar playing too including jazz, classical and flamenco.
In this article, we will look at a few key elements and techniques that are the cornerstone of his overall guitar playing.
Studying the style of other players not only improves your technique and skills on the guitar but also can reignite your motivation and inspiration if you are in a bit of a flat spot.
There is nothing like getting into the style of your favourite players and learning how they approached the instrument, and what made them tick.
So without further delay, let’s get into some of the key elements of Chet Atkins' guitar playing style and technique.
Chet Atkins Guitar Technique 1: Travis Picking
One of the main features of the guitar style of Chet Atkins is what’s known as travis picking. Travis picking is named after the guitarist Merle Travis who was a massive influence on Chet’s own guitar playing.
This technique is all about using the thumb of your picking hand to play a steady bass note pattern on the lower 3 strings of your guitar. Your index (i), middle (m), and ring (a) fingers are then left to play syncopated rhythms and melodies on the higher strings. The result is an amazing combination of bass, harmony, and melody that will have people think they are hearing multiple guitar players playing when it is in fact just you!
Here is a picking pattern that was very common to the Chet Atkins guitar style:

The above is commonly referred to as a 6, 4, 5, 4 bass picking pattern in reference to which strings the notes fall on and in which order.
It’s the pattern of choice for chords with root notes that fall on the 6th string of the guitar. Another common variation Chet would use for these types of chords was a 6, 4, 6, 4 picking pattern where the bass notes fall on the 6th and 4th strings.
A key element to this aspect of Chet’s guitar style is to palm mute the bass notes. This is so that the melody and harmony parts, when added, will stand out more.
Ok, now that you have your steady bass note pattern it’s time to add some melody to go with it. Here is an example of what Chet Atkins would typically do with this particular technique:

There is a bit going on here so take it slowly, and never lose sight of the bass note pattern, as it falls on the beat and is the driving force behind what is going on here.
A few things to note here:
• Mute the bass notes so that the melody stands out in contrast, to the higher strings
• Note how some of the melody notes fall on the beat while others fall off the beat (ie. in between the bass notes)
• Use the bass notes falling on the beat as a reference for how the melody fits in
For chords whose root notes fall on the 5th string, Chet used this variation of the bass note picking pattern:

Notice that the bass note pattern has changed to a 5, 4, 6, 4 pattern in reference to which strings the notes fall on and in which order.
This is the pattern of choice for chords with root notes that fall on the 5th string of the guitar. Another common, but less used variation Chet had for these types of chords was a 5, 4, 5, 4 picking pattern.
Finally, here is a 12 bar blues using the travis picking technique that was so central to the guitar style of Chet Atkins. The patterns used come from the examples above:
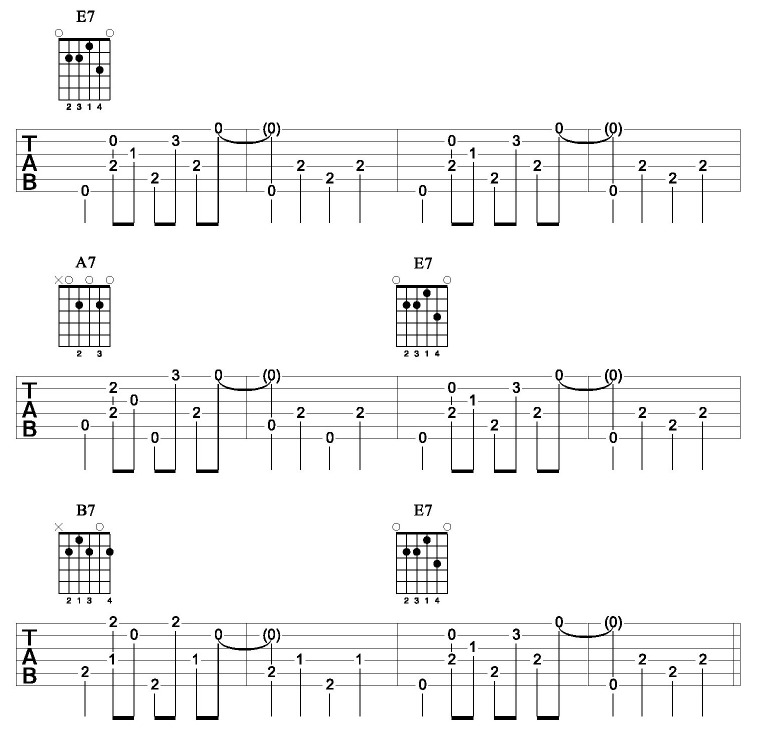
* When playing the B7 chord in the example above, use the second finger of your fretting hand to play the 2nd fretted note on the 6th string. Keep the rest of the chord formed when you do this
Watch the video below for a more detailed breakdown of the travis picking technique.
In this lesson, I break the style down into 3 parts:
• Bass
• Harmony
• Melody
Each part is covered extensively followed by a breakdown of arguably the most famous travis picking tune of all time:
Chet Atkins Guitar Technique 2: Double Stops (3rd’s and 6th’s)
Another fantastic element of the guitar style of Chet Atkins was his extensive use of double stops. Put simply, a double stop is a guitar term used for playing two notes at the same time. These notes can be on adjacent strings and non adjacent strings.
Chet mainly used 3rd’s and 6th’s when it came to double stops and would often use these to harmonise melodies. He would also use them to create fills that provided a really nice counterpoint to the vocal melody of a song.
The following are fretboard diagrams showing how the harmonies of a third and a sixth look on the guitar. Learning to visualise these patterns will help in understanding many of the riffs Chet Atkins would play:
• Thirds:

• Sixths:

* The numbers indicate the fingers to use for each double stop. There are several ways you can go about it, depending on the context. Keeping your second finger on the third string as a constant is one such way.
And here are some double stop licks to get you started using 3rd’s and 6th’s in the style of Chet Atkins:

This first lick connects a D7 chord to a G chord using a combination of 3rd’s and 6th’s. Chet would often slide in from a fret below for a cool sound.

This lick falls on a static chord, G7, and has some single notes mixed in with the 3rd’s. Adding embellishments to your double stops, like the pull off in the last bar of this example, sounds very cool.

The final lick connects a C7 chord to an F chord, much like the first example, only you are exclusively using 6th’s in this one.
For more riffs in the style of Chet Atkins, as well as other famous players such as Tommy Emmanuel and Jerry Reed, check out the video below.
In this lesson, I take you through several riffs, breaking each down in great detail so you can both understand them as well as use them in your own guitar playing:
Discover 10 melodic fingerpicking patterns you can learn in 10 minutes or less
How To Use Chords To Enhance Your Acoustic Guitar Solos
by Simon Candy
 Soloing on acoustic guitar was uncomfortable and awkward for me in my early years of playing. It seemed much harder to do than soloing on electric guitar.
That was until I discovered the concept of using chords in my solos. Most guitar players only think of single notes when soloing on guitar and keep chords for rhythm playing.
However, chords are a great soloing tool too!
There are many ways you can use chords for soloing on acoustic guitar, including adding them to the single note lines you play. You see, soloing is all about tension and release. If a solo has no tension and release, it has no appeal. It will sound dull and boring. Including an element of chords in your solo’s is a great way to create tension and release.
When I say chords, I am referring to chord fragments. Chord fragments come from breaking larger shapes up into smaller pieces, hence “fragments.”
Think of the large chord shape as the parent and the smaller fragments that you break it up into, as the children. If you know which children belong to which parents, then you will have a much more organised way of categorising your fragments on the fretboard leading to being able to recall anyone one of them at any time to use in your guitar solos.
How To Enhance Your Acoustic Guitar Solo’s Using Chord Fragments
Let's have a look at an example of applying some chord fragments to a solo line.
Here is an excerpt of a single note solo across a typical chord progression:
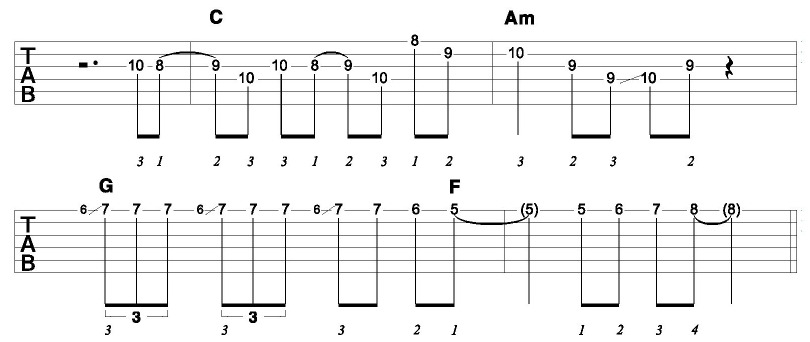
This sounds ok but can be enhanced by adding some chord fragments to it like this:
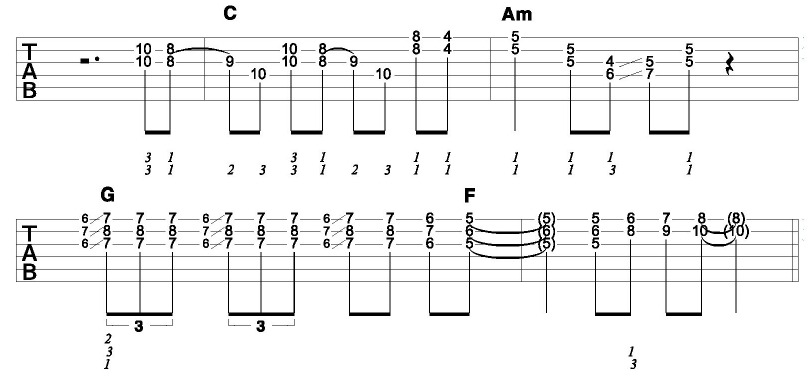
Now we have something with a little more texture to it with the chord fragments adding a whole lot of depth to the line.
Notice that in the example above, you are approaching your fragments by a fret below and/or above. There are also instances where the chord fragment is being approached chromatically from a few frets below.
On a guitar, to move chromatically simply means to move by a fret at a time. This is happening at the end of the 4th bar in the example above.
This is just one example of using chord fragments in your solo’s that will create a lot of movement and pump new life into your guitar playing.
Which Children Belong To Which Parent
To understand exactly what is going on in the example above you need to know where the chord fragments are coming from. In other words, which “children” belong to which “parent”.
Here is a break down for you.
Chord progression:
C Am G F
Shapes Used:
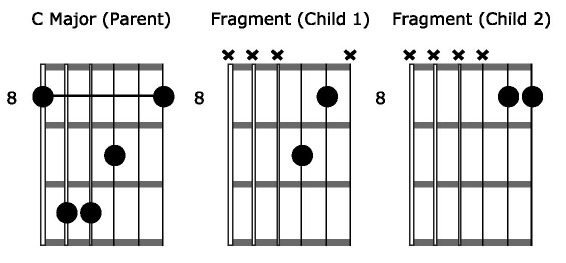
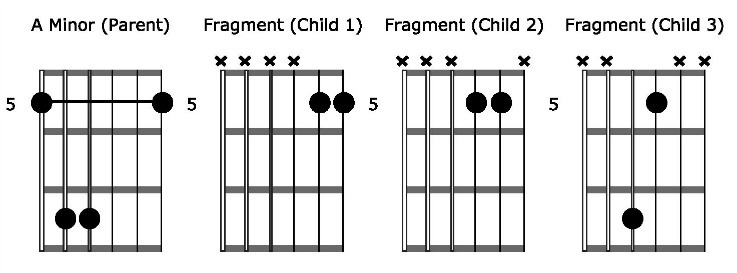
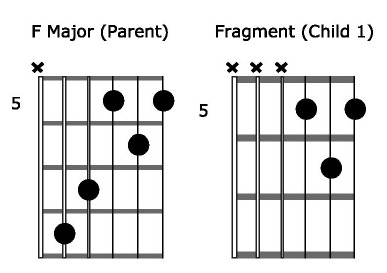
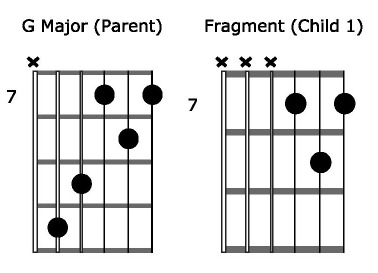
In the diagrams above you can see the larger “parent” chord form first followed by the fragments (ie. children) that are used in our example, and that belong to that parent chord form.
Organising your chord fragments in this way is absolutely crucial. It is the difference between you having all these fragments available to use, in real time, when soloing on your acoustic guitar and not.
Double Stops
Another great way to add texture and contrast to the solos you play is to use double stops.
A double stop is when you play 2 notes at the same time.
In the video below, you learn exercises that get you familiar with double stops as well as a variety of double stop riffs you can integrate into your playing:
Discover 5 cool and easy ways to use chords on your acoustic guitar to enhance the solos you play.
How To Become A More Creative Acoustic Guitar Player - Part 1
by Simon Candy
 Feeling bored and stale with your own guitar playing is very common and something that everybody who has played for at least a few years has felt before.
You know the feeling, you pick up the guitar and find yourself playing the same old tunes in the same old way.
It can be frustrating, but there's no need to despair. There are plenty of techniques, tools, and resources available to help you break out of your rut and refresh your acoustic guitar playing. With a little effort and some exploration, you can find new ways to challenge yourself and keep your guitar skills fresh and exciting.
In this article, I will share two creative ways to play your acoustic guitar and reignite your inspiration. In part 2, you learn 3 more unique ways you can approach your acoustic guitar playing
How To Reignite Your Guitar Playing Creativity
There have been times over the years of playing guitar that I have felt uninspired and unmotivated with my playing. I would feel very stale and like I was treading water rather than making progress. However, what I found was that being open to other styles of guitar and studying players I had not really heard before really reignited my creativity on the guitar.
There are many elements and techniques from other styles that you can bring into your own playing that will complement what you can already do and literally set your guitar creativity on fire! The following ideas and approaches are just to get you started. I want to make you aware of them, if you are not already, and also encourage you to follow through and explore the ones you like further.
So, let's get to it!
Harmonics
 There is nothing quite like the sound of harmonics in your acoustic guitar playing. In a nutshell, a harmonic is sounded by lightly touching a vibrating string at specific points along its length.
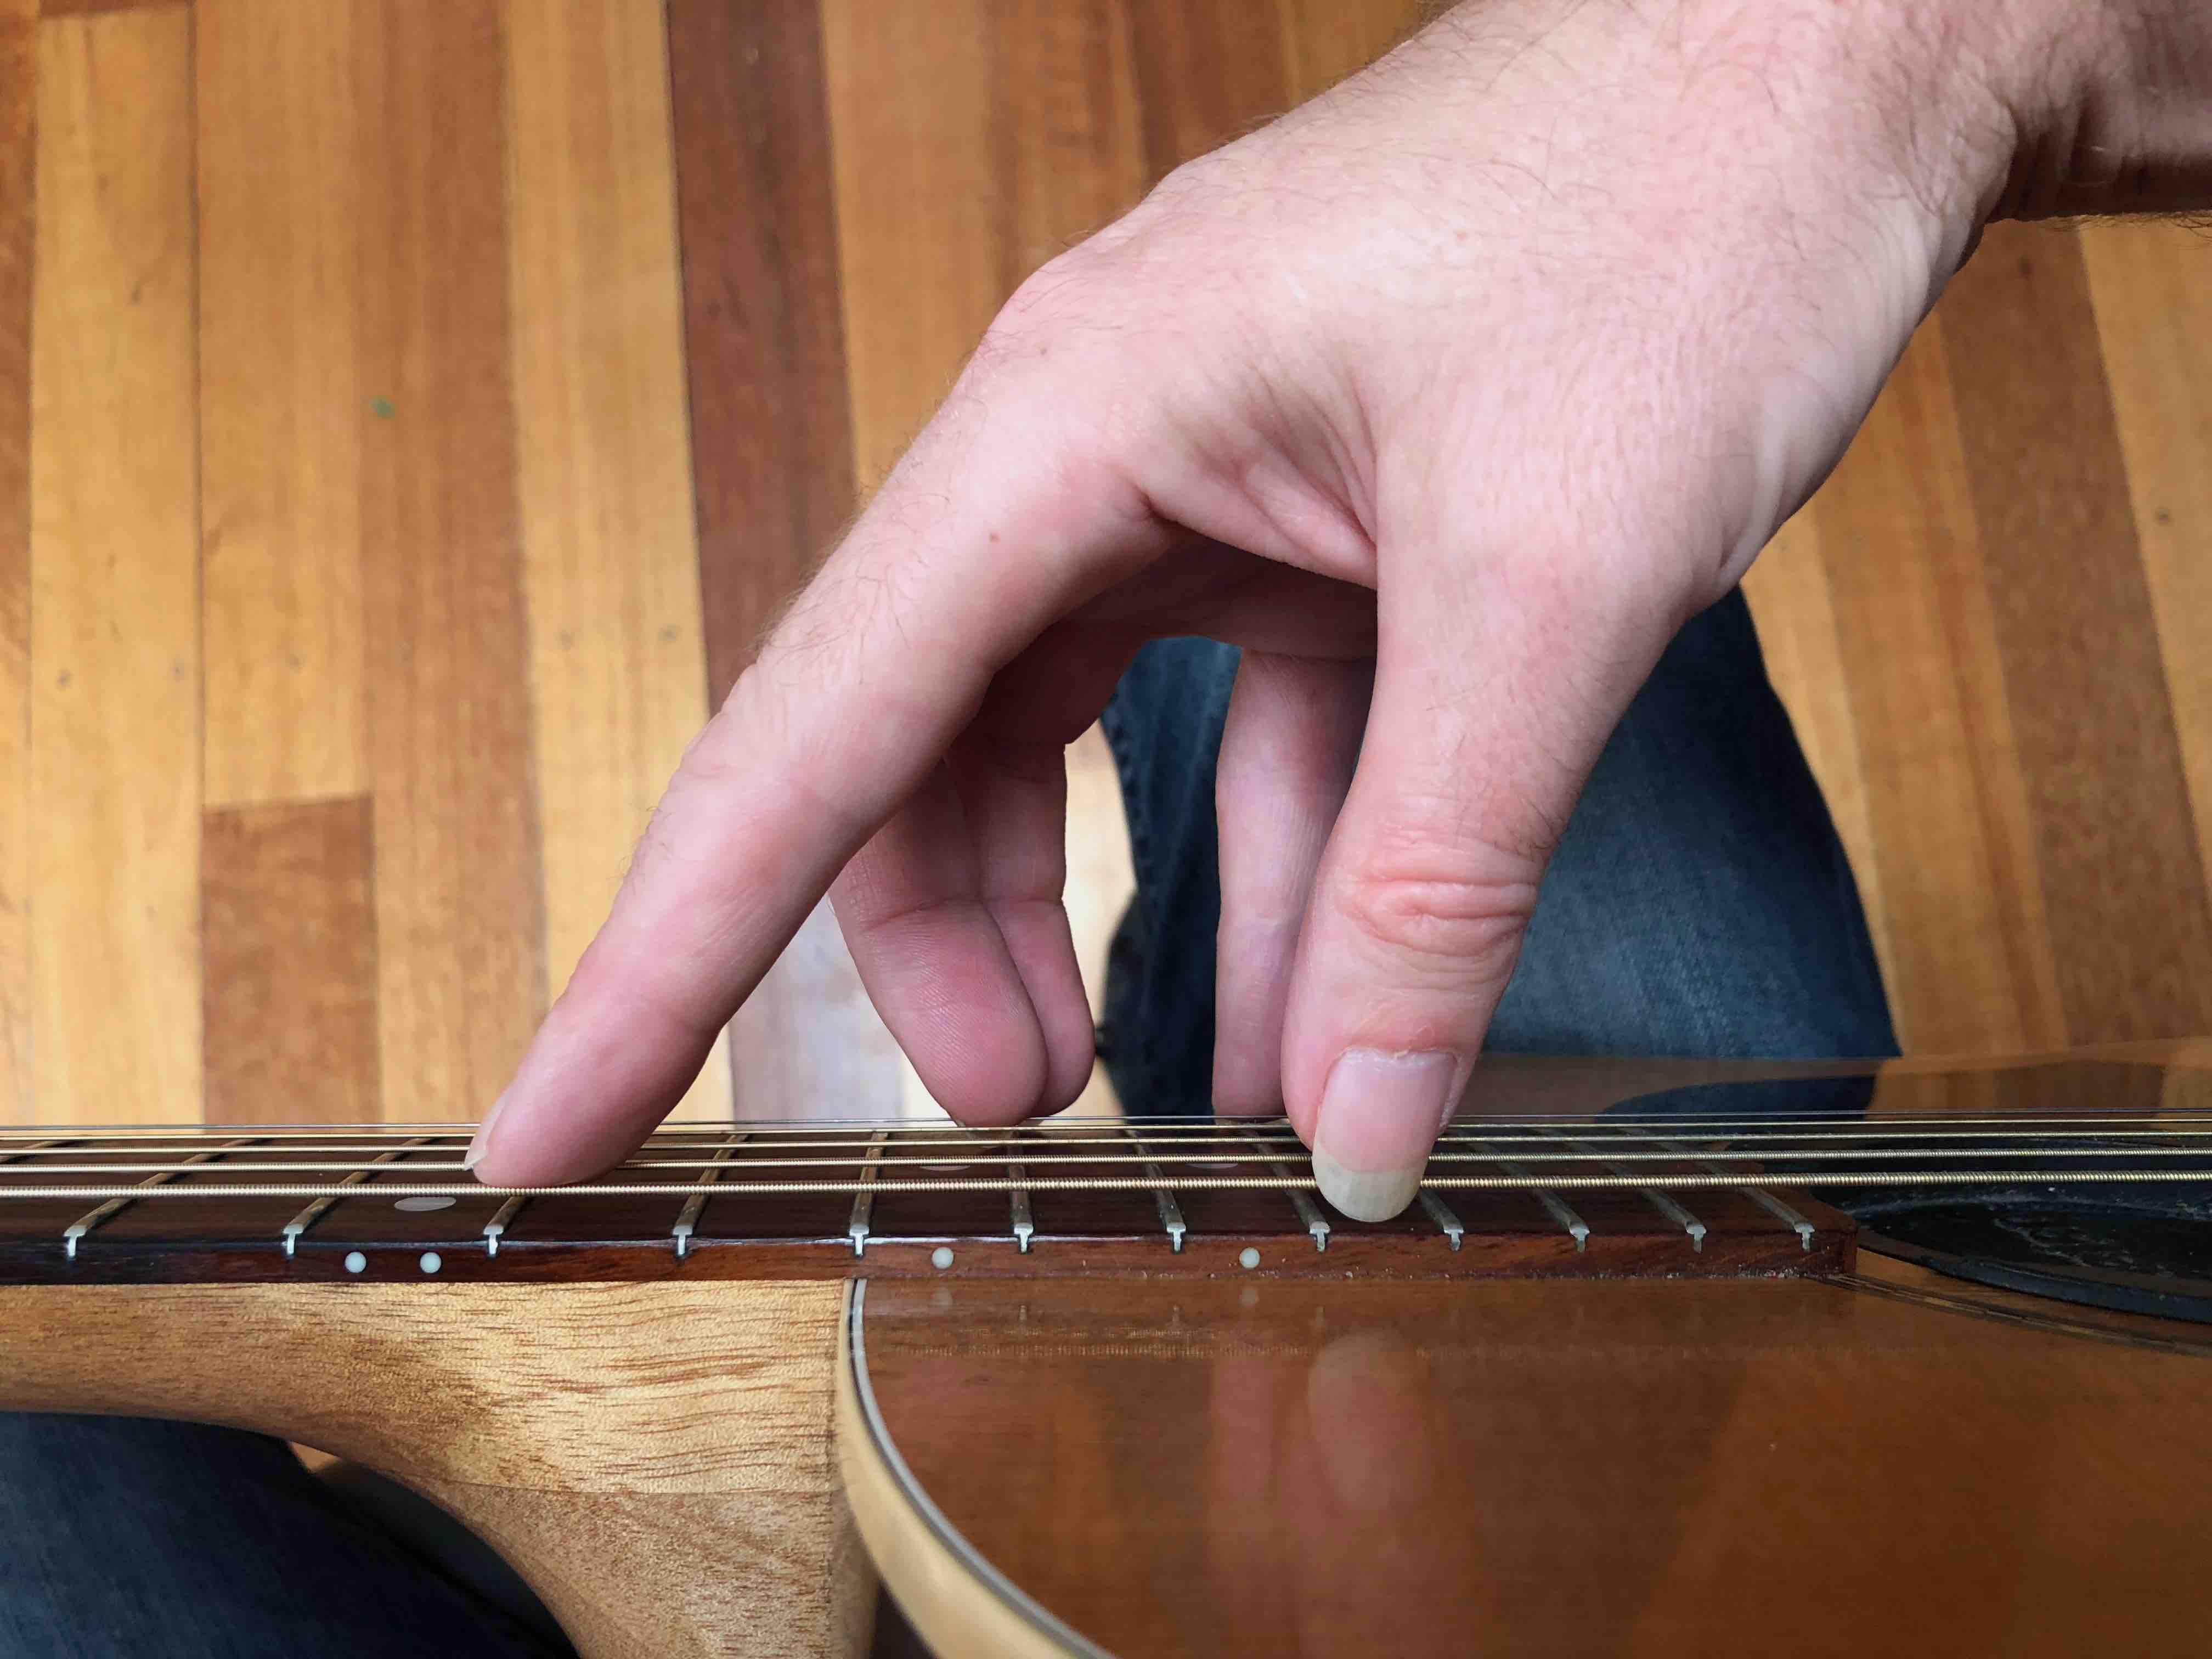
Let's look at the octave harmonic. To get this you simply touch the string as it is vibrating, with your picking hand, exactly 12 frets higher from where you sounded the note. You must touch the string directly over the fret itself, not in between as you would normally do.
Check the picture for reference.
As you can see, I am using my index finger to touch the string while my thumb plucks the string itself from behind sounding a "bell" like harmonic.
In the example below I am sounding open string harmonics. Remember that you need to play exactly 12 frets higher from the note itself. So open string + 12 frets = 12th fret:

* In the example above, the p indicates your thumb and the i indicates your index finger both of which are used to sound the harmonic. The note in the bracket indicates the fret that your index finger is above at the time. In this case, it is the 12th fret all the way
This sounds great over an Em chord or the key of Em in general. However, you don't need to stop there. You can sound harmonics from any fretted note you like. Just be sure to place your index finger exactly 12 frets higher from where you are sounding your note.
Here is an example:

Above, I am using harmonics to produce a G major scale.
To achieve this, you must ensure that your index finger is precisely placed 12 frets above the note being sounded, as indicated in the brackets. It is essential to mentally visualize the shape of the scale one octave higher while sounding the harmonics, and simultaneously play it one octave lower with your fretting hand.
How To Start Creating With Harmonics On Your Acoustic Guitar Right Now
• Take the G scale from above right now and sound it with harmonics over a backing track in the same key. Mix the notes/harmonics up and you will be creating a really cool and unique sound on your acoustic guitar instantly.
• Take an existing melody you know in G Major and sound it out with harmonics. This is also a great way to start getting this technique into your own guitar playing.
To take this sound to even greater heights, check out the video below where I show you the incredible sound of harp harmonics and how you can make this amazing technique part of your playing:
Open/Alternate Tunings
 While standard tuning is exactly that, standard, and the most common tuning used with guitar, there are many open and alternate turnings for your acoustic guitar playing you should consider exploring.
By experimenting with open and alternate tunings, you can transform your acoustic guitar into a fresh and exciting instrument. This change won't feel overwhelming like when you first started playing and didn't know what you were doing. Rather, it will inspire your creativity by making techniques that were once challenging in standard tuning much simpler in open or alternate tunings.
It is a good idea to spend some time in one open or alternate tuning before moving on to another. This way you can get familiar with its nuances and character without getting it mixed up with another tuning.
Here are some open/alternate tunings for you to consider:
Open G Tuning: (D G D G B D) Great for slide playing on your acoustic guitar. The 2nd, 3rd, and 4th strings are unchanged from standard tuning so it is still somewhat familiar but different at the same time.
Here are a couple of slide guitar licks using an open G tuning:


Even though I am only targeting the strings that haven’t changed in the examples above (ie. 2nd, 3rd, and 4th strings), you should still hear the over tones of the other strings when using a slide. This adds to the over all sound.
Checkout the video below to learn 3 ways to play chords in an open g tuning:
DADGAD Tuning: (D A D G A D) A very popular tuning known as "DADGAD" in reference to the open string notes. This tuning creates a Dsus4 sound and is great for open and moveable chord shapes on your acoustic guitar.
Here is an example of exactly that:

Notice the rich sound you can get by holding and moving a single chord form mostly made up of open strings.
Here is a similar example, only this time I have broken the chords up, playing the notes separately for a different effect:

Checkout the video below to learn more ways you can play guitar in DADGAD tuning:
Csus2 Tuning: (C G C G C D) This tuning creates an open Csus2 chord, hence its name. This is a very symmetrical tuning and allows you to play runs and melodies in different octaves across the strings without really having to change position.
Here are a couple of examples of some runs in a Csus2 tuning:


How To Start Creating With Open and Alternate Tunings On Your Acoustic Guitar Right Now
• Study and learn songs that are in tunings other than standard. This will give you a great insight into that particular tuning
• Take something that you know how to play on your acoustic guitar in standard tuning and play it in an open or alternate tuning. This will again give you a great insight into that particular tuning
• Write a song or piece of music in a tuning other than standard
• Assuming you have two or more guitars, consider keeping one of them permanently, or at least for a period of time, in an open tuning. This way you will instantly have a guitar on hand to pick up at any point to play and explore a particular tuning. You will also give the tuning time to settle on the guitar.
The Key Is To Start Creating On Your Guitar Now
Start now!
Choose either of the techniques I've presented today. It doesn't matter which one you decide to go with as long as you begin immediately.
Take your time, be patient, and enjoy the process of expanding and evolving your guitar playing skills. This is the perfect opportunity to lay a foundation for massive improvement and growth as a guitar player and musician. Get excited about the possibilities!
Learn how to make the chord progressions you play sound different every time with these creative acoustic guitar rhythm techniques
Fingerpicking The Easy Way Versus Fingerpicking The Right Way
By Simon Candy
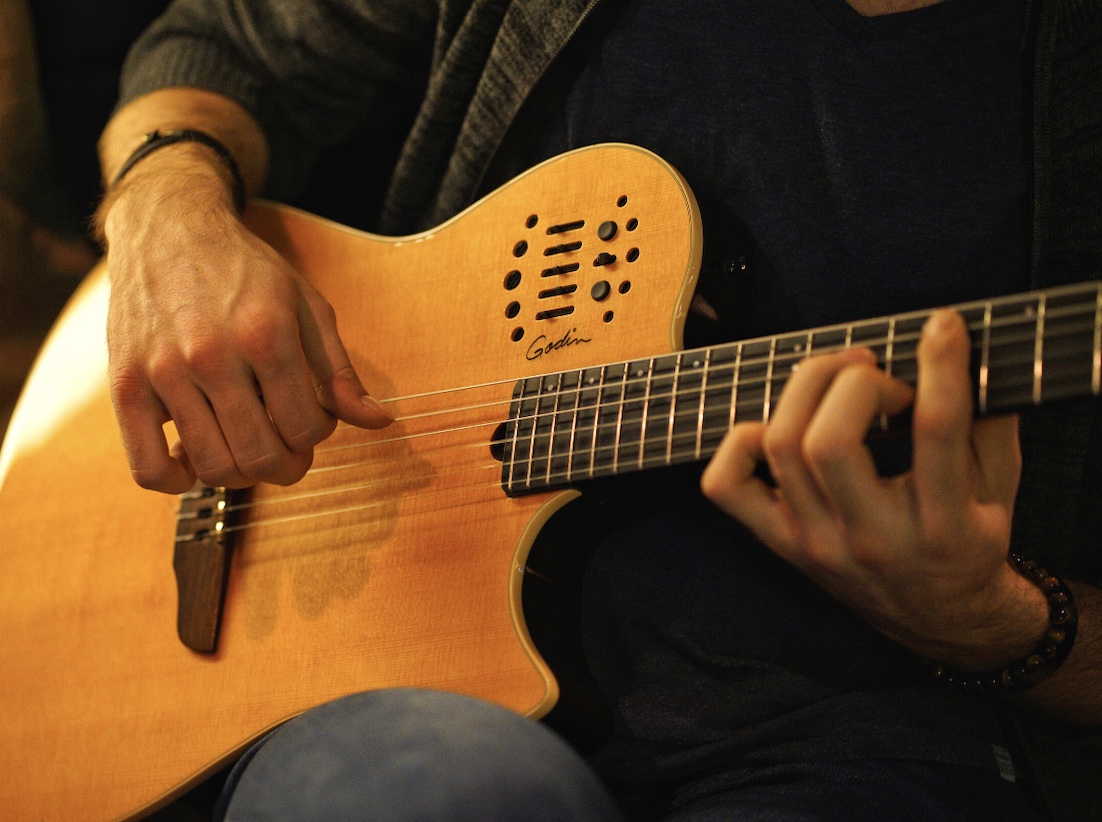 Learning how to fingerpick your guitar can expand your playing possibilities significantly. With fingerpicking, you can do things that would be impossible with a pick or strumming.
However, a common mistake beginners make is choosing what feels easy for them instead of what is correct. Opting for an easy approach will only lead to incorrect, inefficient, and problematic fingerpicking technique.
This creates a weak foundation for all your fingerpicking playing and will significantly limit what you can achieve with the technique in the songs that you want to play or write on your guitar in the future.
But, what is the correct fingerpicking technique, and how can you ensure that you do not opt for an easier method?
In this article, we will address this question in detail, so that you can differentiate between the right and easy approach when it comes to learning how to fingerpick your guitar.
Fingerpicking The Easy Way
Let’s take a look at the “easy” way to fingerpick your guitar.
To me, easy is doing what feels natural to you when exploring this technique.
Taking this approach doesn’t necessarily mean you are only going to make poor choices, but it significantly increases the chances that you will, of which there are 3 main issues that can and most probably will arise:
1. Poor finger choice
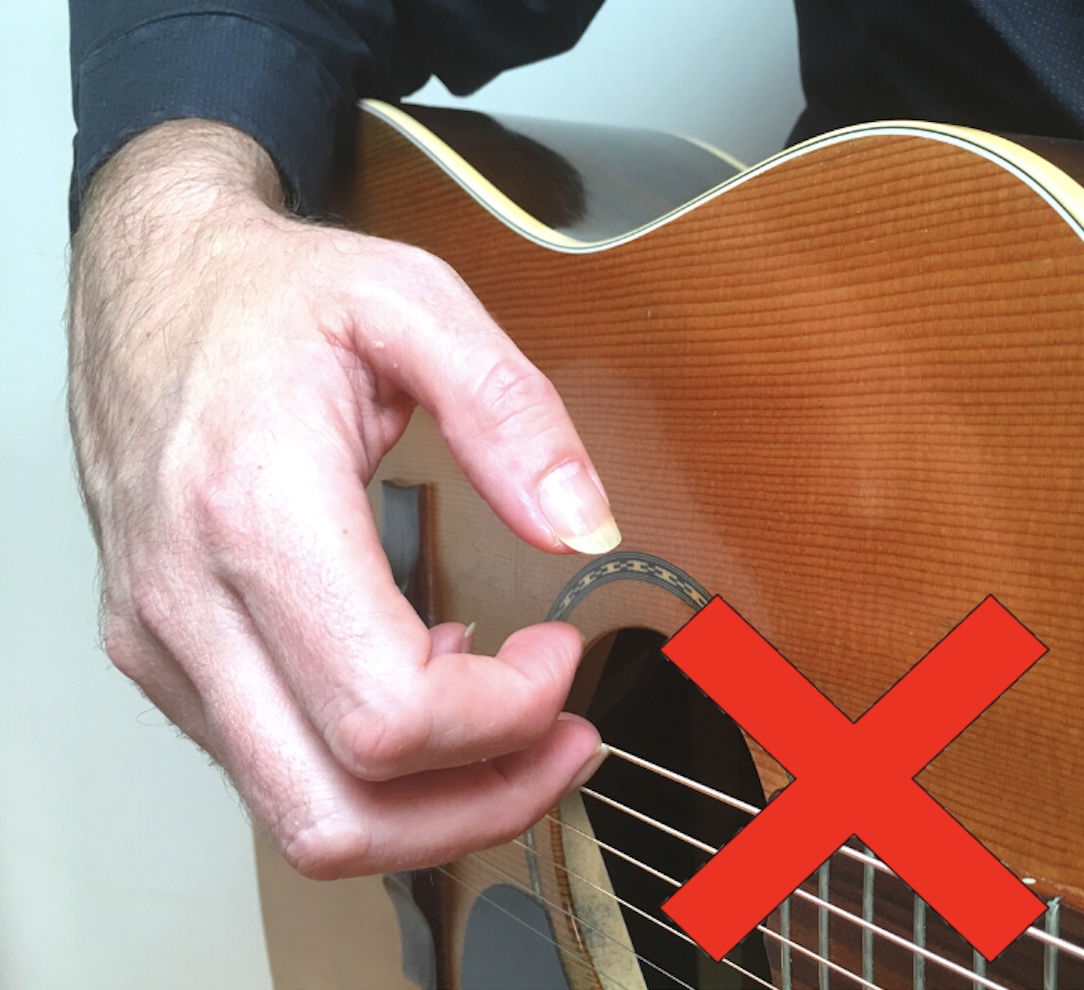 Going the easy way almost always leads to poor finger choice when fingerpicking your guitar. Poor finger choice could be defined as using whatever finger feels comfortable to you at the time to pick the strings, and in turn, will lead to very inefficient movements which leads to bad fingerpicking technique.
This is a classic case of going with what feels easy. It is very unlikely that choosing whatever fingers feel comfortable to you in the beginning, just happens to be the right finger choice too.
Don’t leave it to chance!
2. Incorrect picking hand position
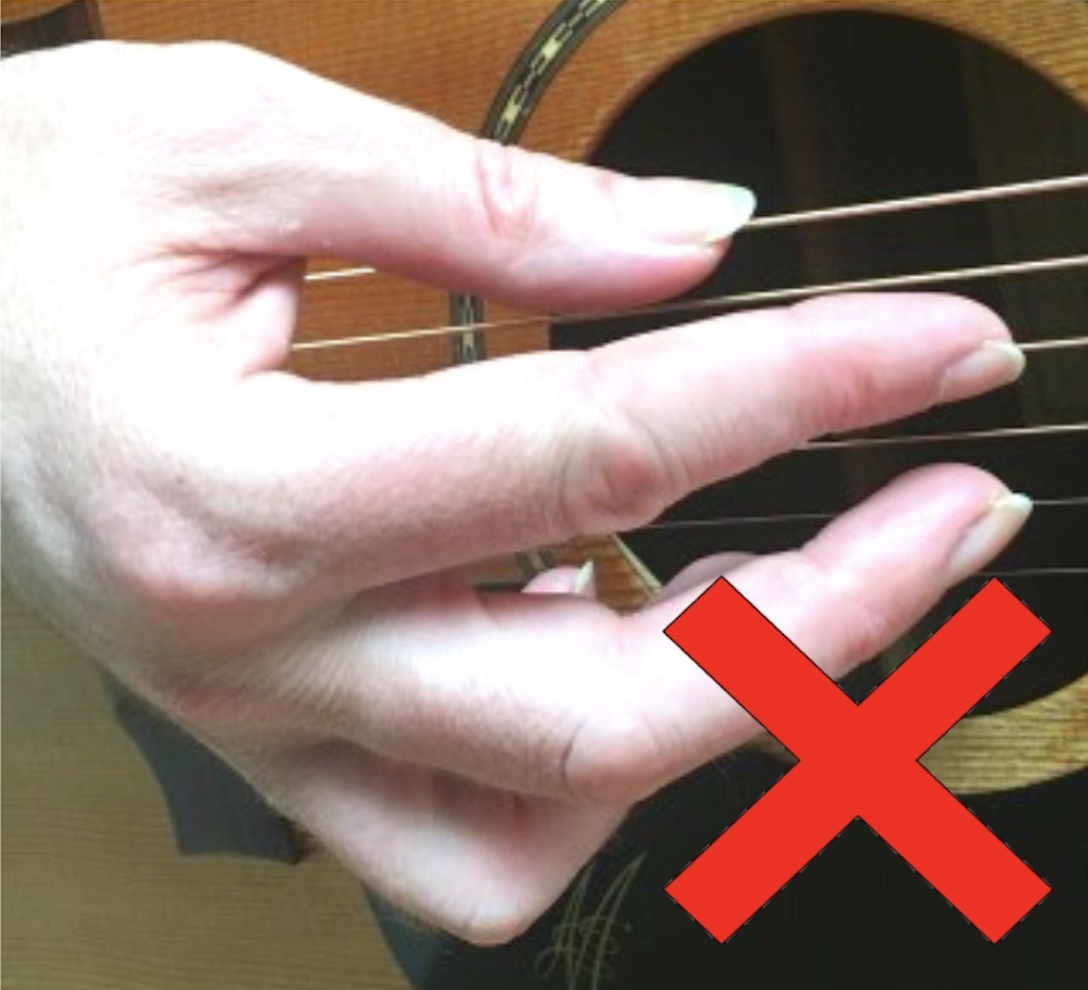 Another symptom of going with what feels easy is the position of your picking hand and the angle of your fingers to the strings. Get this wrong and it won’t even matter if you are using the correct fingers to pick your strings or not. This is because your fingers will be approaching the strings from the wrong angle, resulting in you not getting the leverage needed to pluck the string effectively. Again, this severely limits your fingerpicking technique.
I see this particular issue with a lot of fingerpickers, and while you will still get sound from plucking the strings this way, you will be attacking the strings from a position of weakness.
3. Inefficient movements
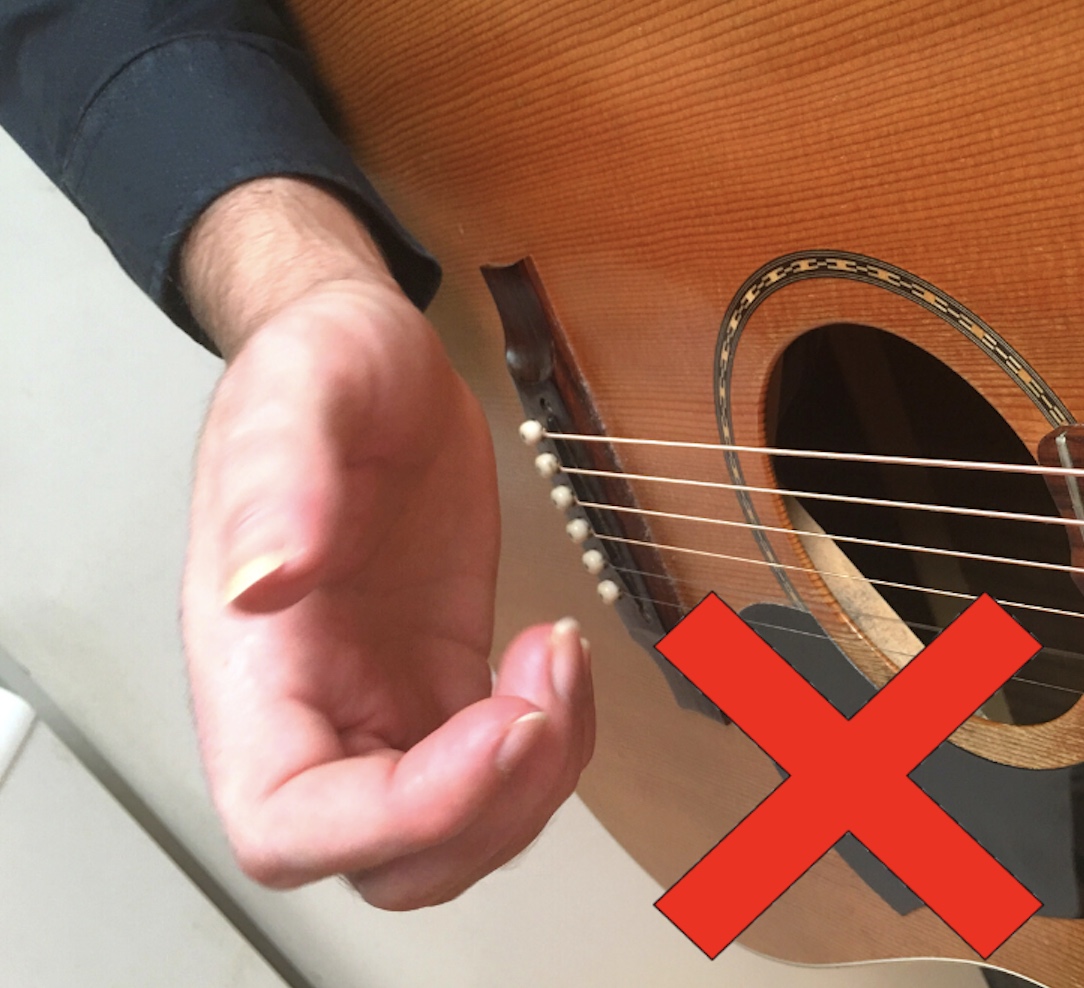 Don't let the hand or arm you’re using to fingerpick itself have inefficient movements. In fact, if your arm has any movement at all it's a big problem and will certainly get in the way of you and a great technique for fingerpicking your guitar. Another symptom of the DIY approach to fingerpicking guitar.
Fingerpicking The Right Way
So then, what is the right way to fingerpick your guitar?
To be honest, there is no one right way to fingerpick a guitar. Even if you study the playing techniques of great fingerpickers like Tommy Emmanuel or Martin Taylor, you will find differences in their approach.
However, what remains the same are the fundamental techniques that form the basis of their impressive skills.
And that is the point, get the fundamentals right with your fingerpicking and the rest will take care of itself.
So let’s now look at these fundamental areas by addressing the 3 main problems caused by taking the easy way with fingerpicking your guitar.
1. Use good, efficient, logical finger choices.
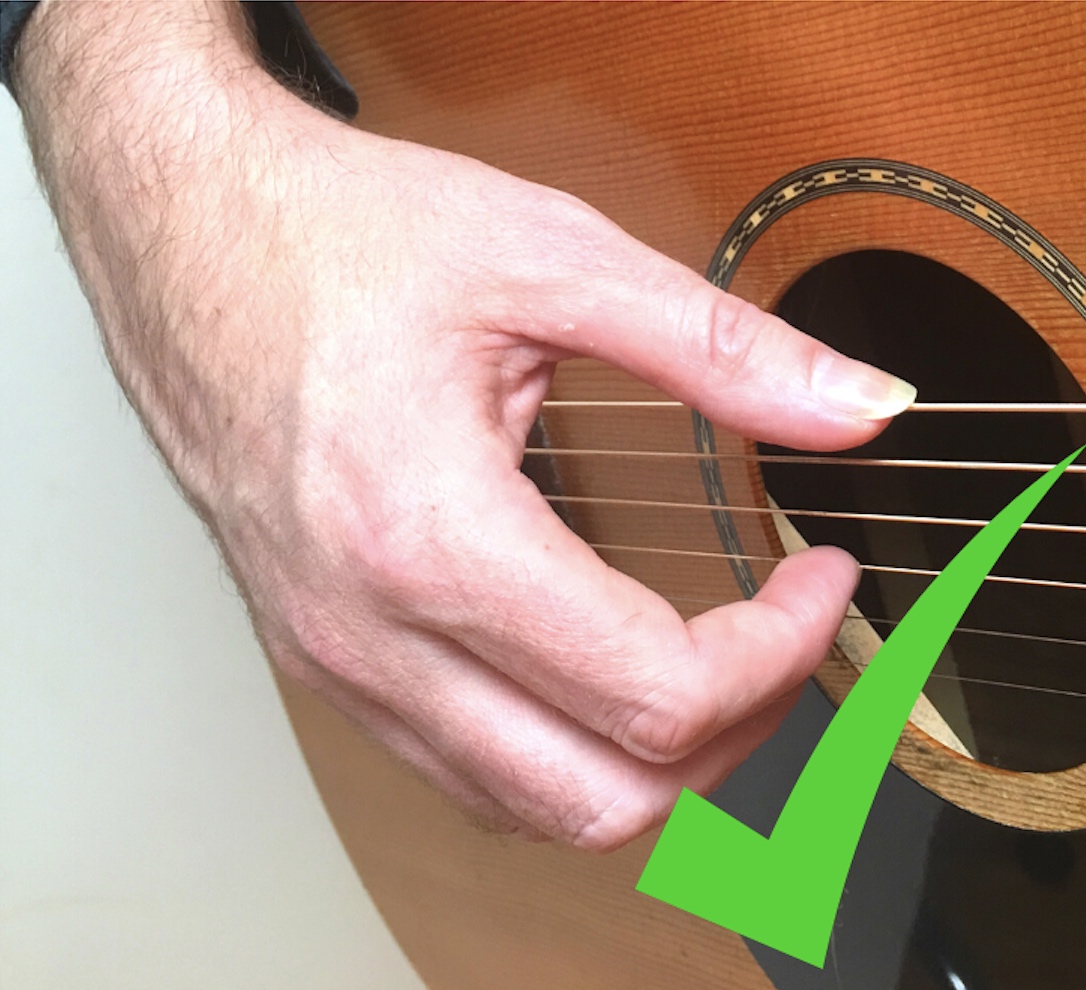 Here is a guide to follow for building a strong fingerpicking foundation for your playing:
• Thumb (p) plays notes on the lower 3 bass strings of your guitar (ie. the E, A, and D strings).
• Index finger (i) plays notes on the third string (G).
• Middle finger (m) plays notes on the second string (B).
• Ring finger (a) plays notes on the first string (E).
The fingers you use to fingerpick one thing may change slightly when fingerpicking something else. As with anything in music, context has everything to do with it. The above, however, will serve as a great starting point, a foundation if you like, to developing awesome fingerpicking skills on your guitar.
Here is a very simple but effective drill you can do to start getting used to this approach if you are either new to fingerpicking or need to break any bad habits in your technique:

Now while doing the above drill let's focus on:
2. Making sure your fingerpicking hand is in the right position.
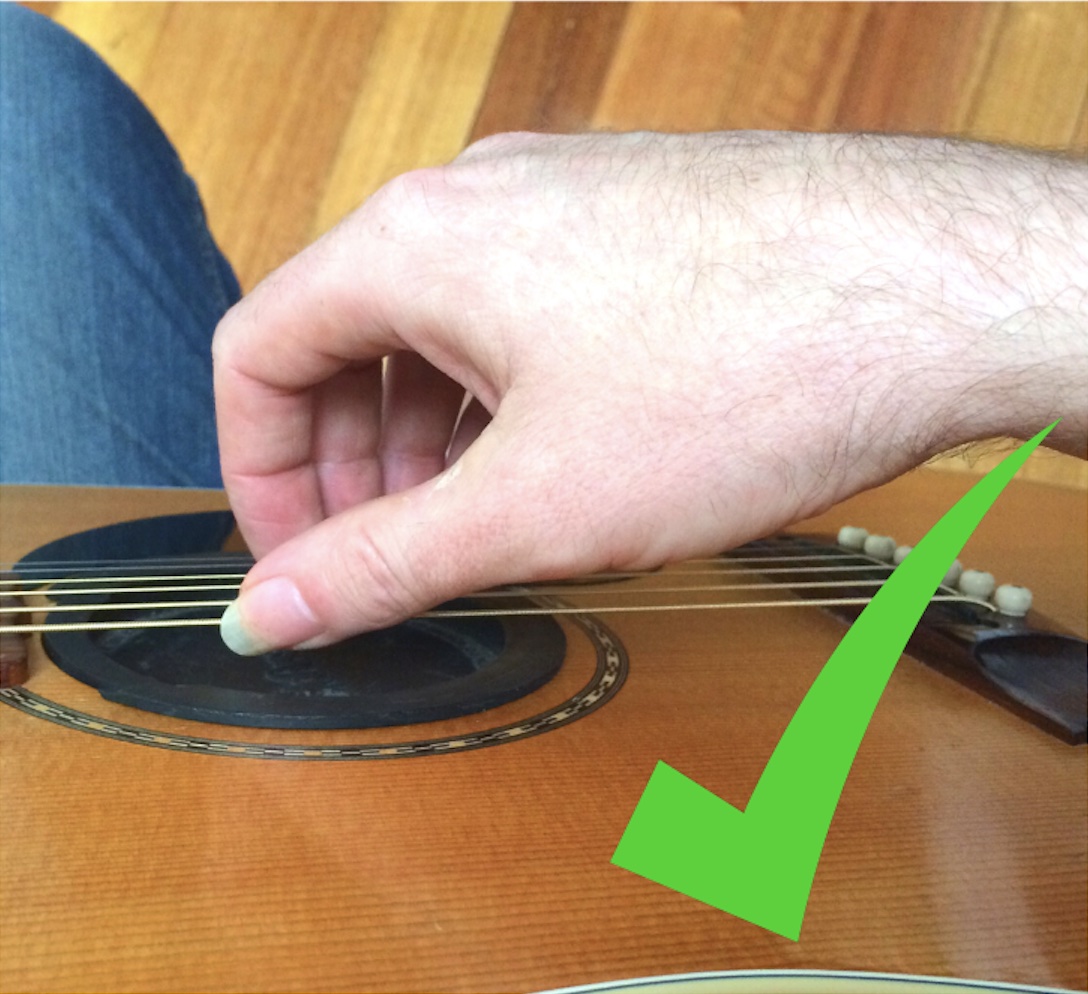 When using a flat pick to play your guitar, your arm and hand are at about a 45 degree angle to the strings
If you don’t change this when fingerpicking, then your fingers will also be at about a 45 degree angle to the strings. This does not allow enough leverage for your fingers to pluck the strings properly and will result in bad fingerpicking technique.
To generate more power when plucking the strings, it's important to position your fingers at a 90-degree angle to the strings. To achieve this, simply raise your picking hand's wrist higher above the strings than you normally would when using a plectrum. This will allow your fingers to be positioned correctly and generate more power when playing.
If you do not have your hand at this angle to the strings then it will cause many problems in your guitar fingerpicking technique. This is essential to get right if you are to have a good foundation to base this style of playing upon.
Watch the video below, where I share a simple 10 second process that guarantees you will have your hand in the correct position every single time for fingerpicking guitar.
It’s much easier to show you than try and explain it in words so check it out:
And finally:
3. Keep the movement to your fingers only.
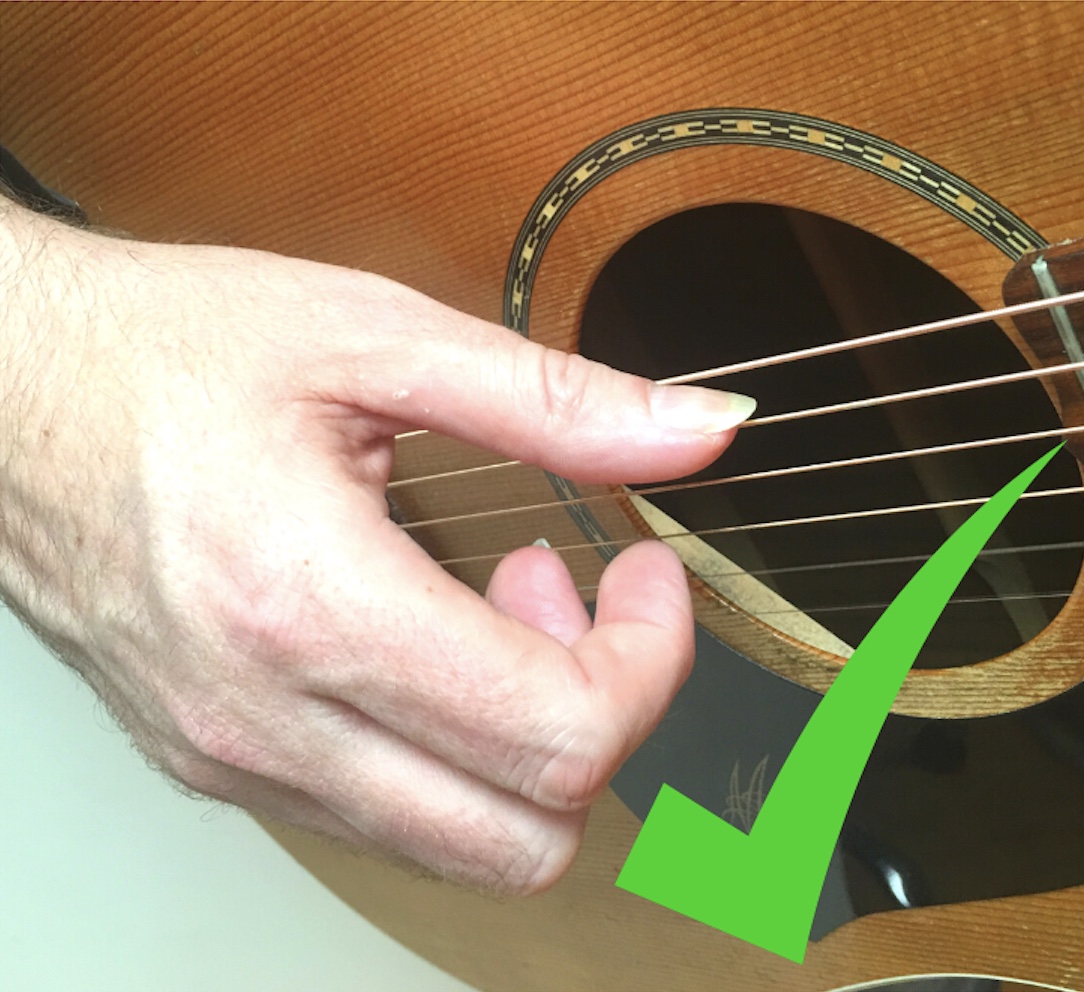 If you have mostly played your guitar with a plectrum, then you will be used to moving your wrist and arm as you play. When fingerpicking your guitar your arm and wrist mostly stay still. All the movement is generated from the fingers themselves that are plucking the strings.
Resist the urge to pull away as you pluck each string with your fingers.
For more ways to make sure you are creating a strong foundation for fingerpicking guitar, check out the video below.
In it, I reinforce things covered in this article plus a lot more including the best ways to practice these fingerpicking techniques and fingerpicking in general:
How To Best Train Your Fingerpicking Technique
Here is an E7 chord vamp for you to hone your newfound fingerpicking skills:

When playing this example, rotate your focus on each key area of the fingerpicking techniques we have covered, including:
1. Using the correct fingers
Start from the foundation we have set up earlier in the article with specific fingers assigned to specific strings. In this example, as is often the case, there is no need to deviate from this. Then play it several more times and focus on:
2. The picking hand position
Are your fingers at more or less of a 90 degree angle to the strings? Is your wrist raised above the strings as opposed to how it is when flat picking?
Continue playing the example but now shift your focus to:
3. Isolated finger movement
Make sure movement is isolated to your fingers with your arm and wrist kept still.
Train your fingerpicking by rotating your focus across these 3 key areas and you will be on your way to a great fingerpicking guitar technique!
Before we finish up, it’s worth mentioning that it’s recommended to have fingernails on your picking hand so that when you pluck the strings they contribute to the sound.
I’d say it's approximately a 60/40 ratio of the nail to flesh that strikes the string. You need to file your nails so they are rounded and make sure they are not too long as they will get caught under the string when plucking.
Can you fingerpick without any nails?
Yes, but I’d suggest you go the nail approach as you will have more control and a better tone to your sound.
Watch the video below and discover 5 tips for achieving a great tone when fingerpicking guitar.
Tone is in the fingers as they say, and there are simple things you can do to get a much better sound out of your instrument when fingerpicking:
Learn 10 pro sounding fingerpicking patterns for your guitar playing