How To Create Beautiful Music On Guitar With A Two Chord Vamp
by Simon Candy
Below, I take you through 5 simple steps to develop the ability to create hours of beautiful music on your guitar with one simple chord change. With a little bit of the old creativity juice, there is much you can do with just a little when it comes to chords on guitar.
The video below will help reinforce and further train what is covered in this lesson, so bookmark it to check out after working through what follows:
• Step 1: E Chord Shapes
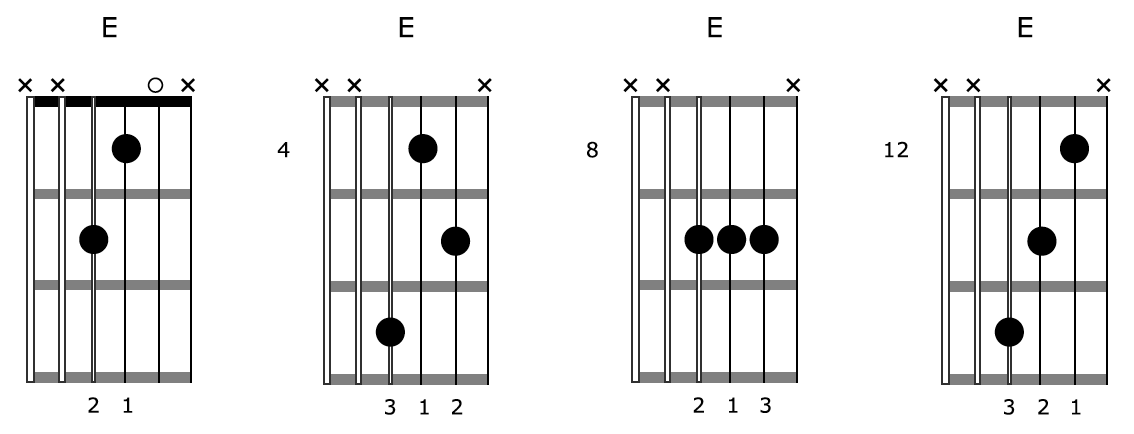
Here are the four E triad chord shapes I want you to learn:

* the 4th shape is really the same as the first shape only an octave higher
Below are the diagrams for each chord:
• Step 2: Open Strings (High Drone)
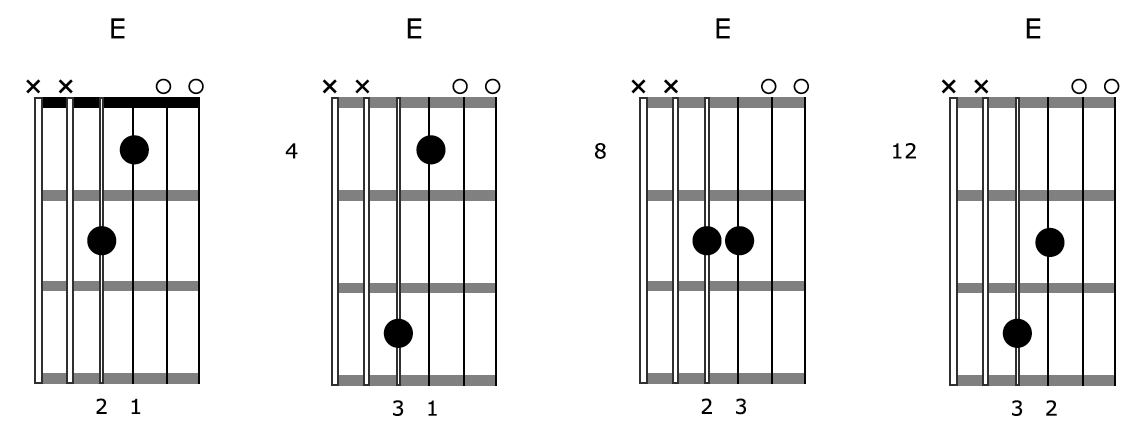
Next, you simply add the open second string by removing the finger that is on this string resulting in the following chord shapes:

We will also include the open first string with our E chord shapes.
This creates a cool, droning sound on the top of each chord, which is an essential component of the beautiful music you will soon be creating with these chords on your guitar.
Below are the diagrams for each chord:
• Step 3: Open Strings (Low Drone)
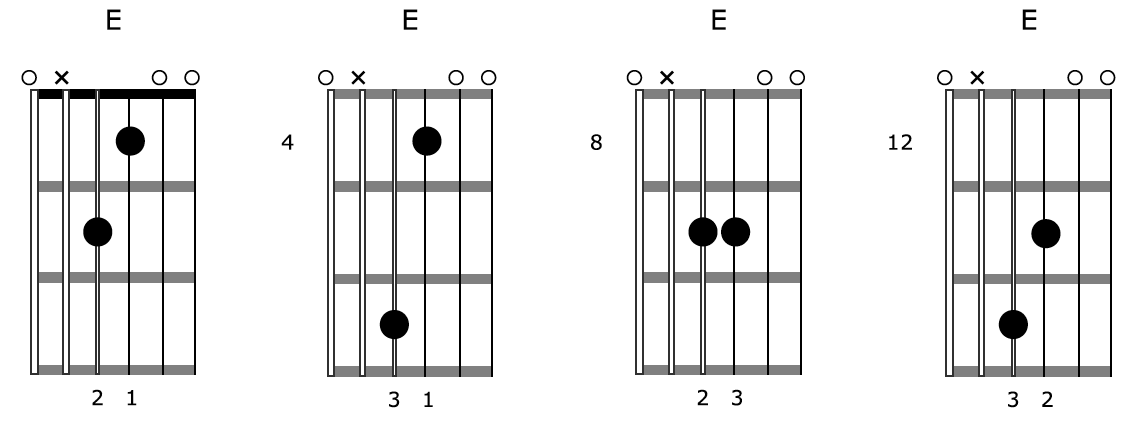
To achieve a full sound with our chords, we will also include the drone of the low E string like so:

This provides the lower end that now makes what you play sound full and complete.
So simple, yet so effective!
You have the bass, the chords, and in just a moment, the melody component.
These are the 3 layers of music.
Below are the diagrams for each chord:
To become more familiar with these shapes, let’s apply some strumming to our E shape:

And picking through the notes of the chord shapes separately, like so:

• Step 4: Adding Notes
Now it’s time to add notes to our existing E chord shapes to create an amazing amount of variety to the sounds we can get from each.
Let's start with notes that sound more consonant becasue they are in key:


Here are all possible notes, in and out of key, that could be added to each chord on the top string of your guitar:


Some of the sounds you heard here may have seemed unpleasant due to their dissonant nature. However, dissonance is an important aspect of music and is necessary to create tension and release.
It’s all about context.
• Step 5: Adding The A Chord
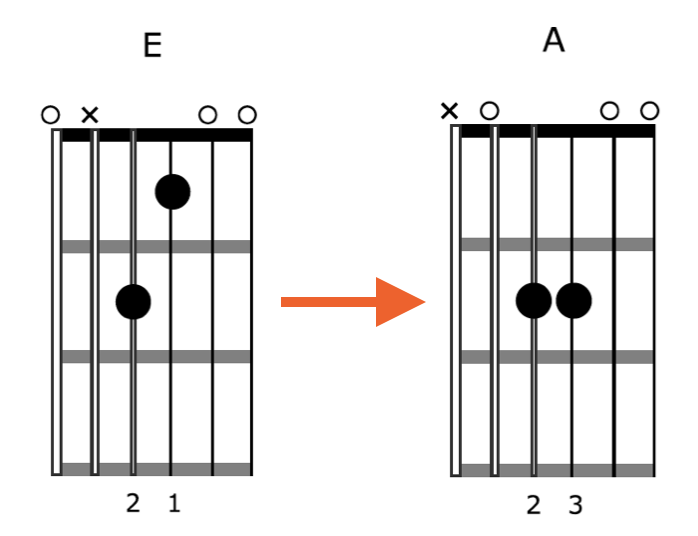
So far, we have been practising with only one chord. But now, we are going to introduce an A chord to complement the E chord. This will allow us to create more diverse sounds.
To do this, you simply need to position the two chord shapes next to each other on the fretboard.
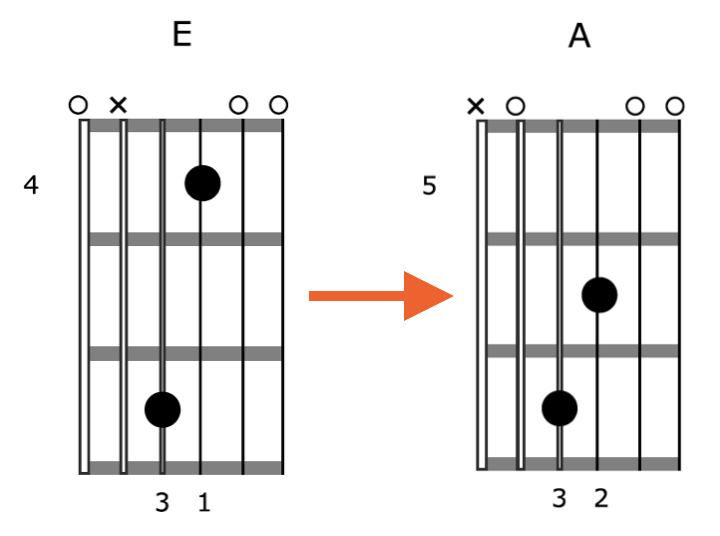
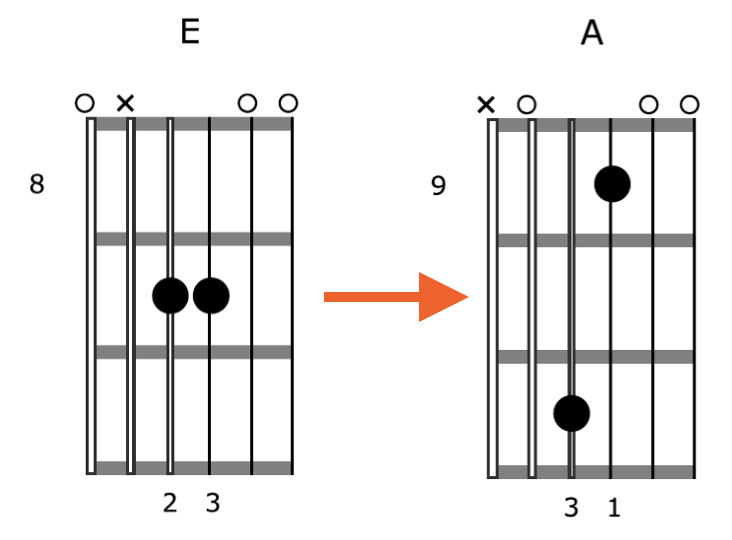
Here are the paired shapes of both the E and A chords, based on their proximity on the fretboard:
Pairing 1:
Pairing 2:
Pairing 3:
Creating Beautiful Music Using A Two Chord Vamp
The following are examples of some simple two chord vamps using our E and A chord shapes.
• Chord Vamp 1
This first example uses the first chord shapes for each of the E and A chords:

• Chord Vamp 2
Here I am creating a two chord vamp with the second shapes for the E and A chords:

• Chord Vamp 3
Finally, here is another two chord vamp using the 3rd shape for each of the E and A chords:

Mixing Chords Shapes
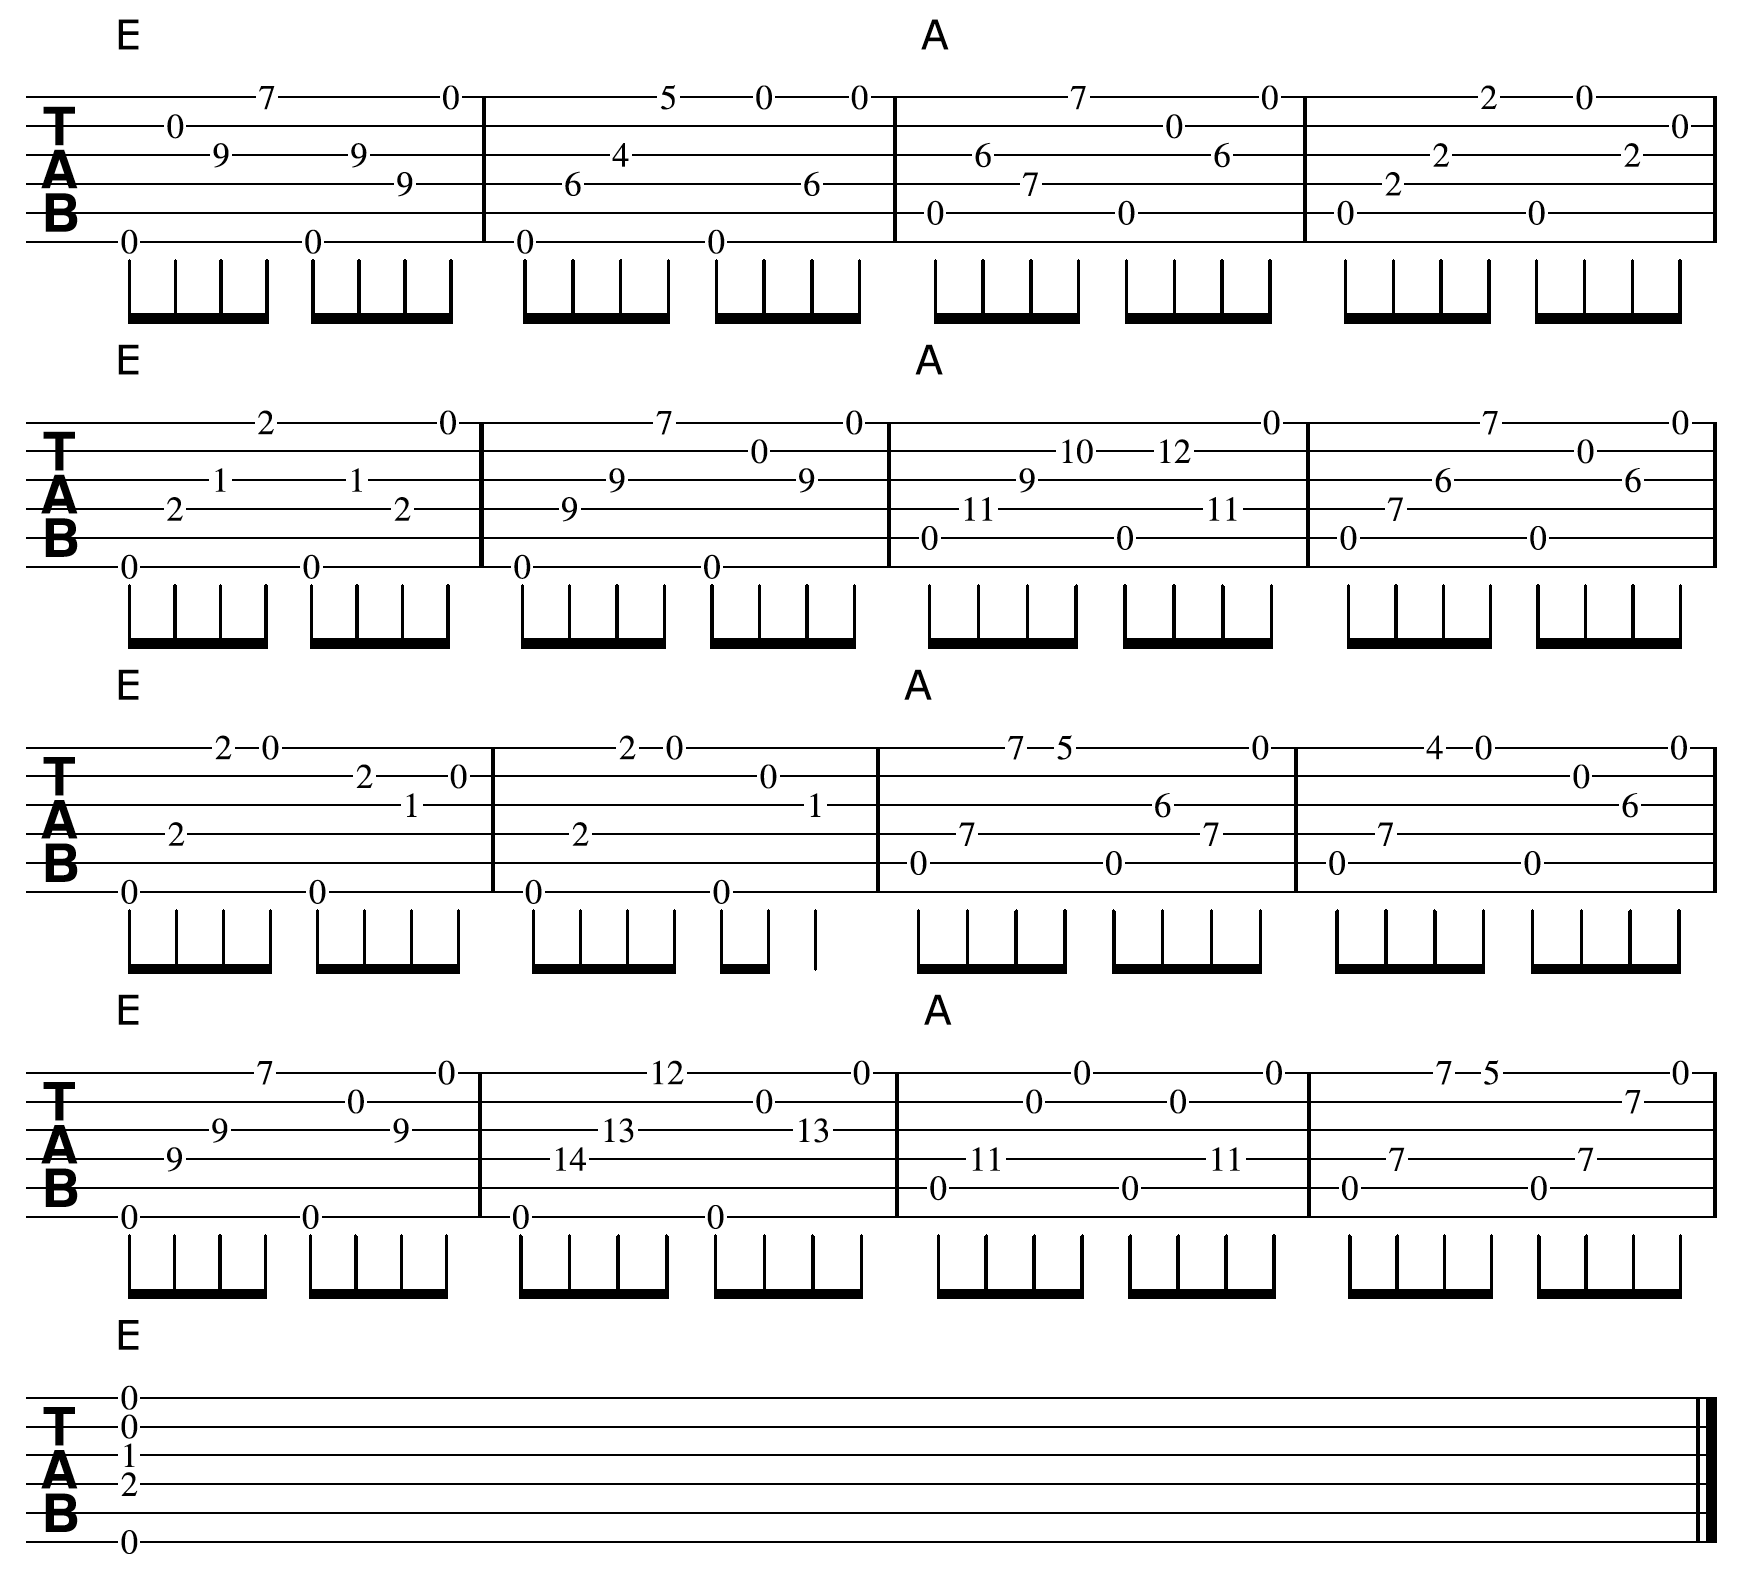
Once you become comfortable playing two-chord vamps using the E and A chord shapes in their corresponding positions, you can start mixing them up to create an almost endless amount of awesome, awe-inspiring music on your guitar.
Here is an example of that:
Discover how to create great sounding solos on guitar using chords
How To Turn One Guitar Chord Into Amazing Sounding Music
by Simon Candy
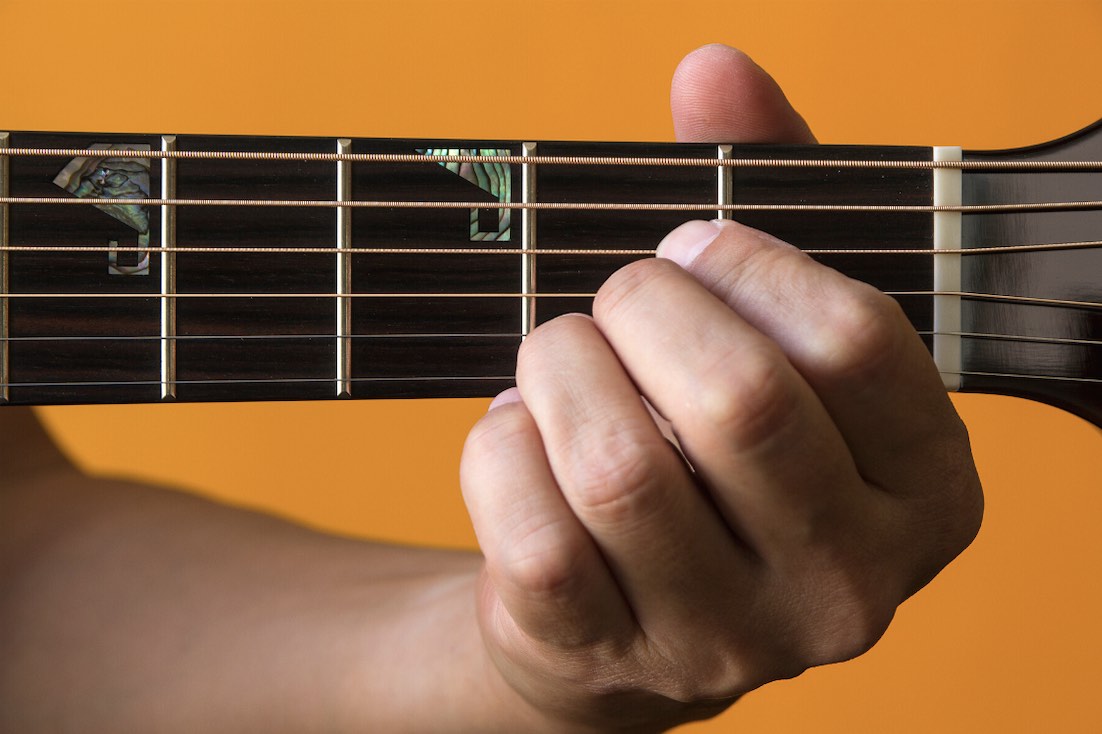 In today's lesson, I am going to reveal to you a 4 step process for creating unique and amazing music using just one chord on guitar.
Yes, that’s right, just one chord!
You are going to learn how to create amazing and sophisticated music with an A major chord. And with this A major chord you are going to sound full and complete much like a pianist does when sitting down at the piano to play. You won’t need anyone else to play along with you, or any backing track to help fill out the sound.
But first a word about . . .
Creativity
This lesson is as much about creativity as it is about guitar chords.
I want you to approach it like a child in Kindergarten with a big white sheet of paper in front of them and some paints and crayons. The child does not care what primary colours are, or which colours mix well together to create other colours. They simply jump in and have fun creating, oblivious to everything else around them.
So, turn off the analytical side of your brain, rid yourself of any doubts that you may have about being creative, and get in there and have fun creating awesome music with these guitar chords.
The video below will help reinforce and further train what is covered in this lesson, so bookmark it to check out after working through what follows:
The Strategy
The following are 4 steps to creating pro, advanced sounding music on your guitar using just a single chord. Work your way through each step carefully, and discover just how much great music lies within one chord on your guitar!
• Step 1: Chord Shapes
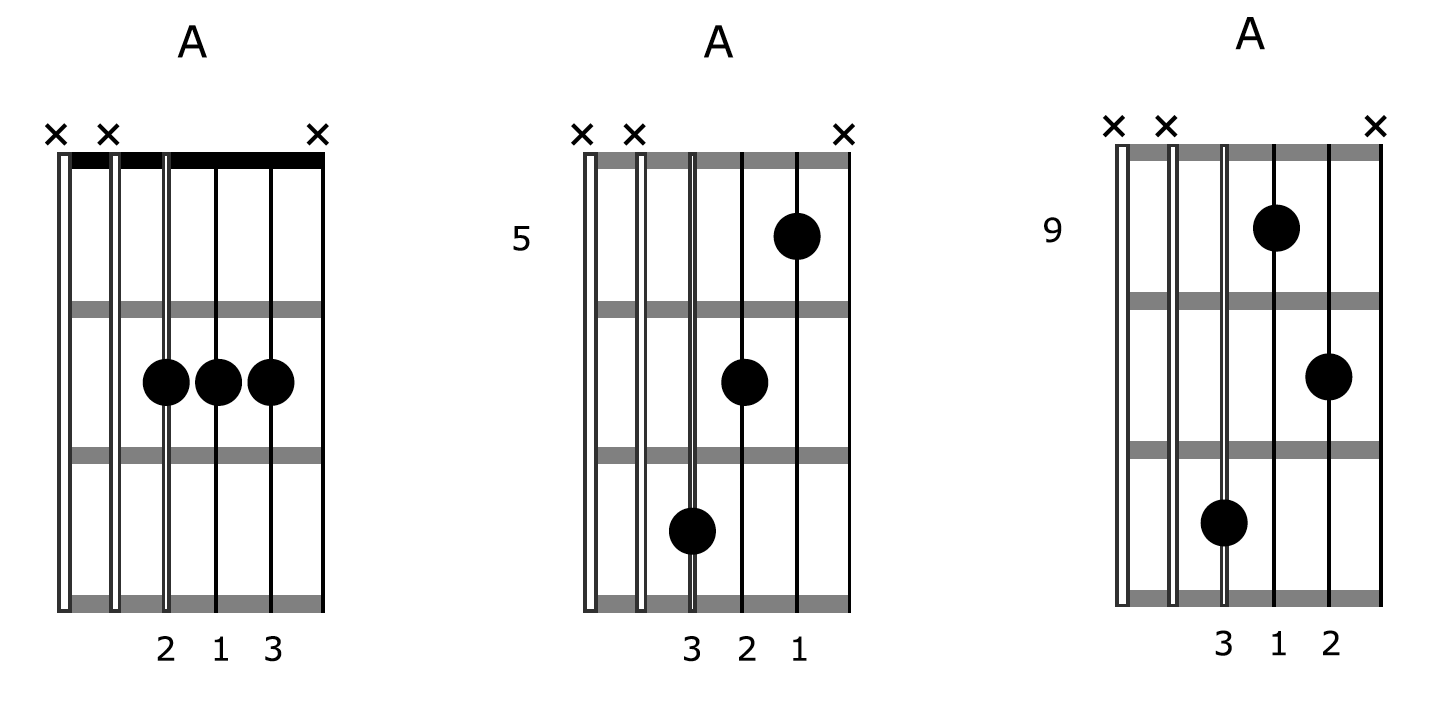
To begin, learn the following three A chord shapes that fall on strings 4, 3, and 2 of your guitar:

The shapes above are known as triads (3 note chords).
Below are diagrams for each chord:
• Step 2: Open Strings
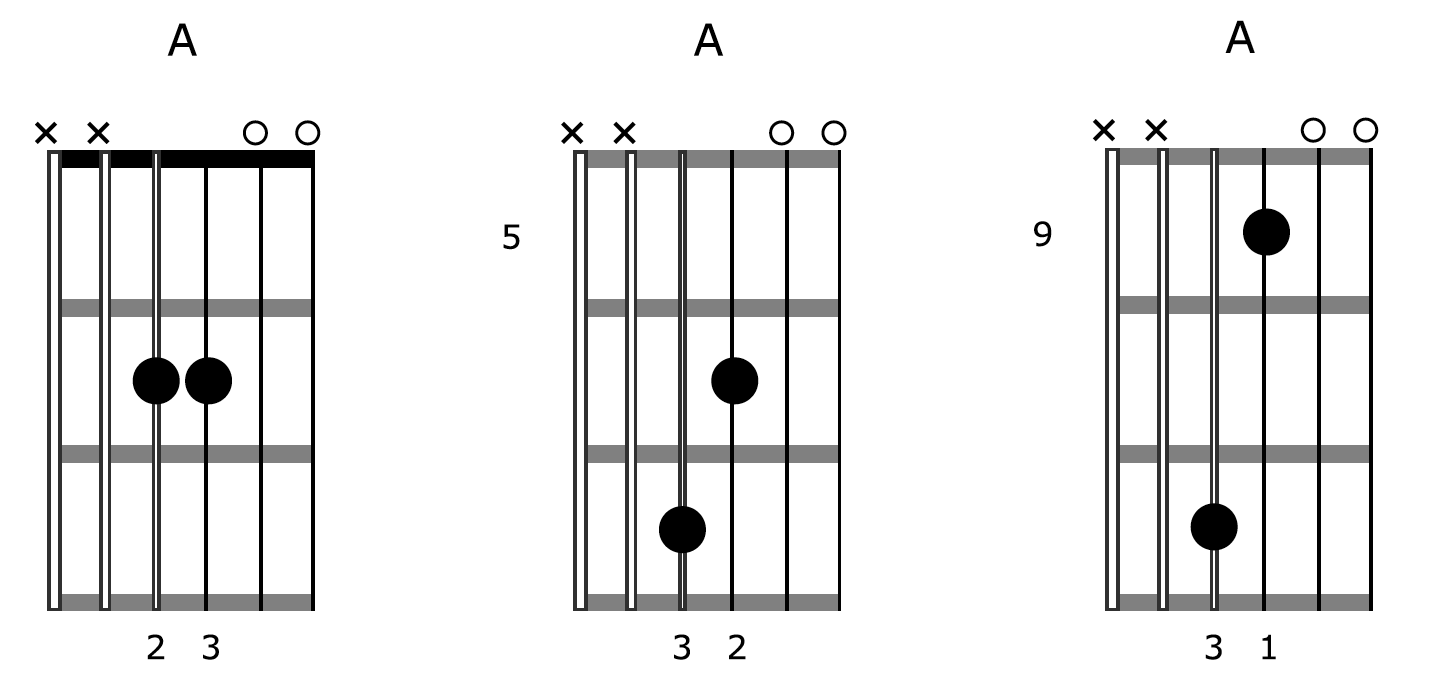
Next, I want you to remove the note on the 2nd string of each chord. In doing so you expose the open 2nd string. I want you to include this string along with the open 1st string with your chord like so:

This creates a mesmerizing droning sound with each chord. The sound of open strings ringing through against the fretted notes creates a captivating effect.
Below are diagrams for each chord:
• Step 3: The Low A String
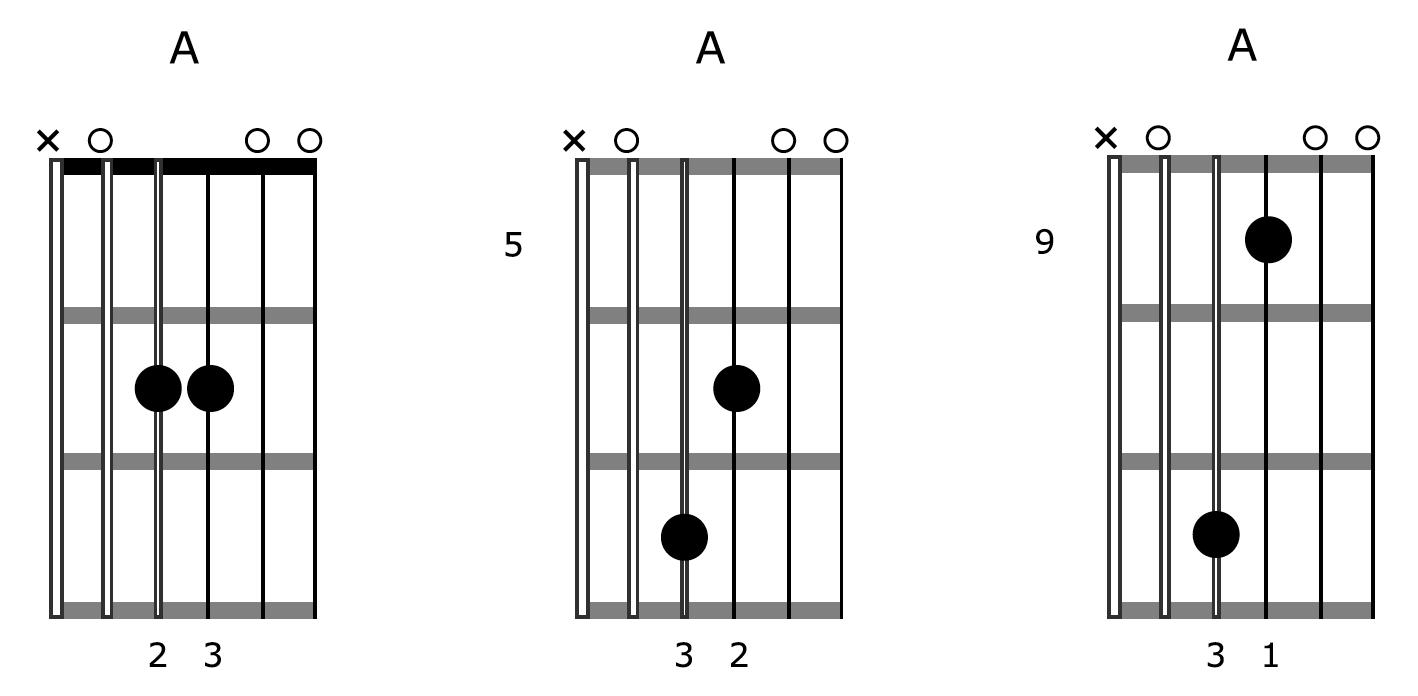
To help fill out the sound, and provide some lower end to our chord, simply pluck the open A string with each shape:

As simple as this is to do, it makes a massive difference. So much so, that what you are now playing sounds full and complete.
Below are diagrams for each chord:
At this point I want you to play around with these chords, both by strumming and picking the notes of each separately. You can do this with a plectrum or with your fingers, whichever you are most comfortable with.
Here is an example strumming the chords:

In the example above I am separating the bass note from the chord but you could of course include the bass note with your strumming if you prefer.
Next is an example of picking the notes out of each chord separately:

There are many other possible picking pattern combinations to the one I have provided above, so be sure to explore some of these. You can also change the order of the chords for variety.
• Step 4: Multiplying The Possibilities
The final step is to add fingers to notes on either the first or second string.
When doing this don’t lose the chord shape. Just add a note to it and see how your chord sounds as a result. You will get notes that sound consonant and dissonant. To the untrained ear, dissonant notes will sound wrong. However, there are no wrong notes here. Just varying degrees of consonance and dissonance.
Here are more consonant notes being added to each of our A chords.
• Chord Shape 1:

• Chord Shape 2:

• Chord Shape 3:

Notice how all the notes sound nice with our A chord in the example above. This is because all the added notes are notes that belong to the key of A Major. Generally speaking, these are more consonant sounds, although there are certainly degrees of dissonance here at play too.
Now have a listen when I include all possible notes to our chords on the first string, in and out of key.
• Chord Shape 1:

• Chord Shape 2:

• Chord Shape 3:

In the example above, there is more dissonance as compared to the first one, but all the notes work together. The choice of sound depends on the level of tension you want to create.
However, when you create tension, you must resolve it to make the dissonant notes work. A basic rule of thumb is that if you hit a note that is dissonant (out of key) move it up or down one fret and you will resolve it (put it in key).
Creating Music With One Chord
So now the idea is to simply explore the possibilities you have with an A major chord on your guitar.
The following are some examples using our A major chord shapes, including notes on either the first or second string to create some cool sounds.
• Example 1
This first example uses the first A chord shape:

• Example 2
Here is the second chord with a melody added using notes on the first two strings:

• Example 3
This third example is doing the same using the third A chord shape:

• Example 4
In example 4, I am combining two chord shapes to cover the range of the notes on the top two strings. I am using the first and second A chord shapes:

• Example 5
In this last example, I am again using two chord shapes, the second and third shapes in this case:

So there you have it. Who would’ve thought there was so much sound you can get from just one guitar chord!
Imagine what you will be able to do with a chord progression!
Discover 5 unique ways to play a simple chord progression on guitar
How To Create A Travis Picking Arrangement On Guitar
By Simon Candy
 Travis Picking is the foundation of the style of such guitar greats as Merle Travis, Chet Atkins, and Tommy Emmanuel. It is a great way to arrange a song on guitar without needing anyone else to play along with you.
In this lesson, you learn a step by step method for creating your own travis picking arrangements on guitar.
The following video will help reinforce and enhance the art of travis picking in your playing. Bookmark it and watch it after completing what follows below:
Travis Picking Guitar Arrangement
The following is a step by step guide for turning a melody into a travis picking arrangement on your guitar.
I will be using the tune “I’ve Been Working On The Railroad” throughout to demonstrate.
Breaking down the process in this way can make it much easier to understand and execute. This can be especially helpful if you find this technique to be complex and difficult.
• Step 1: Bass
The bass component of travispicking alternates using a combination of the lower 3 strings on the guitar.
You have some choices regarding bass patterns you can use with travispicking. It will largely come down to which string the root note of the chord is on.
For root 6 chords you have:
6, 4, 6, 4
6, 4, 5, 6
For root 5 chords you have:
5, 4, 5, 4
5, 4, 6, 4
* The numbers refer to the strings the bass notes fall on, and in which order
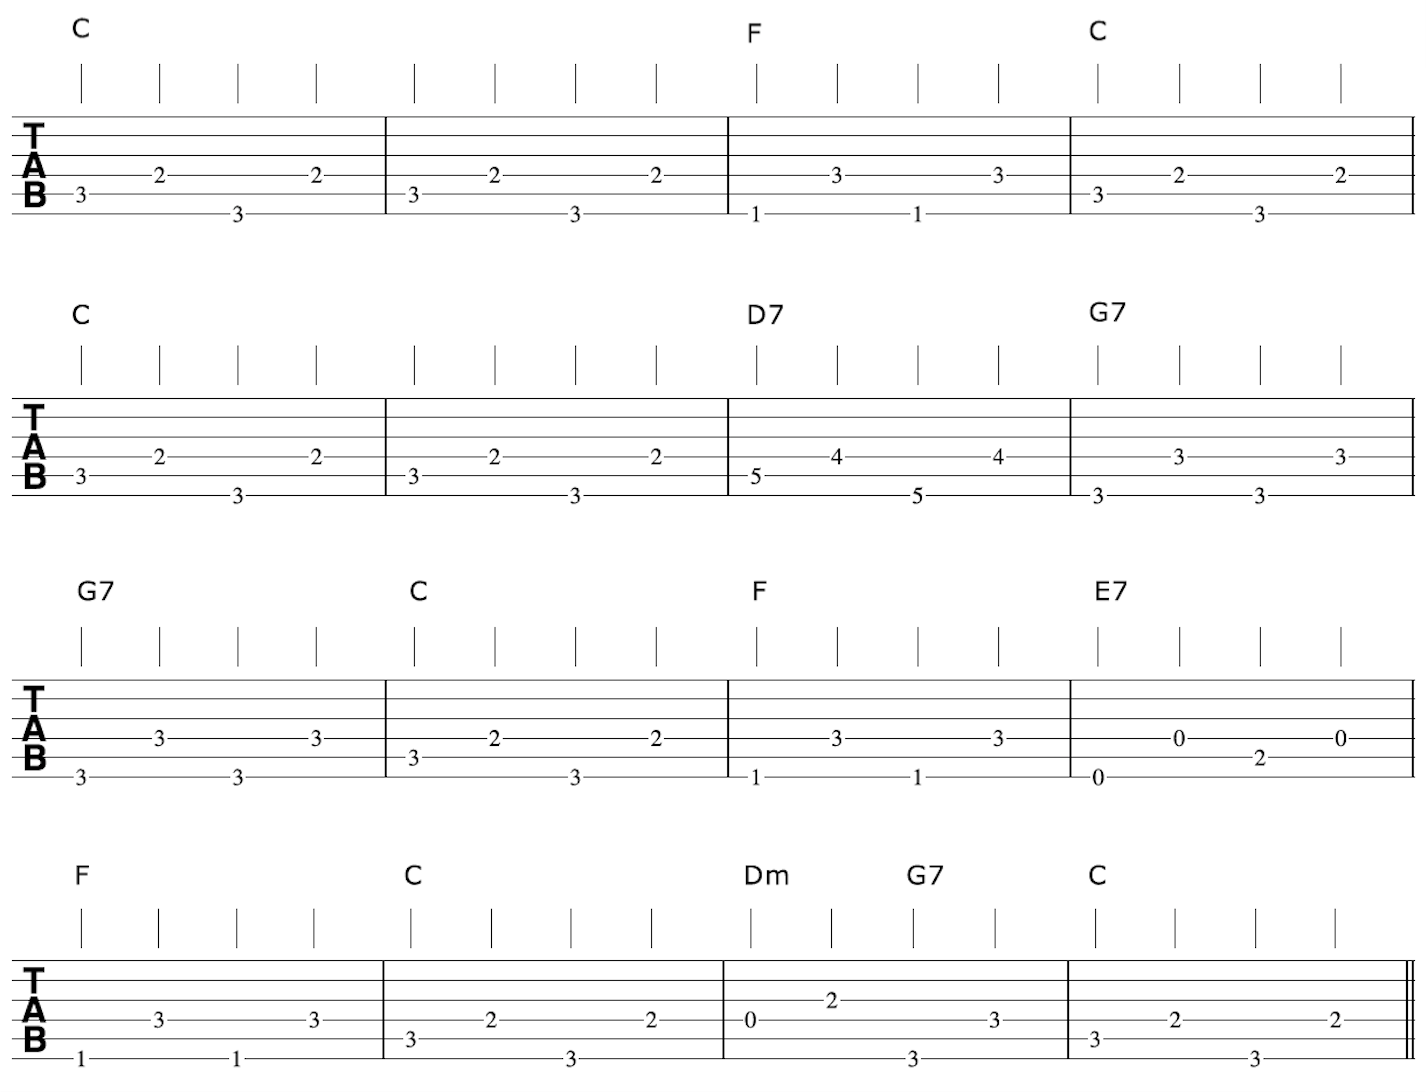
Here is an arrangement of the bass part, isolated, for our tune “I’ve Been Working On The Railroad”
• Step 2: Melody
Once the bass part is sorted, it’s time to add the melody.
To begin, keep the melody straight. By this I mean keep it on the beat and directly in line with the bass.
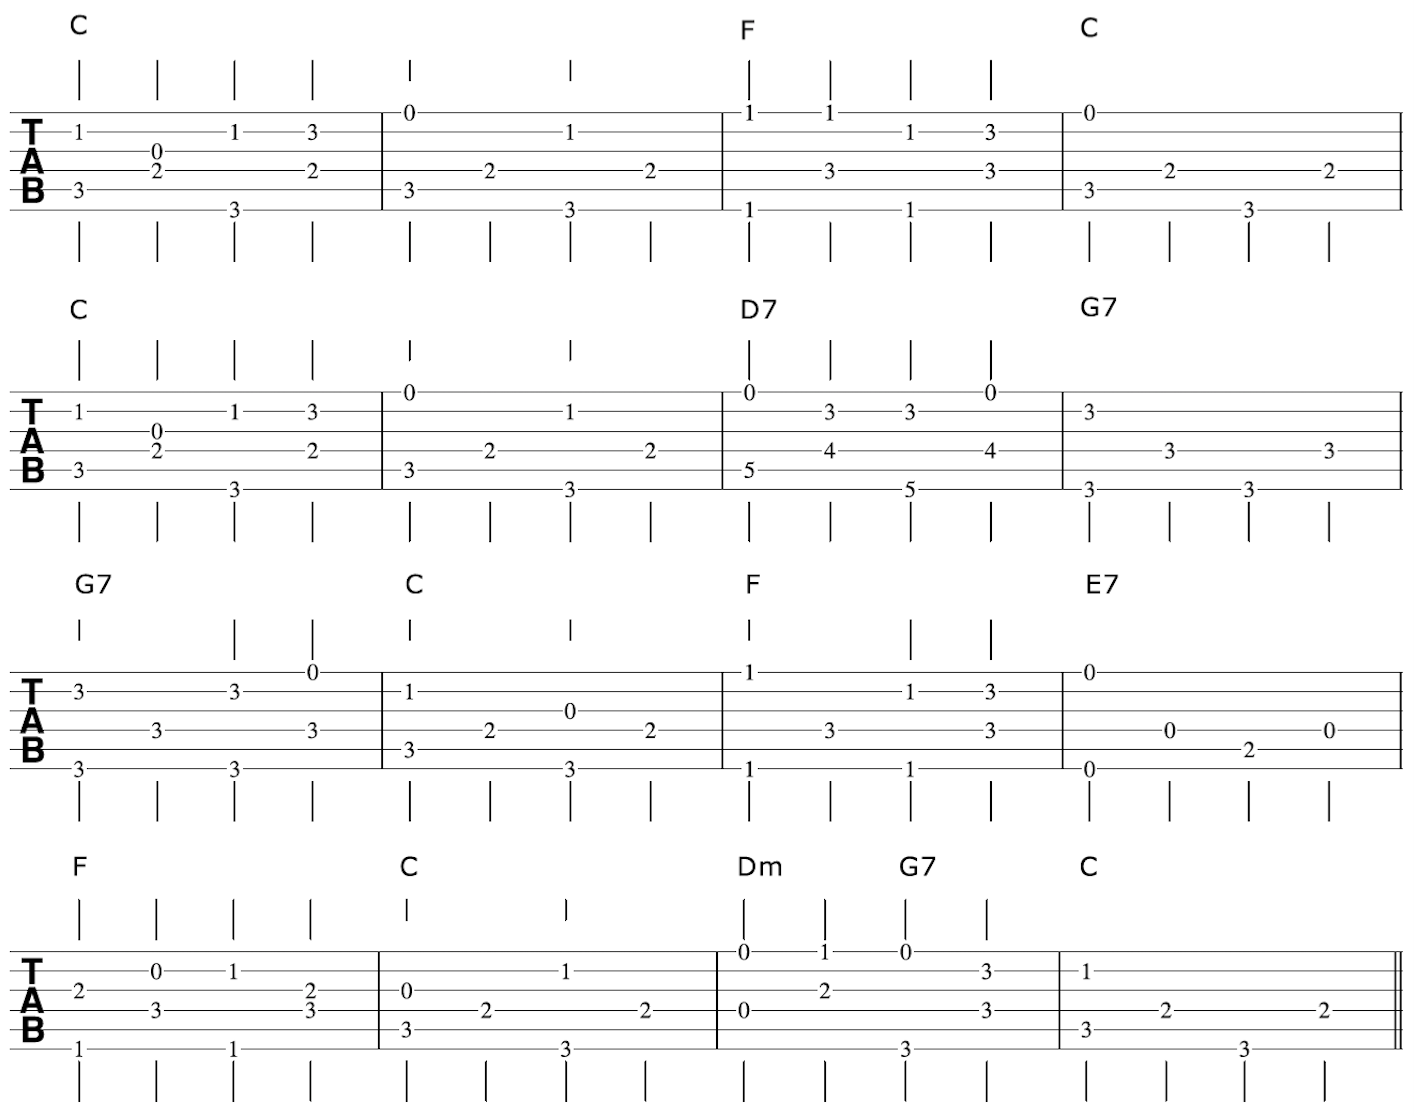
Here is our tune with bass and melody parts together:
• Step 3: Syncopate Melody
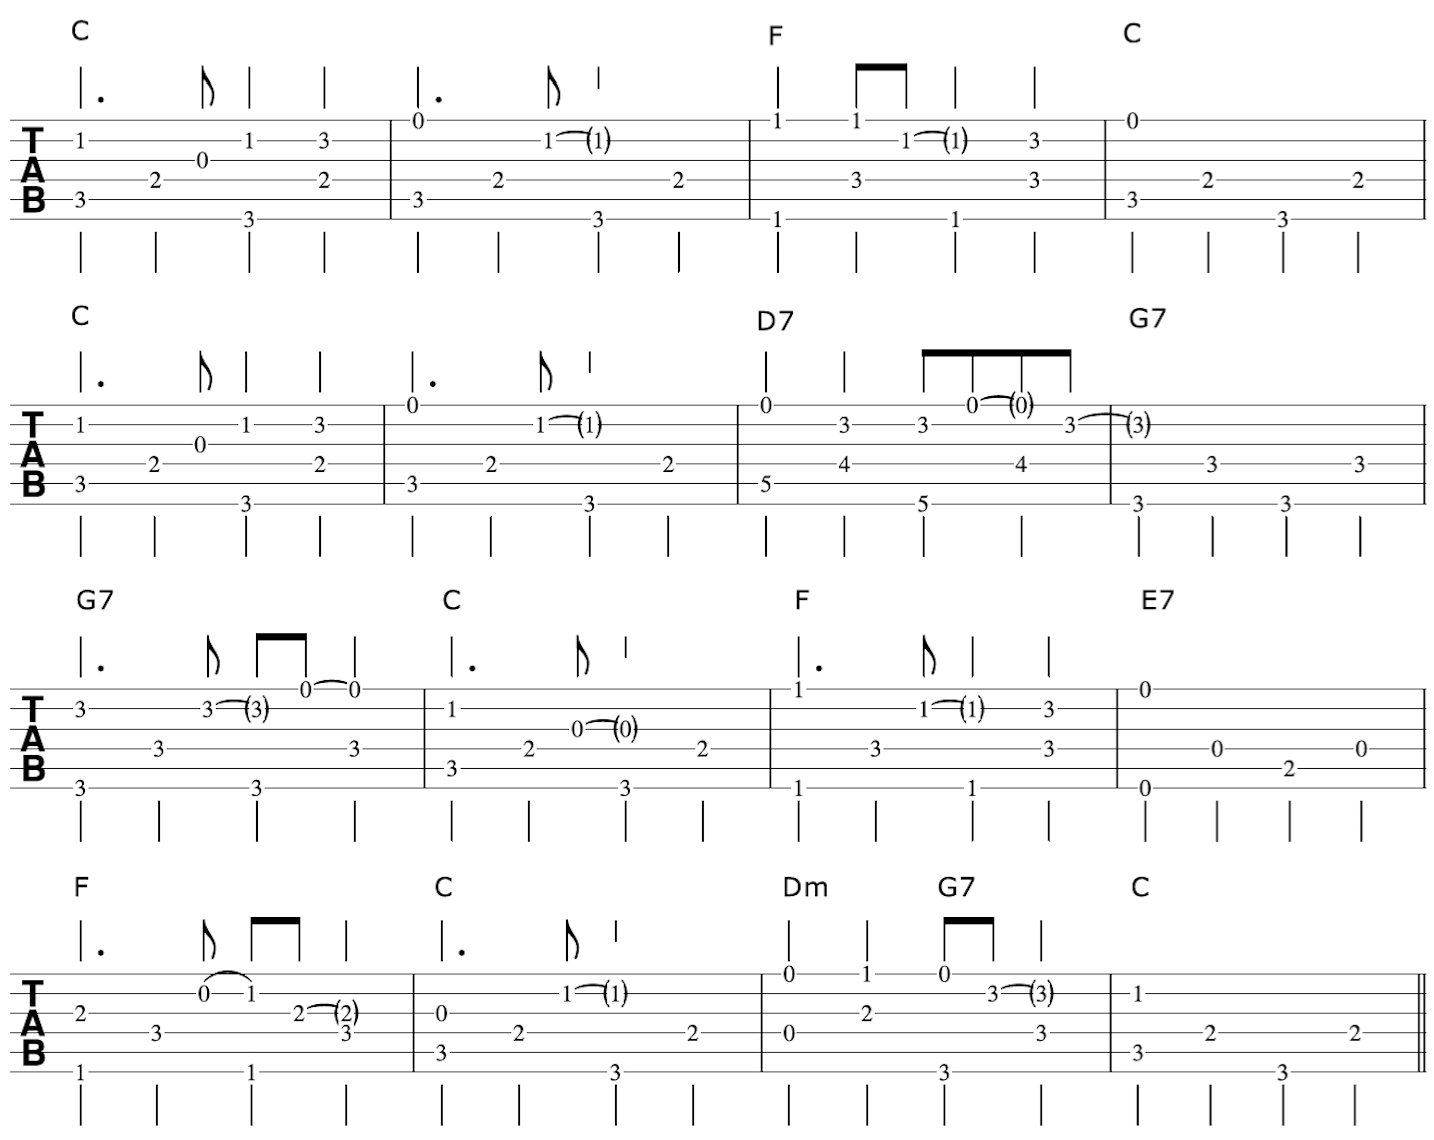
Once you have the melody and bass parts together, the next step is to syncopate the melody. This will have your travispicking arrangement come to life. By syncopation I am referring to moving some of the melody notes so that they fall on the off beats, in-between the bass notes.
Here is our tune arranged in such a way:
• Step 4: Harmony
Finally, it’s time to fill in the arrangement with some harmony.
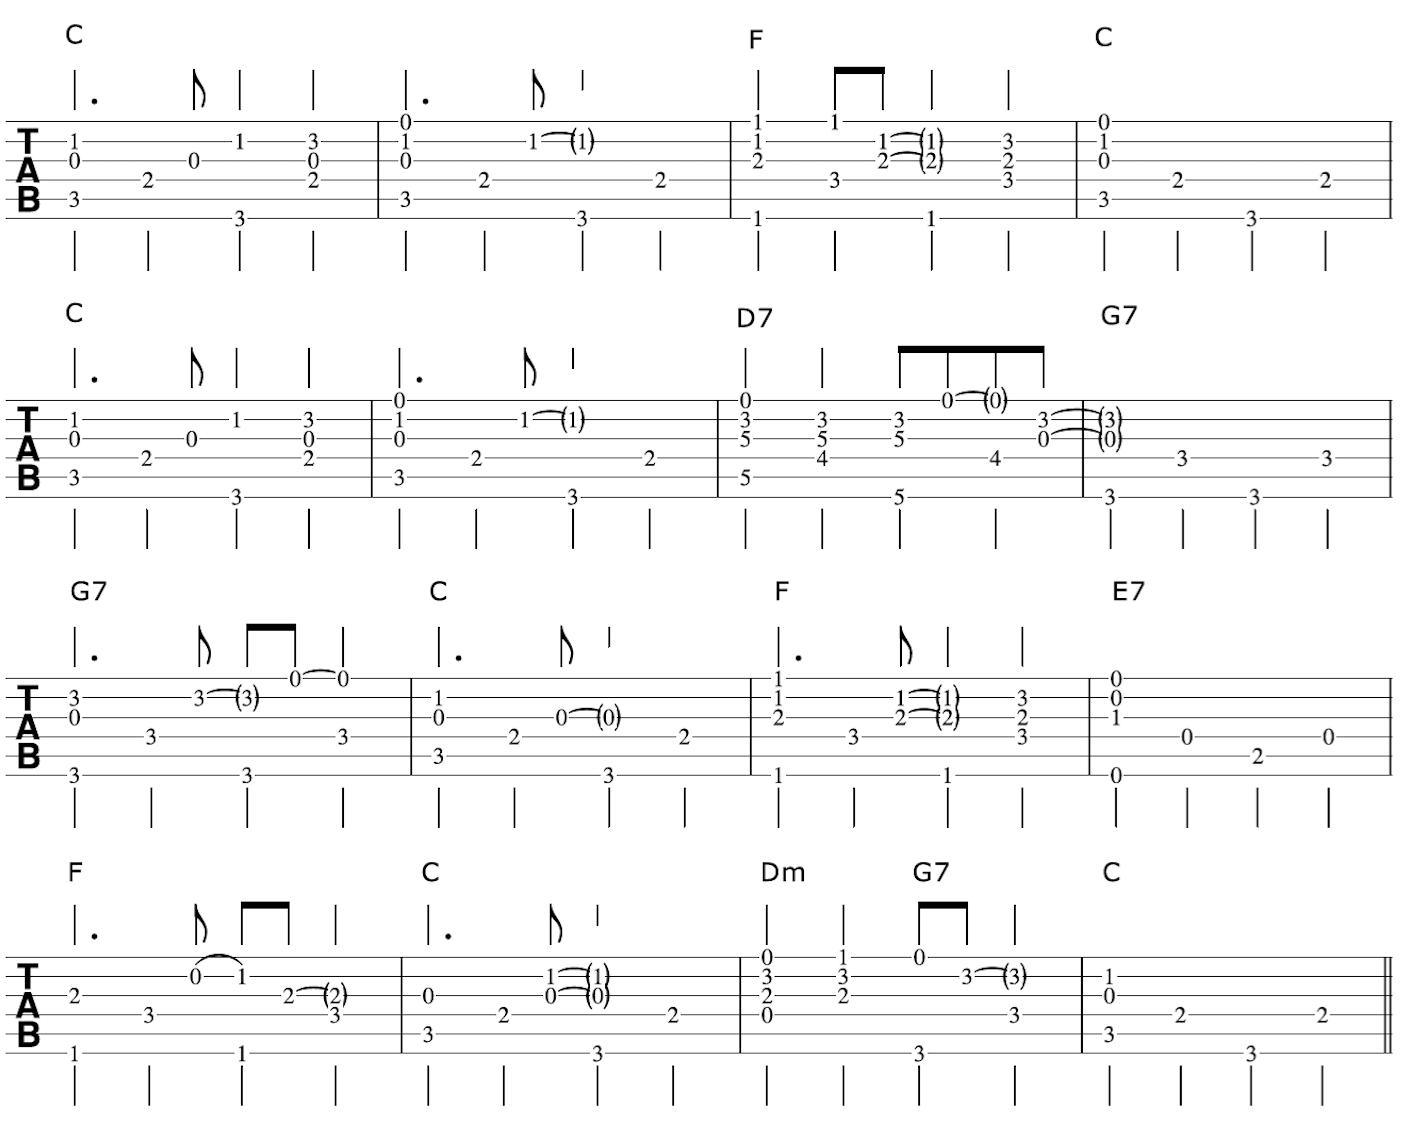
This step should be left until last to ensure you know the lowest and highest notes, allowing you to fill in the harmony parts accurately. This has been established by working out the bass and melody parts of our arrangement first.
Here is our tune with some harmony added:
Discover more ways to create fingerpicking guitar arrangements
How To Create A Fingerpicking Arrangement On Guitar
by Simon Candy
 Creating your own fingerpicking arrangements on guitar can be challenging. However, it can be made a whole lot easier if you have a strategised way of going about it.
To begin, consider the components that make up a song:
• Melody
• Harmony
• Bass
In a band, the singer takes care of the melody while either a guitar, piano/keyboard, or both instruments provide the harmony. Additionally, the bass guitar takes care of the bass part.
In a choir, the soprano voices sing the melody while the alto and tenor voices fill the harmony parts. The baritones take care of the bass.
Thinking of guitar fingerpicking arrangements the same way helps simplify things.
In this lesson, I take you through a melody from the ground up and run you through a process that works for creating fingerpicking arrangements on guitar.
The video below will help reinforce and further train this strategy, so bookmark it to check out after working through what follows:
Throughout this lesson, I will be using the tune “I’ve Been Working On The Railroad”.
• Step 1: Fingerpicking Guitar Arrangement - Chords
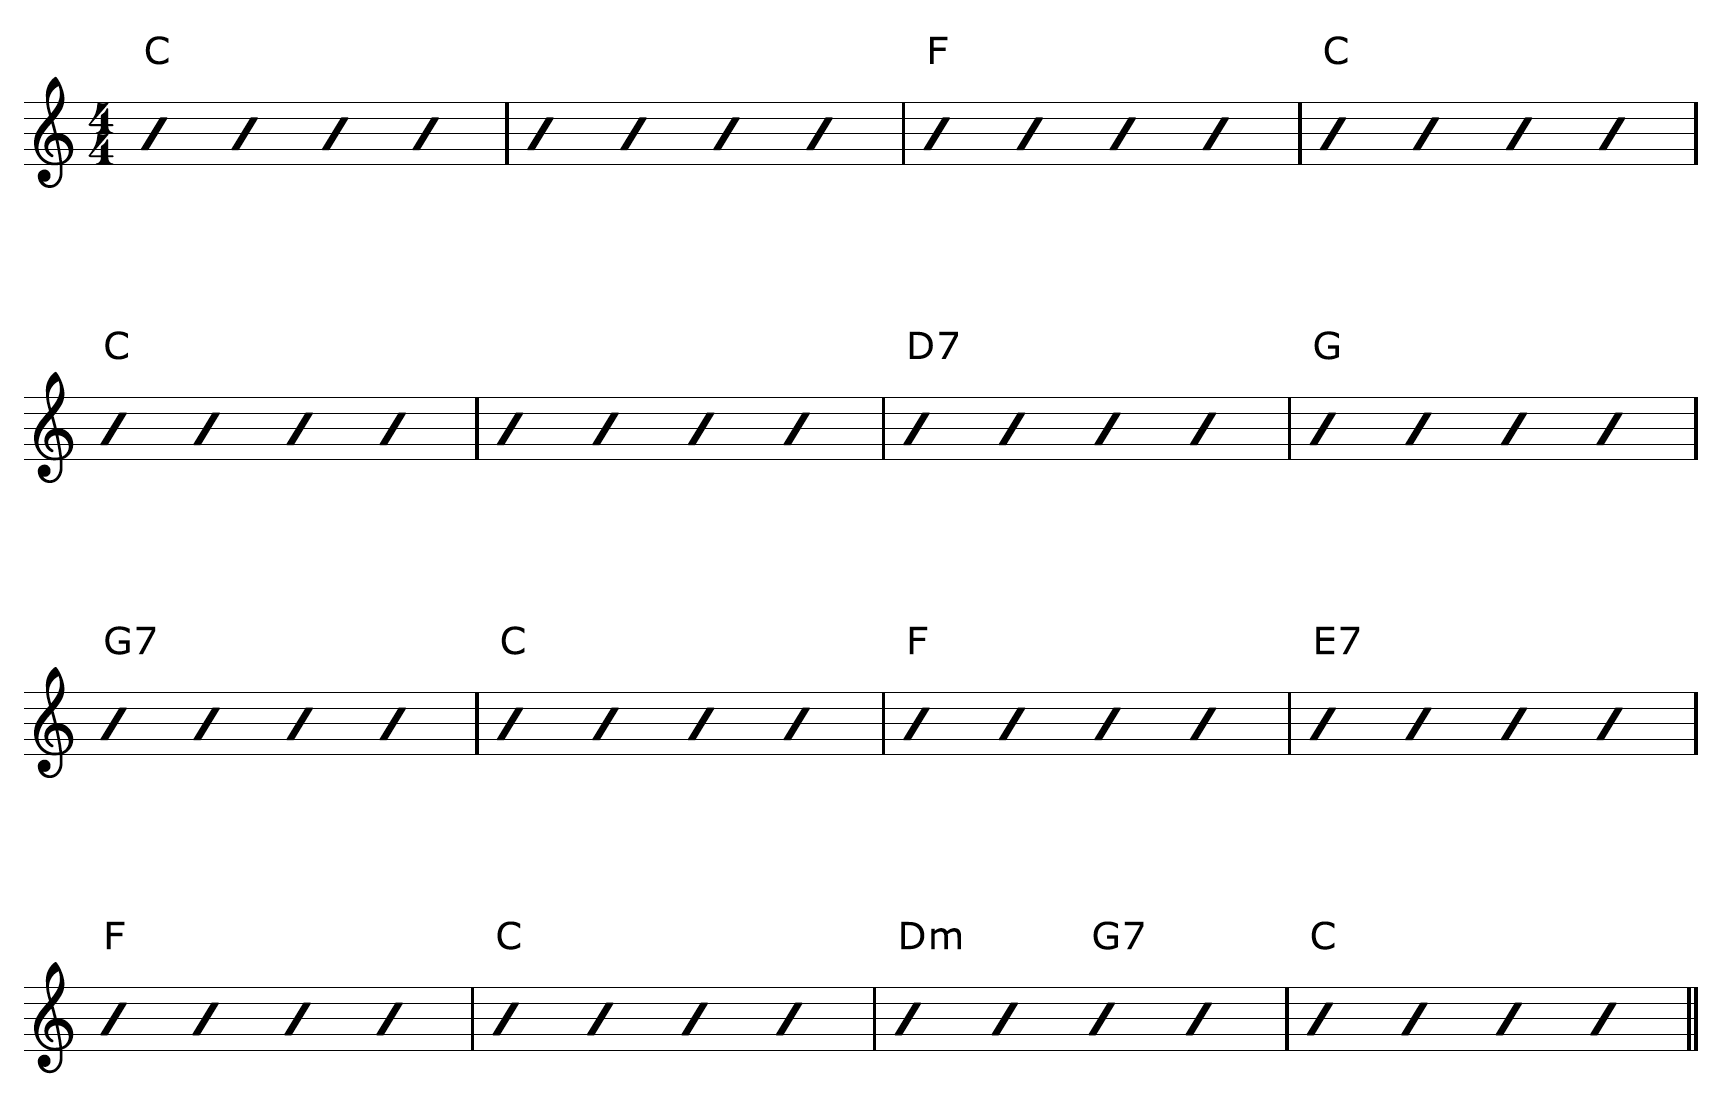
Learn and memorise the chords to the tune:
• Step 2: Fingerpicking Guitar Arrangement - Melody
Learn and memorise the melody to the tune:
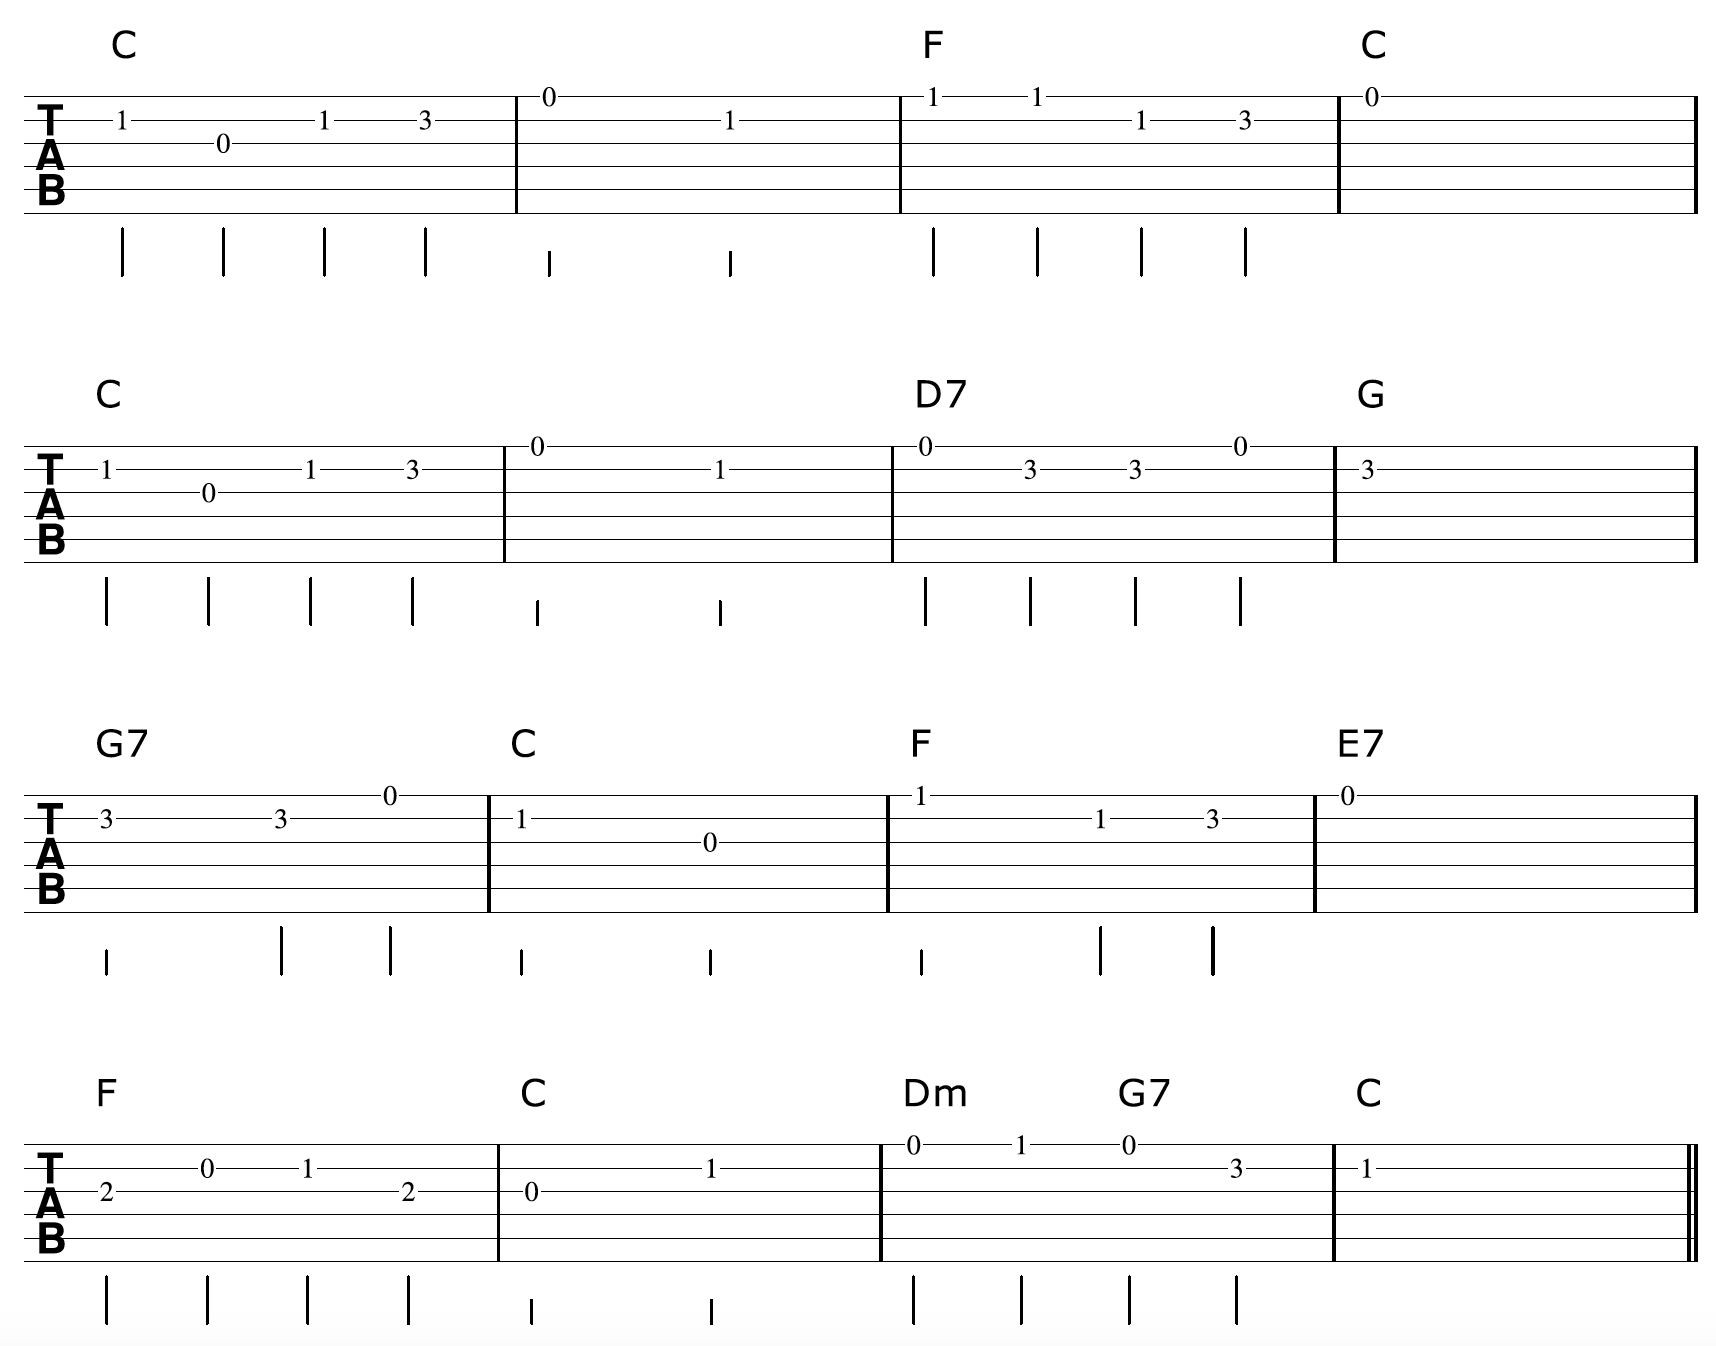
• Step 3: Fingerpicking Guitar Arrangement - Chords And Melody
Put the melody and chords together: (I explain and demonstrate how to do this in the video above)
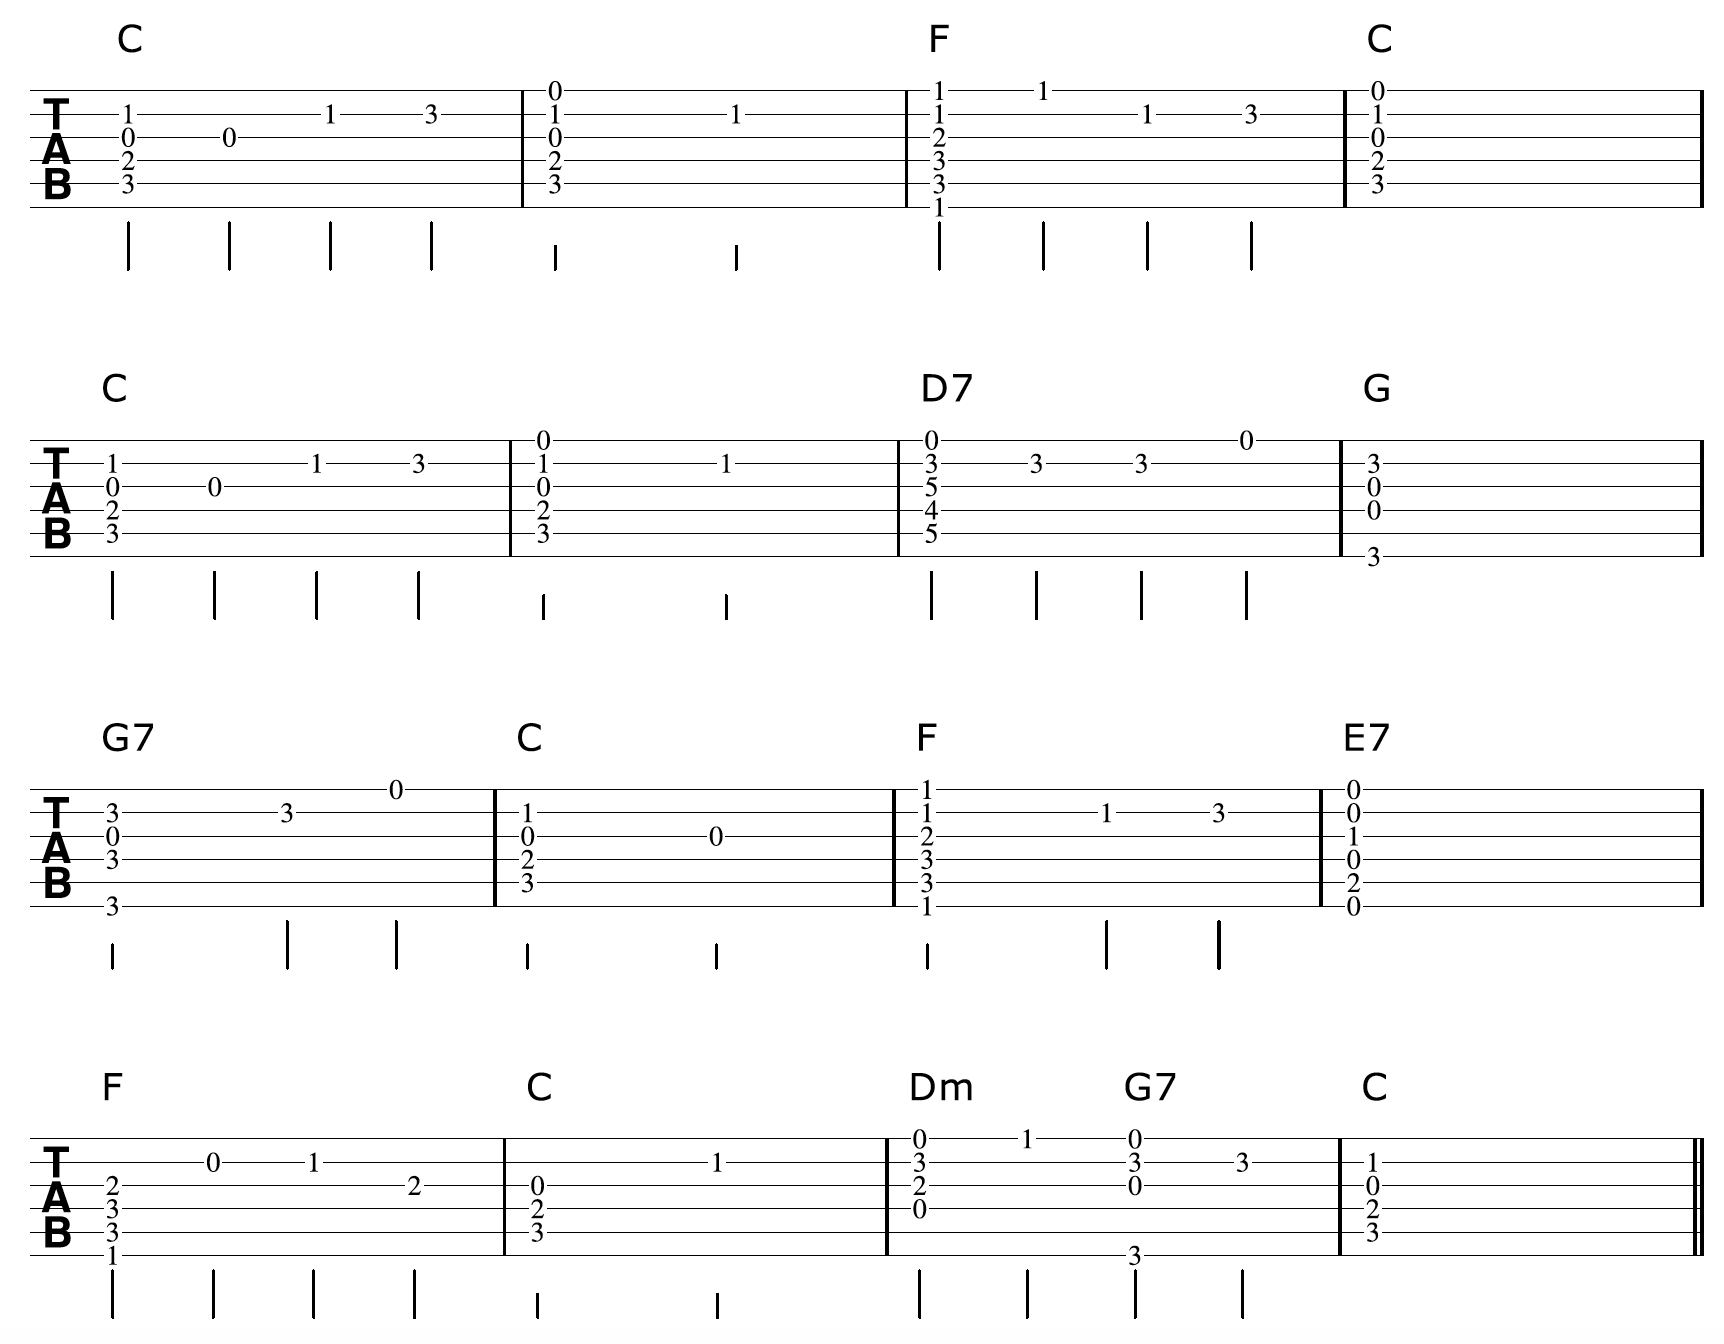
• Step 4: Fingerpicking Guitar Arrangement
Once you have the chords and melody together, you can flesh things out a little and make the arrangement sound more musical.
Here is an example of this:
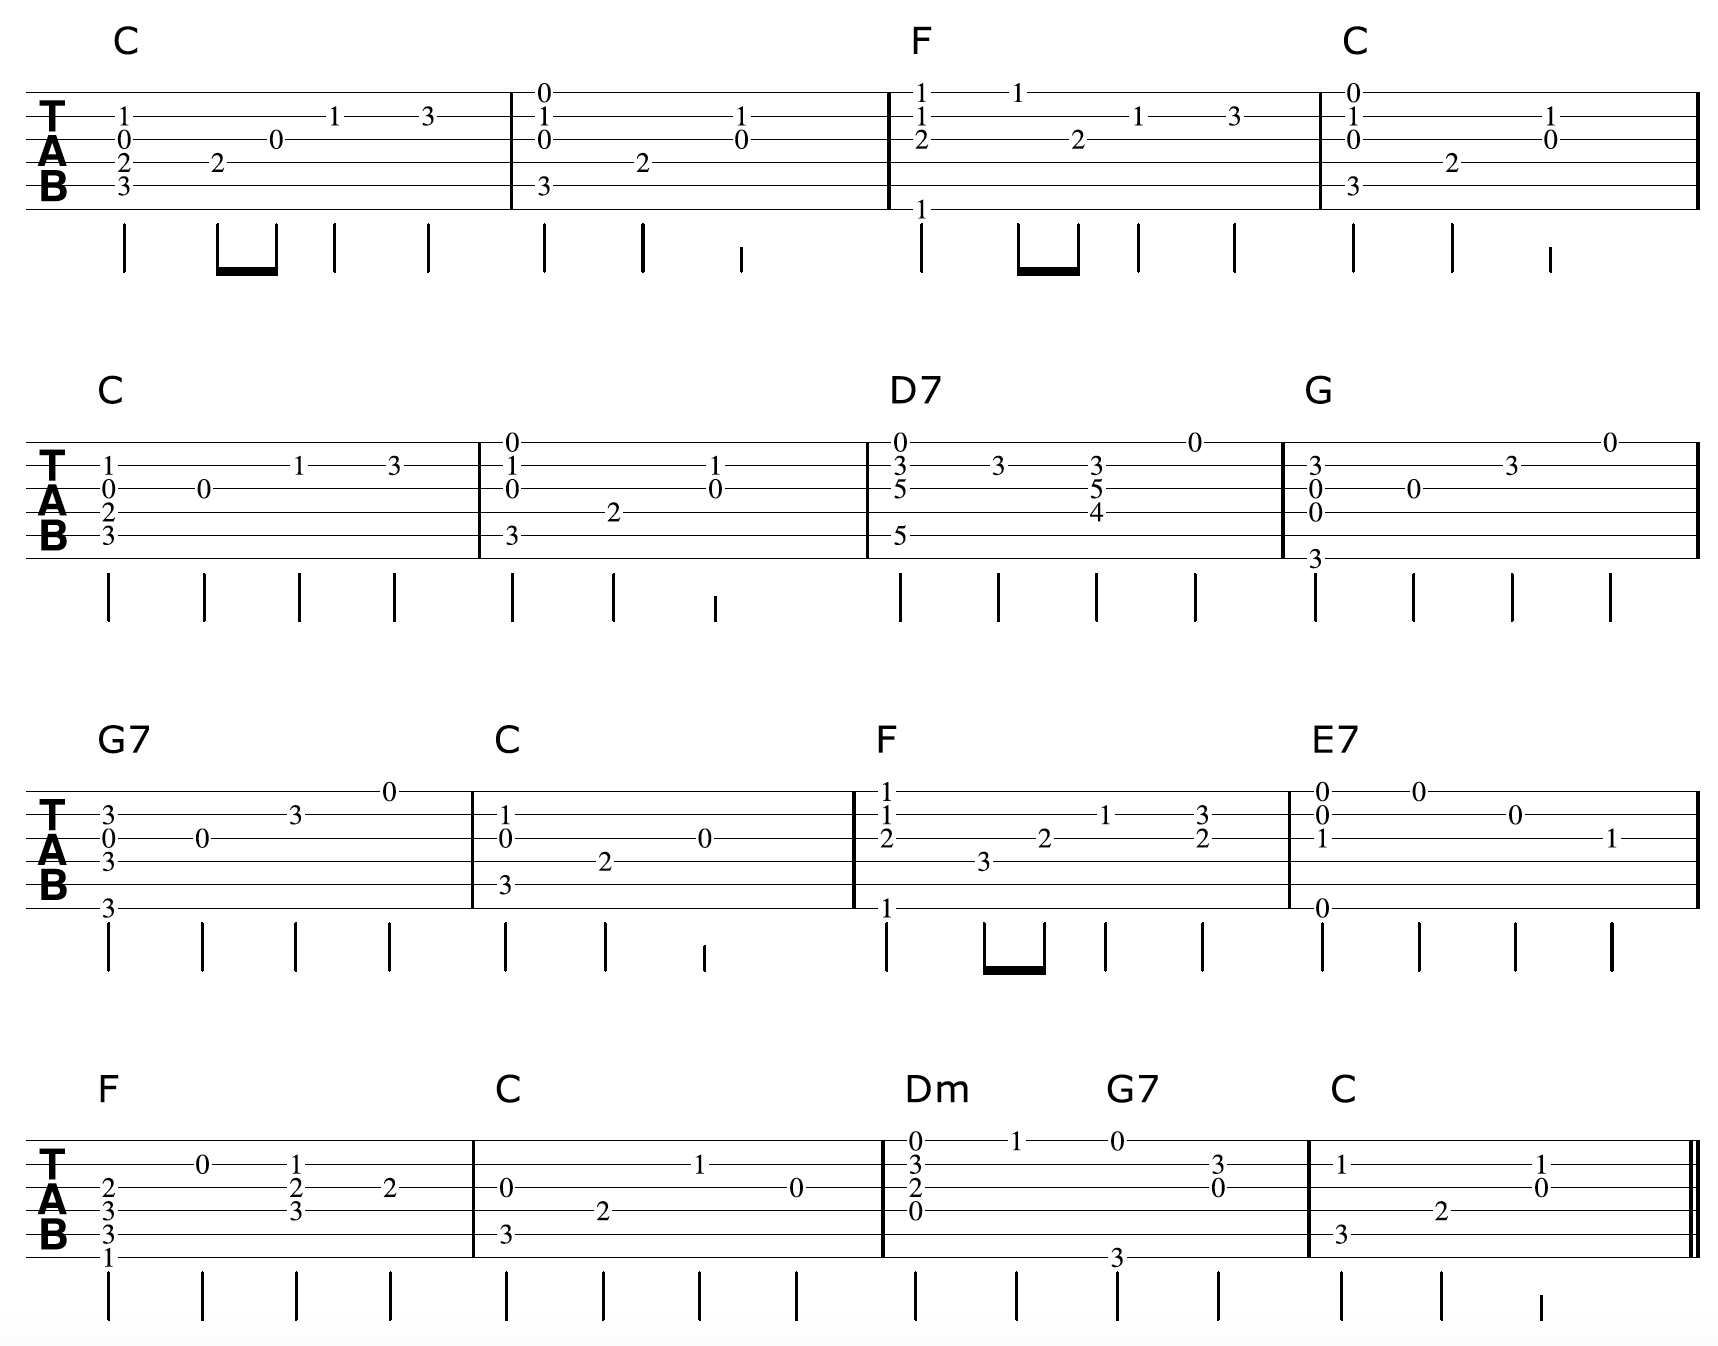
I have made some changes to the arrangement above to make the chords and melody flow more naturally. Specifically, I have arpeggiated the chords in bars 8, 9, 11, and 12 to add some richness to the sound.
Learn more ways to create fingerpicking arrangements on guitar