How To Turn One Simple Fingerpicking Idea Into A Full Blues
by Simon Candy
 You might already know several fingerpicking patterns, riffs and techniques, yet still struggle to turn them into something that sounds like a complete piece of music.
That’s a common gap. Learning individual ideas is one thing. Knowing how to connect those ideas together is something else entirely.
A simple fingerstyle blues guitar arrangement is a great way to bridge that gap because you don’t actually need very much material. With one basic riff, a steady bass and a simple 12-bar blues structure, you can create something that sounds full and complete on one guitar.
Better still, once you understand how the pieces fit together, the same approach becomes a template for creating your own variations.
In this lesson, you’ll learn how to:
- Turn a simple fingerpicking riff into a complete piece of music
- Make one guitar sound fuller with a steady bass
- Get more mileage from the fingerpicking ideas you already know
- Use the same framework to start creating your own blues
Watch the video below to learn more:
Start With A Simple 12-Bar Fingerstyle Blues
The backdrop for this arrangement is a 12-bar blues in E as follows:
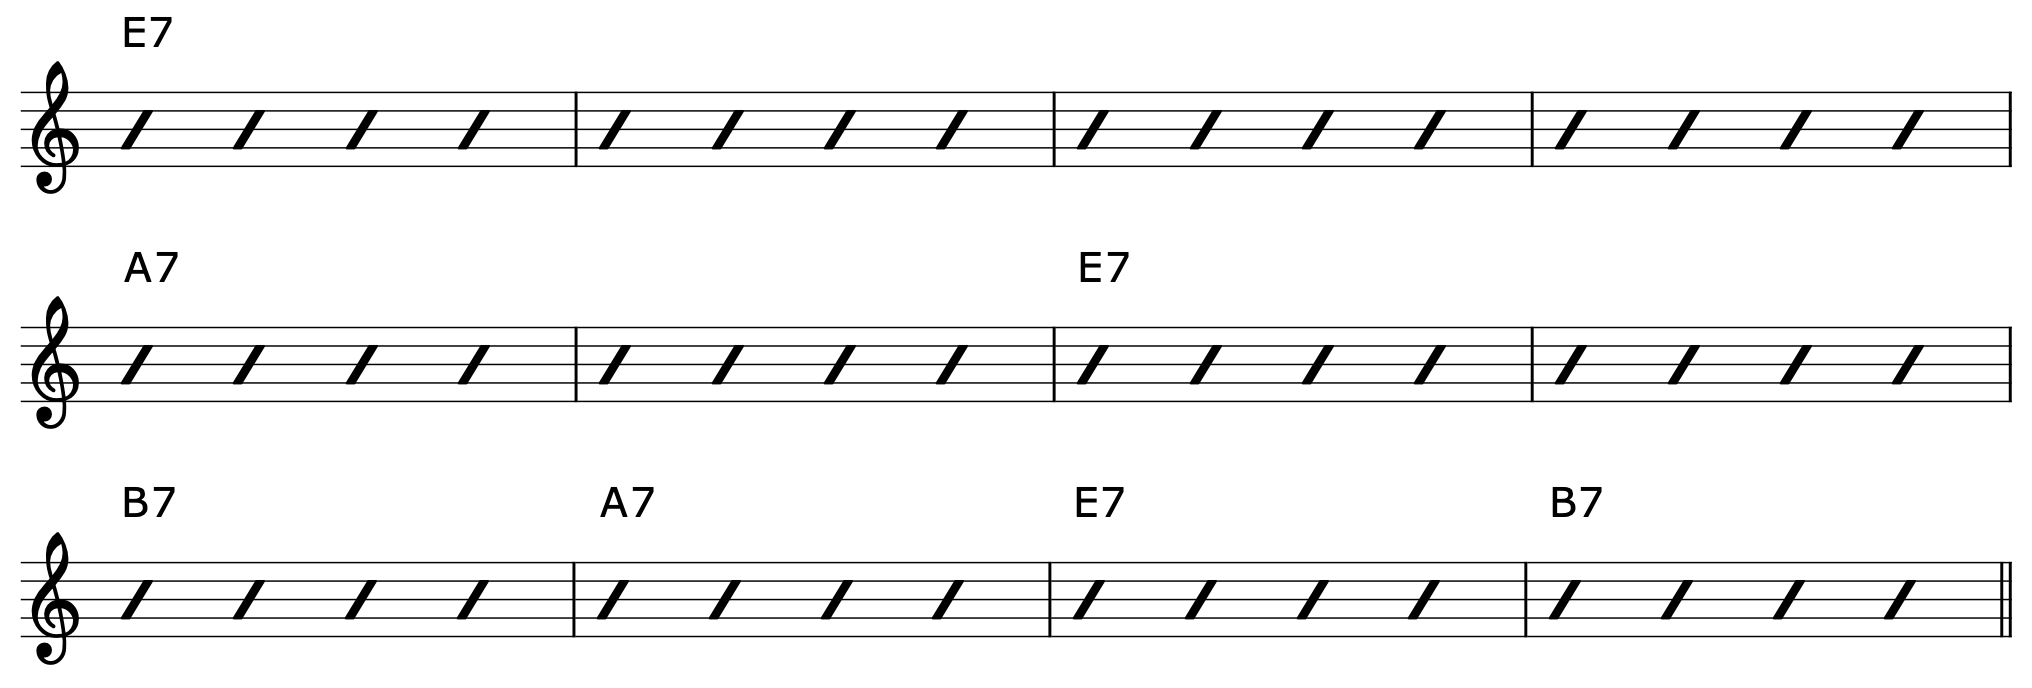
You don’t need to get caught up in the theory behind this. What matters is that the structure gives you somewhere to put your fingerpicking ideas.
Instead of having a collection of disconnected riffs, you now have a framework that turns those ideas into a piece of music.
Build The Blues Around A Steady Bass
There are really only two things happening through most of this easy fingerstyle blues arrangement.
The first is the bass.
Your thumb plays steady quarter notes like so:

The string changes depending on the chord, but the rhythm remains the same.
Over E7, your thumb plays the open low E string. When the progression moves to A7, your thumb moves to the open A string.
This steady bass fingerpicking gives the arrangement its groove and creates the foundation underneath everything your fingers are doing.
The second part is a short two-bar riff taken from the open E minor pentatonic scale:

Play the riff by itself first. Once you have it comfortably under your fingers, place it over the steady bass like so:

Neither part is particularly difficult in isolation. The challenge is keeping your thumb steady while your fingers play the riff independently above it.
That independence is what starts making one guitar sound much bigger.
Use One Riff Across The First 8 Bars
One of the most useful things about this approach is that you don’t need a different riff for every chord.
For the opening four bars of E7, play the two-bar riff twice while your thumb keeps the low E bass going underneath.
When the progression moves to A7 for bars five and six, keep exactly the same riff.
The only thing that changes is your bass.
Move your thumb from the low E string to the open A string and continue playing the same steady quarter-note groove.
Then, for bars seven and eight, return your thumb to the low E string as the progression moves back to E7.
Here is how this looks:
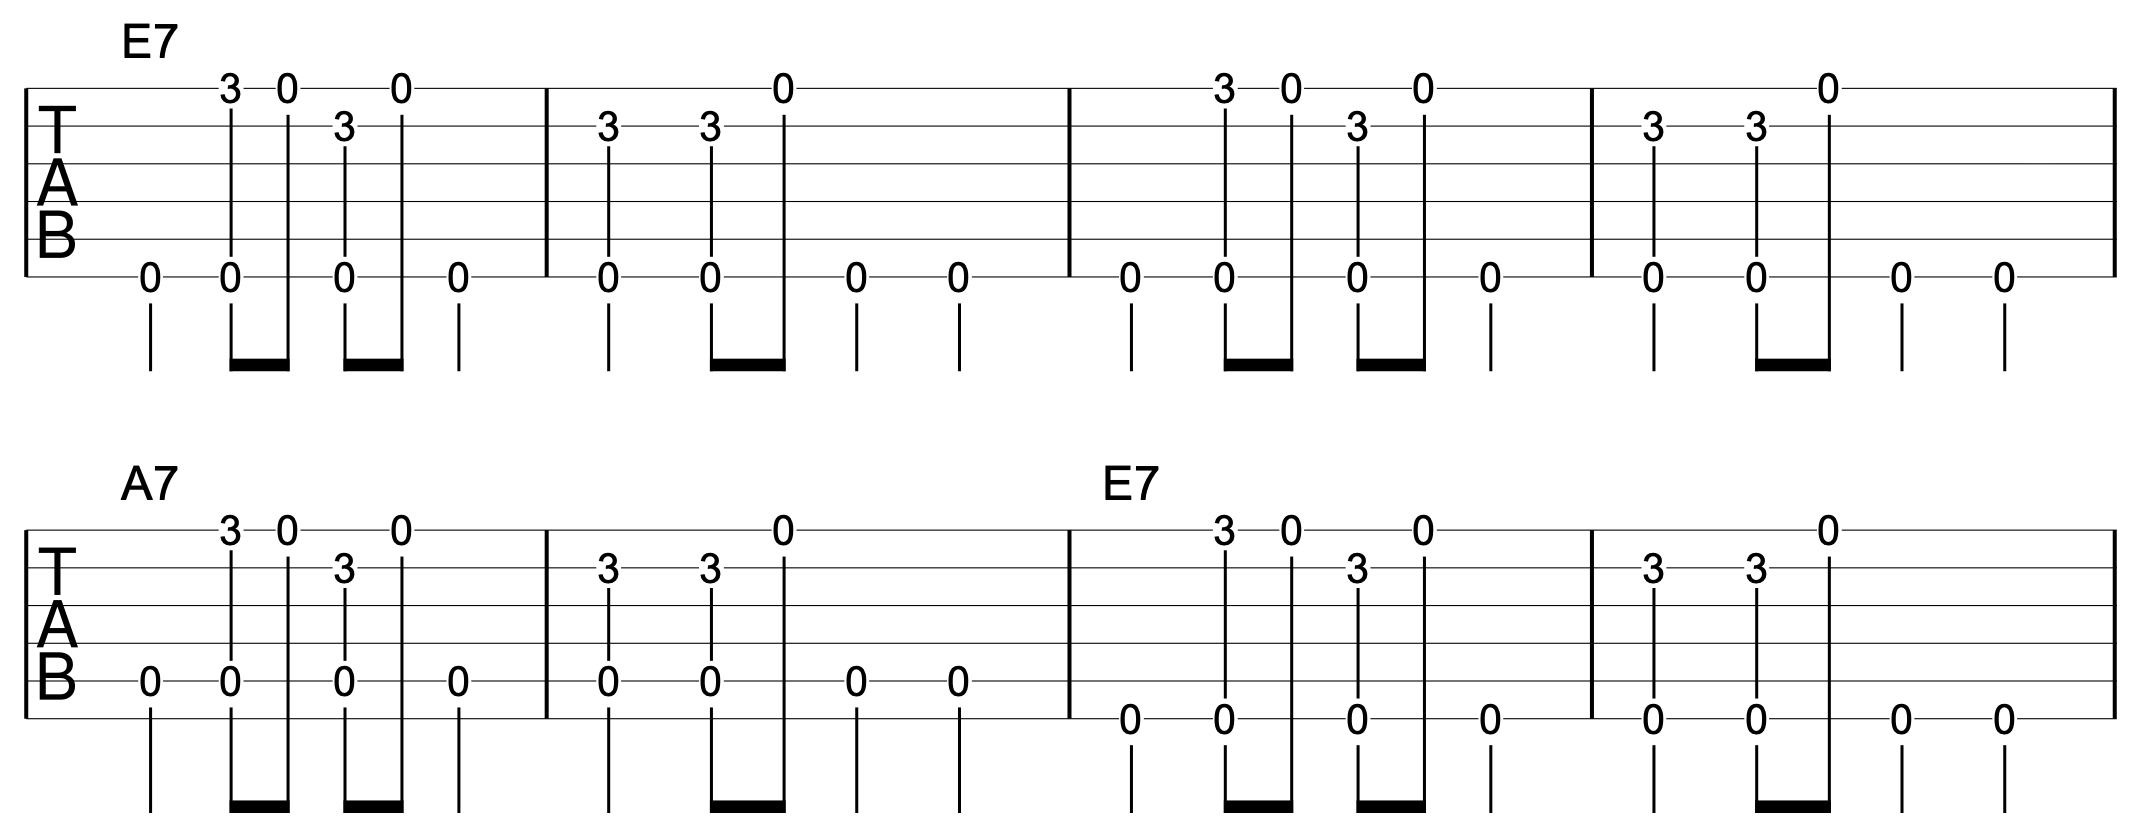
You’ve now covered eight bars of the blues using one riff and two open bass strings.
It’s a good example of how you can get a lot of music from very little material.
Add Contrast To Your Fingerpicking Blues
The final four bars give you an opportunity to change things slightly.
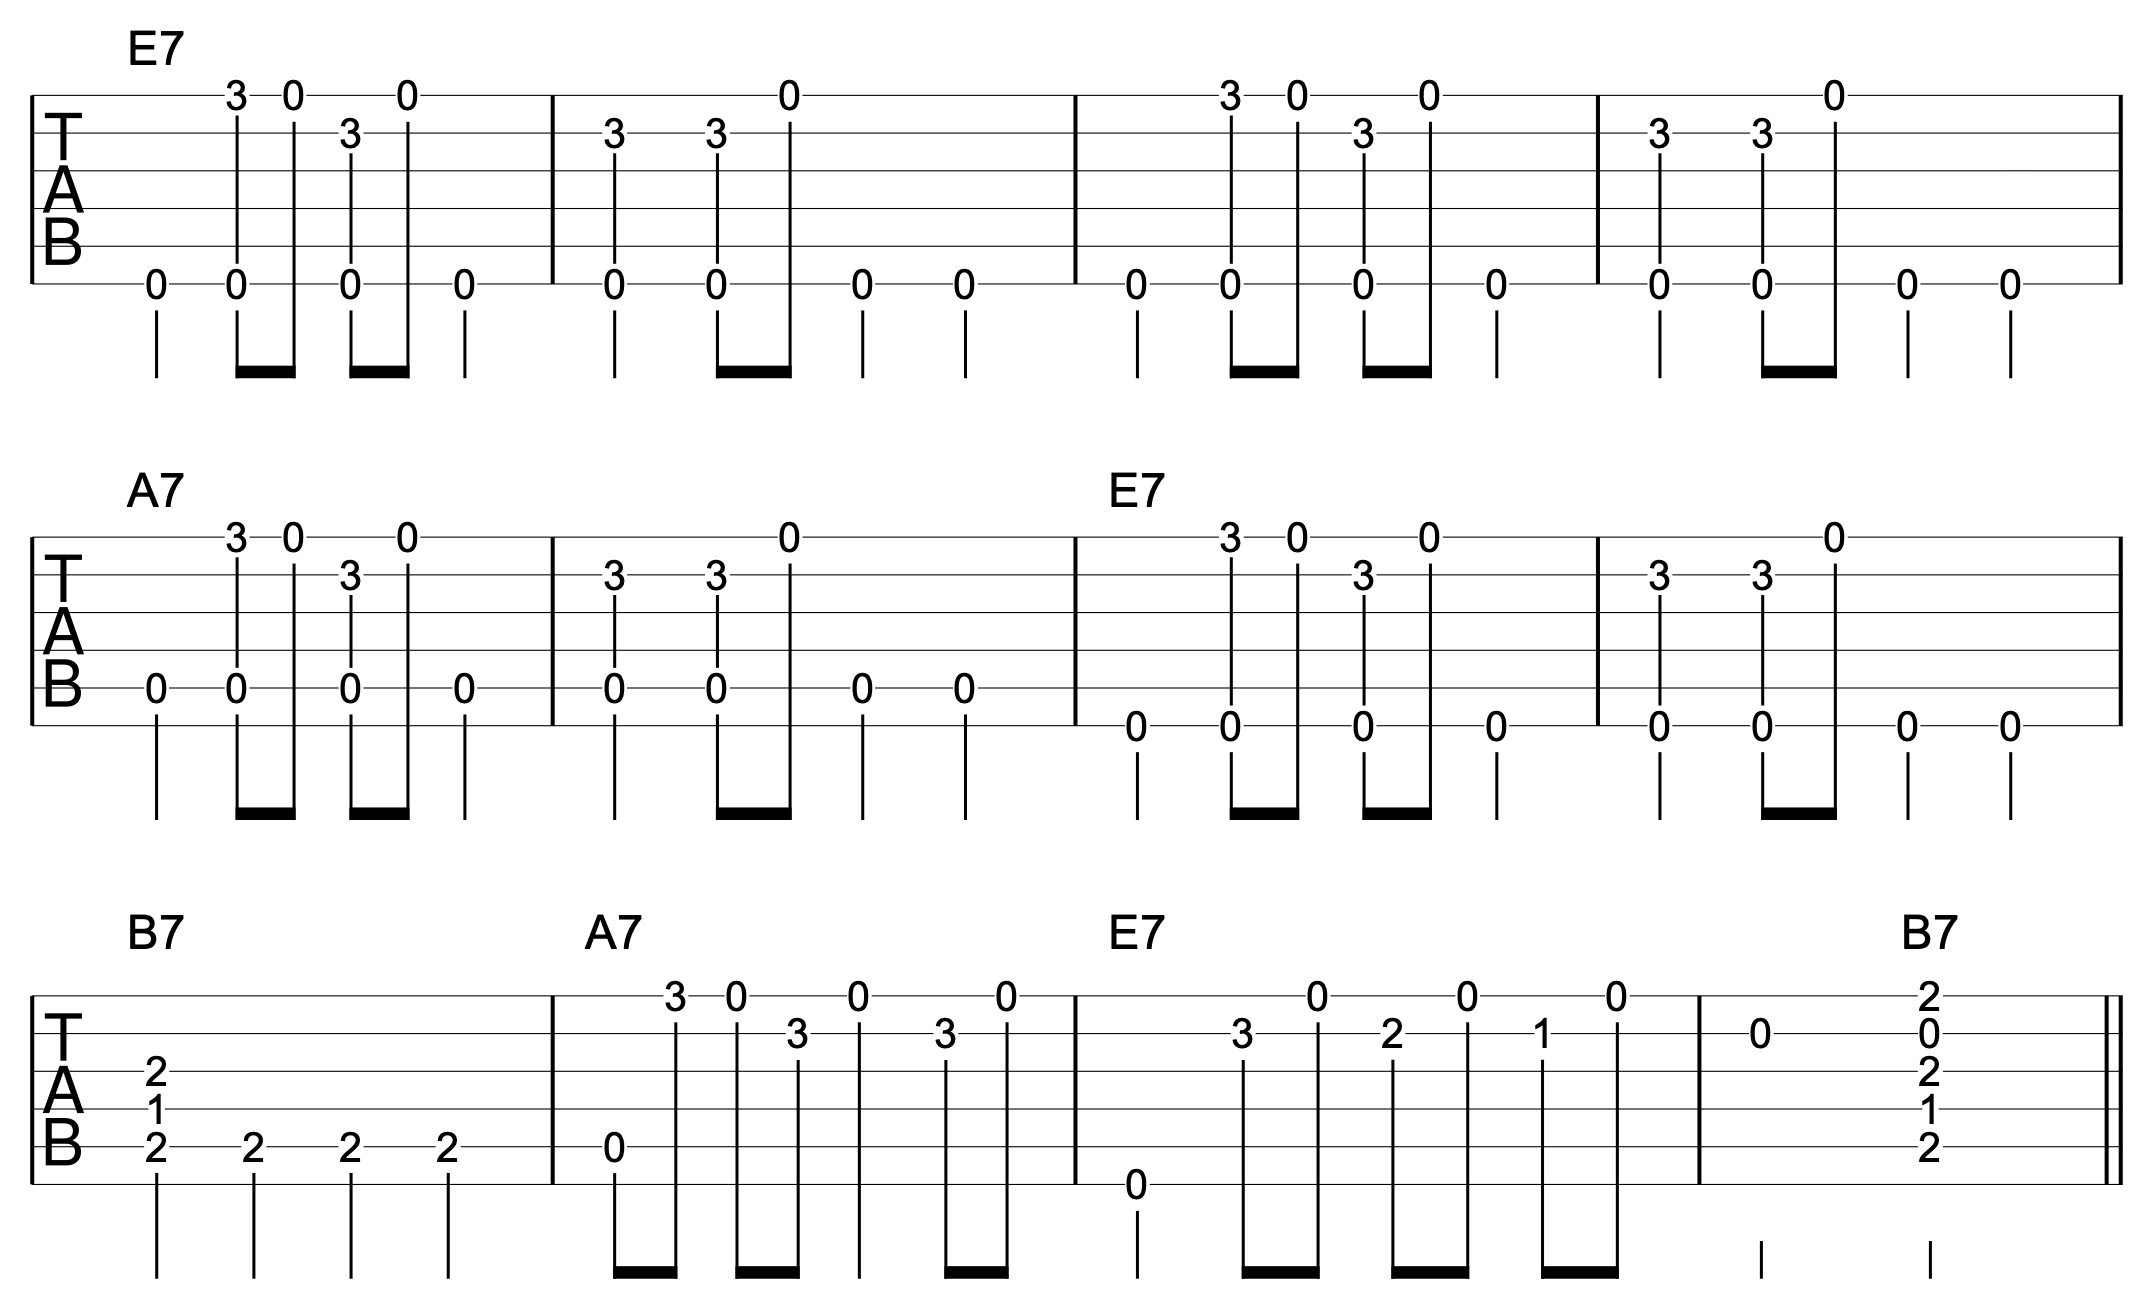
Bar nine moves to B7. Here, play the lower part of the B7 chord while maintaining the same steady quarter-note bass feel:

Then something interesting happens in bar ten.
After spending most of the arrangement establishing the steady bass, briefly take it away.
Hit the low A note and allow it to ring while you play a short variation of the riff above it:

That small break from the regular bass pattern creates contrast.
A steady groove doesn’t mean everything has to remain identical from beginning to end. Briefly breaking an established pattern can make the music more interesting because you’ve already created an expectation in the listener’s ear.
Taking the bass away momentarily gives the arrangement some breathing room before the final turnaround.
Finish With A Simple Blues Turnaround
The final two bars contain the turnaround.
A turnaround does exactly what its name suggests: it turns the music around and leads you back to the beginning of the blues.
Here, you can keep it very simple.
Start with the low E string, add a small descending line on the second string and finish on B7.
From there, you can either return to E7 and play another 12 bars or resolve the piece and finish:

Turnarounds can become quite elaborate, but there’s no need for that here. A simple, familiar phrase does the job perfectly well and gives your acoustic fingerstyle blues a satisfying sense of direction.
You now have a complete blues built largely from one riff, a steady bass and a turnaround.
Here is our blues arrangement in its entirety:
Turn The Arrangement Into A Template
This is where the idea becomes much more useful.
Instead of treating the arrangement as one piece that you learn and repeat forever, think of it as a template.
Create another simple two-bar riff from the same E minor pentatonic area and plug it into exactly the same structure.
Play your new riff over the low E bass for E7. Keep the riff unchanged when you move to A7, but switch your thumb to the open A string.
When you reach the final four bars, keep the B7 section, A7 variation and turnaround exactly as they were before.
Here is how that looks:
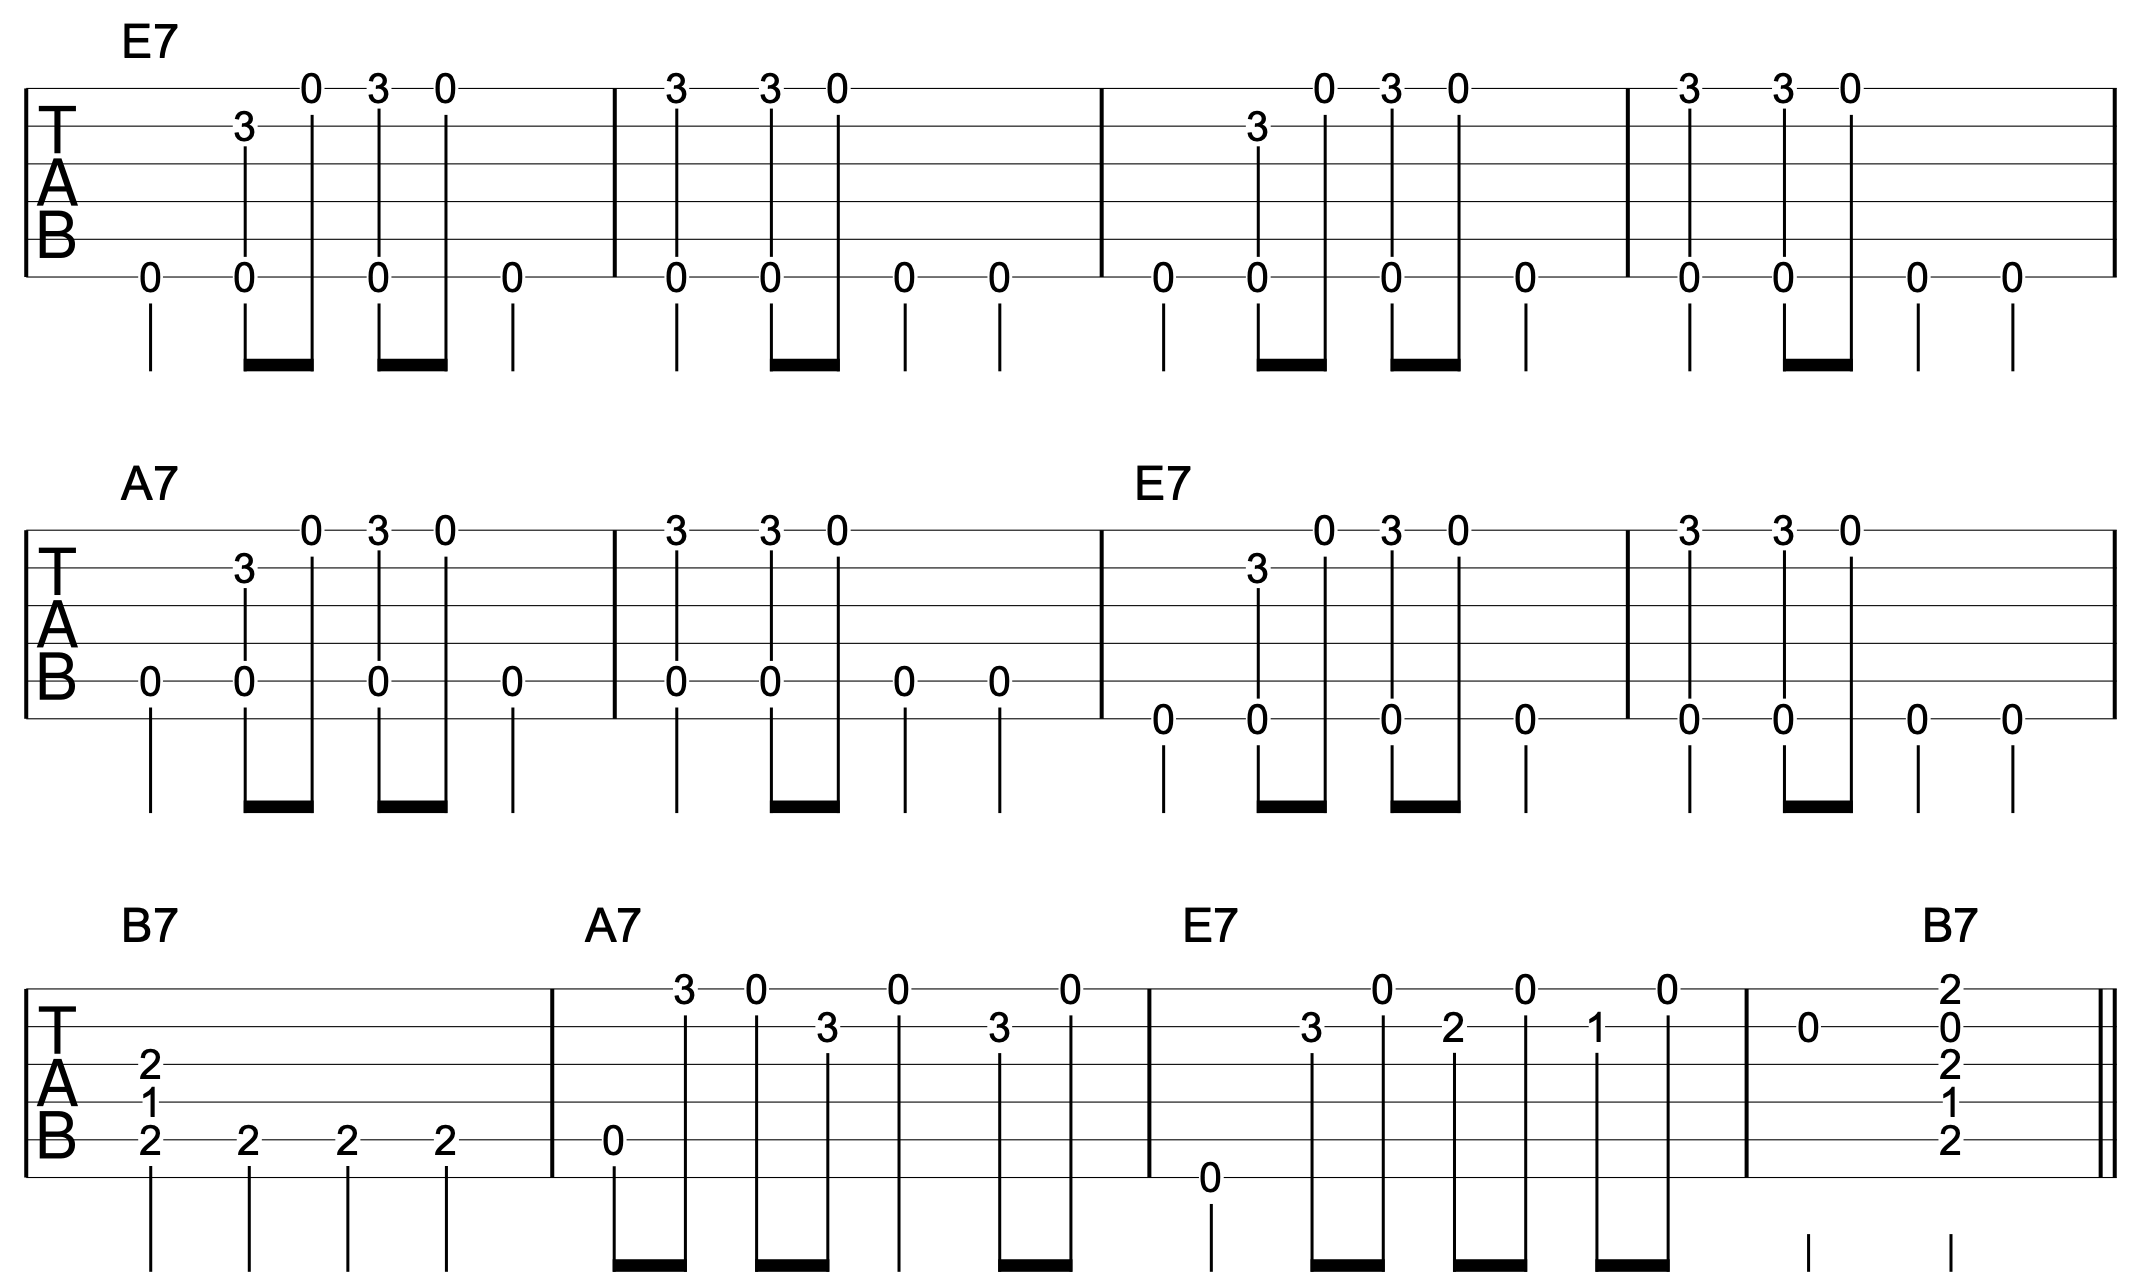
You now have another chorus of fingerpicking blues without having to learn an entirely new arrangement.
Create a third riff, and you have three choruses that can be played back to back.
Suddenly, one simple arrangement has become something much longer and more varied.
Watch the video above for another example of this.
Start Creating Your Own Fingerstyle Blues
Spend some time getting the original riff coordinated with the bass first. Your thumb needs to remain steady enough that you don’t lose the groove when your fingers become busy.
But don’t stop at copying the example.
Once the structure feels comfortable, come up with a small riff of your own. It doesn’t need to be clever or complicated. A few notes with a rhythm you like are enough.
Put it over the low E and A bass notes, then lead into the same final four bars and turnaround.
That’s the real value of this approach.
You’re no longer simply collecting fingerpicking exercises or memorising someone else’s arrangement. You have a simple framework for taking your own ideas and turning them into music.
And you don’t need much to make it work.
One riff, a steady bass and a simple blues structure can be enough to create a fingerstyle piece that sounds full and complete on one guitar.
Frequently Asked Questions
Is fingerstyle blues guitar difficult to learn?
It doesn’t have to be. Start with a simple bass and riff separately before combining them. Keeping the material simple allows you to focus on coordination and groove rather than trying to play too much at once.
How do I keep my thumb steady when fingerpicking?
Practise the bass part by itself until the quarter-note pulse feels automatic. Then add the upper notes gradually without allowing your thumb to change speed or follow the rhythm of your fingers.
What is a 12-bar blues on guitar?
A 12-bar blues is a chord progression lasting 12 bars, usually built around three main chords. In this lesson, those chords are E7, A7 and B7.
Can I use the same fingerpicking riff over different chords?
Yes. This lesson demonstrates how the same riff can work across E7 and A7 simply by changing the bass note underneath it. This is an easy way to create more music from a small amount of material.
How can I create my own fingerstyle blues?
Start with a simple 12-bar structure and steady bass, then create a short riff you can repeat over the progression. Once that works, create additional riffs and use the same structure to build several different choruses.
Other Lessons You Might Like
Explore these related lessons to continue building your guitar skills:
Fingerstyle Picking Hand Position
A comfortable picking-hand position makes it much easier to keep the bass steady while your fingers play independently. Start here if coordinating the two parts feels awkward.
Fingerpicking Fluency and Accuracy
These exercises will help improve the control and coordination needed to play fingerpicking patterns cleanly without losing the groove.
Easy Fingerstyle Blues Guitar
Take the blues idea further with another practical fingerstyle approach that helps you create a fuller sound on one guitar.
Easy Guitar Fingerpicking Patterns
Build your vocabulary with simple fingerpicking patterns you can apply to chord progressions, songs and your own arrangements.
Fundamental Fingerpicking Guitar Techniques
Strengthen the core fingerpicking skills that make arrangements like this easier to play cleanly, steadily and musically.
 Discover 5 Easy Fingerpicking Hacks
Learn five simple ways to make fingerpicking feel easier and help your playing sound more musical.