How to Play Thousands Of Songs With The Travis Picking Pattern
by Simon Candy
 Today's lesson is all about a fingerpicking pattern that can be used over and over again in many, many different playing situations.
Once you have the basics of this pattern down, you will find it easy to create lots of variations, further extending its use and possibilities in your own guitar playing.
This particular fingerpicking pattern can be heard in thousands of songs such as “Landslide” (Fleetwood Mac), Dust In The Wind (Kansas), The Boxer (Simon & Garfunkel) and many more.
What is it?
It is the Travis Picking pattern. The video below will reinforce and further train the concepts taught in this article, so bookmark it to check out after working through this lesson:
The Travis Picking Pattern
Your reference point for the travis picking pattern is the bass, as it consistently falls on the downbeat (1, 2, 3, 4 etc), and is played with the thumb of your picking hand.
If we take a C open chord for example, and apply the bass component of the travis picking pattern in isolation, it looks like this:

In the example above I am simply alternating between the root of the chord on the 5th string (C) and the 3rd of the chord on the 4th string (E) with my thumb picking each note throughout.
Once we have the bass down, we simply add combinations of higher notes/strings in-between the bass hits, on the off beats. Here is one very common pattern, again using a C open chord:

Notice the bass part has not changed. It remains on the beat, alternating between the 5th and 4th strings while my fingers play combinations of the 2nd and 3rd strings of the chord on the off beats.
This in essence is the travis picking pattern.
It’s that simple!
We can take this a step further, however by creating a variation in the bass. The previous pattern we used is what is sometimes referred to as a 5 4 5 4 pattern. This is in reference to the bass strings and the order in which they are plucked.
The following is known as a 5 4 6 4 pattern, as we are now going to add more movement by bringing the 6th string into our bass, like so:

And here is our 5 4 6 4 bass with the higher strings of the chord added in as per the first example:

Both of these bass patterns are suitable to use, and sometimes one will be more appropriate than the other depending on the situation.
However, note that the 5-4-6-4 pattern requires a little more effort from your thumb, so take your time with it.
Once you have mastered these bass patterns, you can apply the travis picking pattern to any chord you wish. Just make sure to adjust the pattern to fit the specific chord you are playing.
For example, if I was to apply this pattern to a G chord, I would need to start it from the 6th string because this is where the root note of a G chord is (You want to always start the bass pattern from the root note of the chord to which it is being applied).
So I could apply my travis picking pattern to the G chord with a 6 4 6 4 bass.
First, here is the bass in isolation:

And the complete pattern:

Or I could use a 6 4 5 4 bass pattern, again in reference to the order in which my thumb is plucking the lower strings of the chord.
Here is the bass pattern in isolation:

And the complete pattern:

Travis Picking Pattern Application
After practising the travis picking pattern on individual chords, it is time to apply the pattern to a chord progression. It is recommended to try this on many progressions until it becomes a natural part of your guitar playing.
To get started, here is an example of a progression.
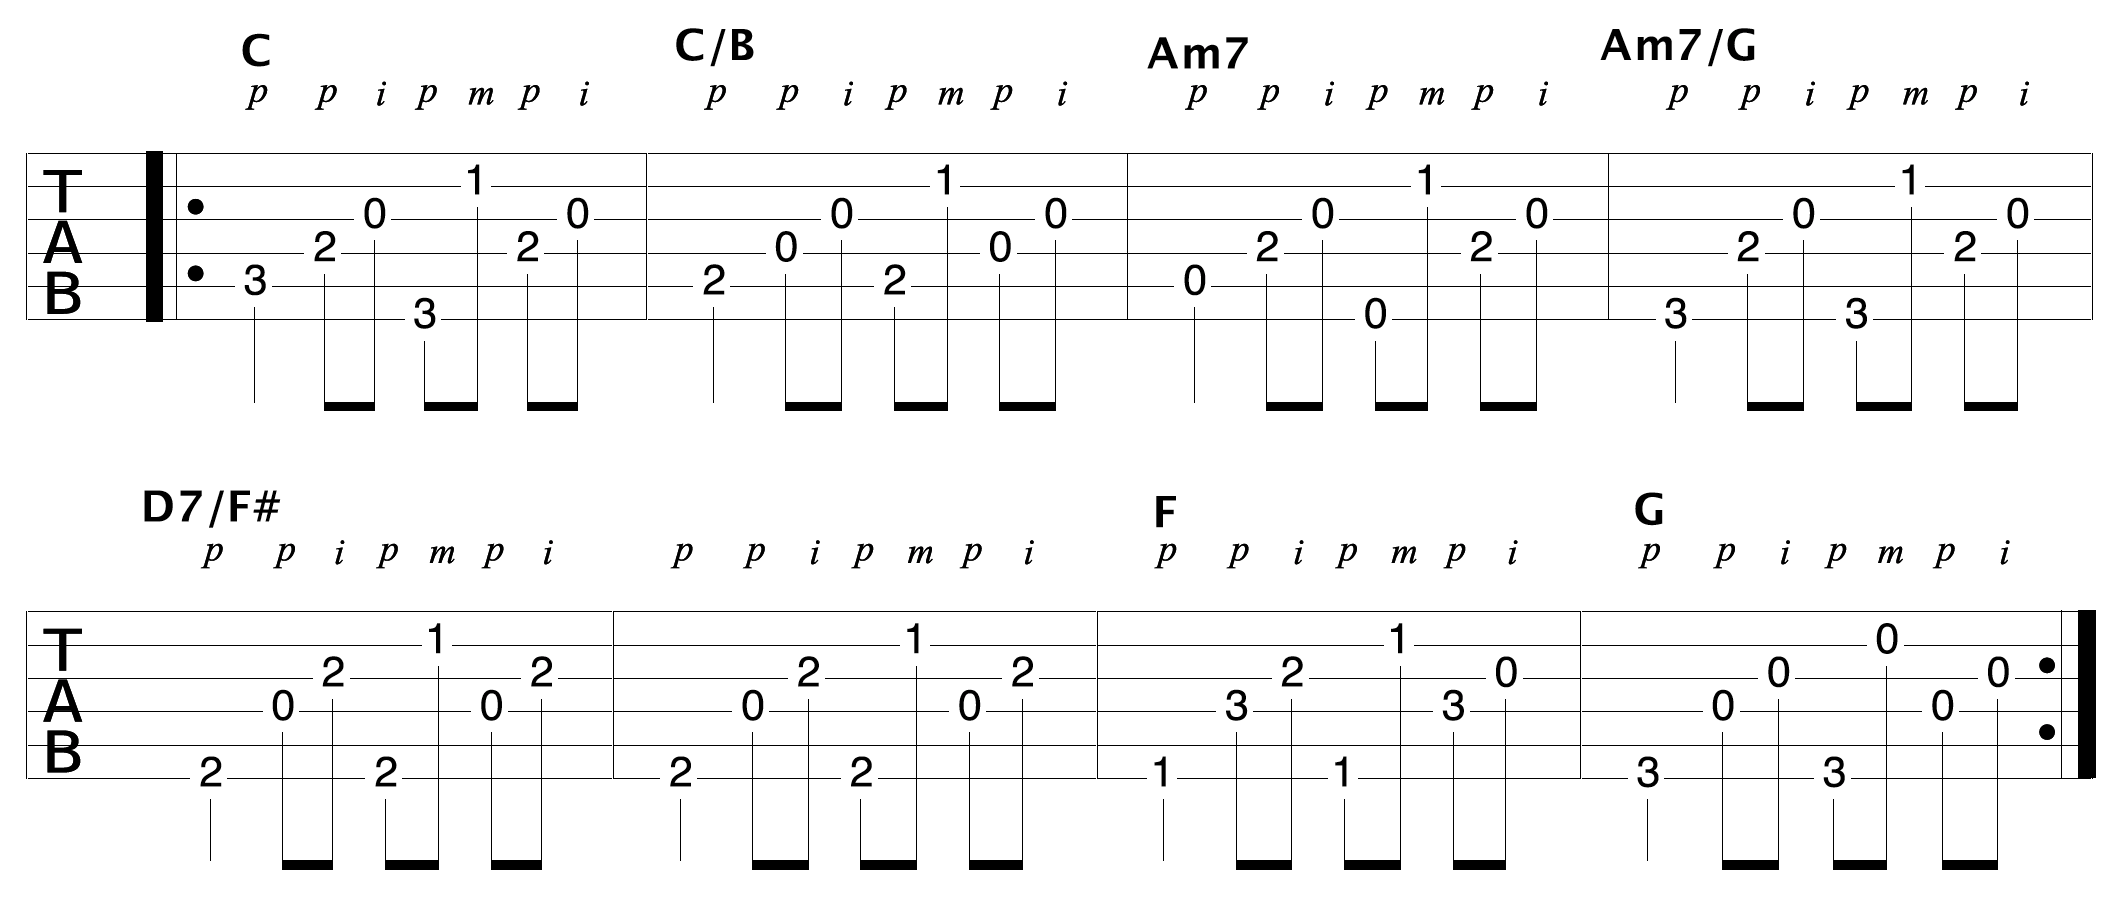
In the example above, I am using slash chords to create nice voice leading between the shapes I am using. Slash chords are great for creating smooth connections between the chords you play in a progression.
Check out the video below to learn all about slash chords:
Upgrade your fingerpicking with these 10 melodic fingerpicking patterns you can learn in 10 minutes or less
How To Create Simple But Great Sounding Fingerstyle Blues Arrangements On Guitar
By Simon Candy
 Playing a fingerstyle blues on guitar is a lot of fun to do and easier than you may think. You can create your own arrangements with some basic, yet amazing-sounding fingerpicking ideas.
In today’s lesson, I share some of these ideas with you. We will focus on an approach that allows you to play both the melody and accompaniment parts of a blues tune simultaneously.
Once you get the hang of this technique, it will be effortless, sound impressive, and make your listener believe that there is much more going on than what you are playing.
This approach involves the constant pedalling/plucking of the lower open strings with your thumb, while your fingers play riffs and melodies on the higher strings. The lower open string you are plucking will imply a chord of some sort, depending on what you are playing on the higher strings.
Watch the video below as I break down the process of creating a fingerstyle blues arrangement in 5 simple steps. Below the video are the examples I cover including detailed explanations of each part of the process:
Step 1: The Pentatonic Scale
Ok, to begin developing this skill I am going to use the following partial pentatonic scale in the key of Em. This is a combination of both pattern 1 and pattern 2 on the top 4 strings of your guitar:

Step 2: Adding The Low E Open String
Next, I want you to play this scale on the beat, using a quarter note rhythm, and with every note of the scale pluck the low open E string with your thumb like this:

Step 3: Swinging 8th Notes
Let’s now do the same thing, only this time your thumb will play a swinging 8th note rhythm on the low E string, while you continue to play the scale with a quarter note rhythm like this:

Be patient, this drill is a little more challenging because your thumb and fingers have different rhythms to play.
For the most part, I am palm muting the low open E string. This is done so the notes of the scale stand out in contrast to the pedalling bass note.
Step 4: Riffs And Melodies
• Blues Riff 1
Ok, so now you have the basic idea, and some drills to help develop this technique, we need a riff for our fingers to play on the higher strings while our thumb continues to pluck the low open E string.
Here is one that comes from our pentatonic scale:

While playing this riff, I am going to get my thumb to pick a constant 8th note rhythm on the low open E string, as I did with the scale, like this:

As a result, you get both the riff and your thumb creating the accompaniment to that riff.
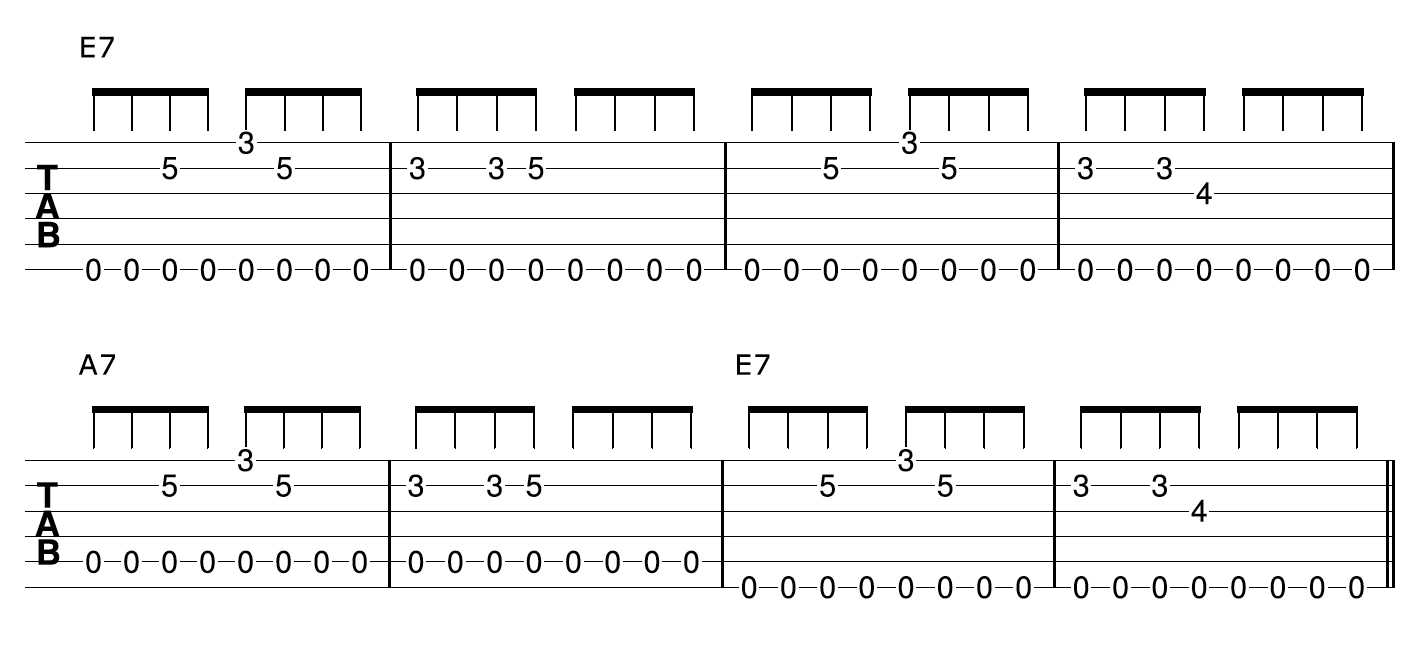
In this case, the open E string is implying an E7 chord, the I chord of a blues.
Now, by simply switching the thumb to the open A string we can now play the same riff over what will be an implied A7 chord, the IV chord of a blues in E, like this:

With our thumb plucking/pedalling both the E and A open strings, we can now play the first 8 bars of an E blues, like so:
• Blues Riff 2
To reinforce the idea, let's use another riff from the pentatonic scale:

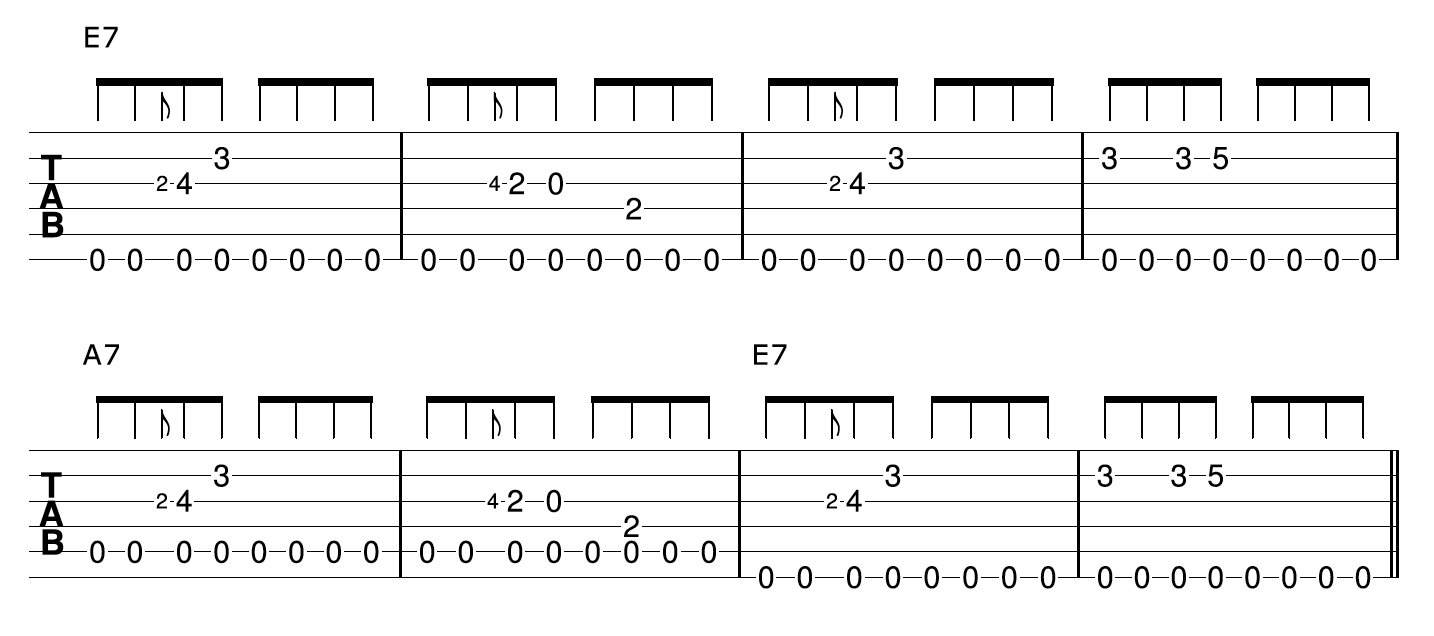
As we did with the first riff, we simply get the thumb to pick the 8th note rhythm on the low E string to imply the E7 chord while playing the riff on the higher strings:

And then on the 5th string to imply the A7 chord:

We can organize the first riff to cover the opening 8 bars of a typical 12-bar blues in E, just as we did before:
Step 5: The B7 Chord
When playing a 12-bar blues in E, the E7 and A7 chords are the most commonly used, but the B7 chord needs to also be included if you want to play through the entire 12 bars using the fingerpicking approach.
However, unlike the E7 and A7 chords, we don't have an open B string to use as a bass pedal. This is not a problem though, as the pedal tone does not necessarily have to be an open string. It's just that open strings make things easier and more preferable if available.
For the B7 we can simply hold the open B7 chord and pedal the root note (2nd fret, 5th string) as we play a simple melody on top like this:

Once we have our B7 chord sorted, we now have everything we need to play through a complete chorus of an E blues fingerpicking both the melody and accompaniment.
Here is an example using a combination of the riffs we worked with above:
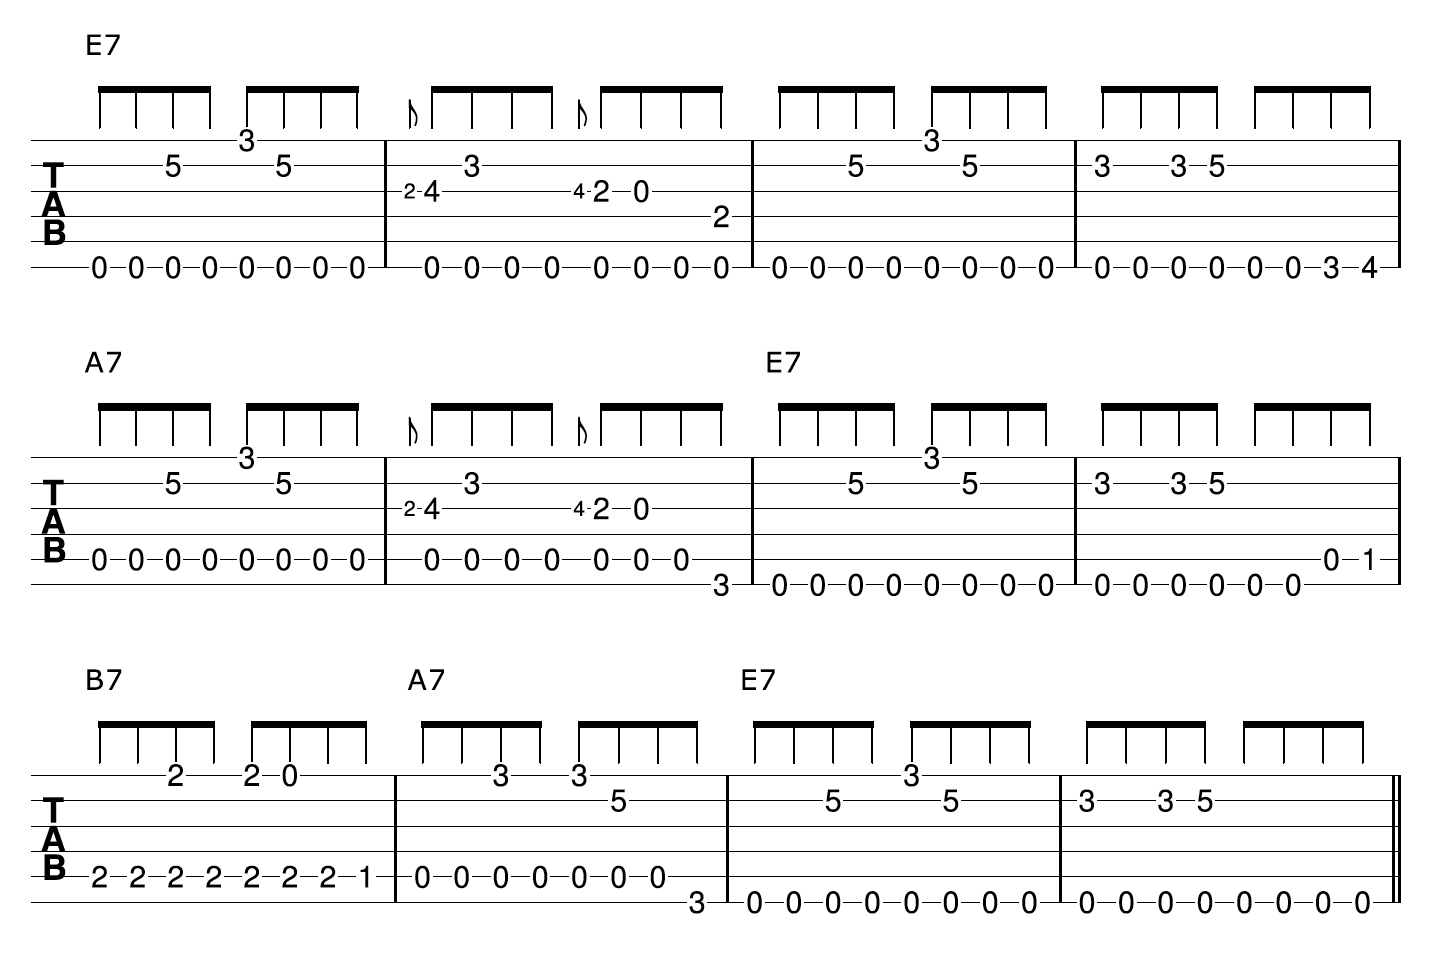
As you can hear, the pedalling of a lower bass note can be very effective when combined with riffs and melodies played on the higher strings. It can add a lot of depth and interest to a piece of music. Additionally, I included a few bass note connections between the changes of the blues I played earlier to add even more interest and movement to the piece.
For more ways to play fingerstyle blues on guitar check out the video below. In it, you learn 3 ways to fingerpick your way through a blues including chord embellishment approaches, travis picking and block chords:
Learn more ways to create your own fingerstyle blues arrangements on guitar
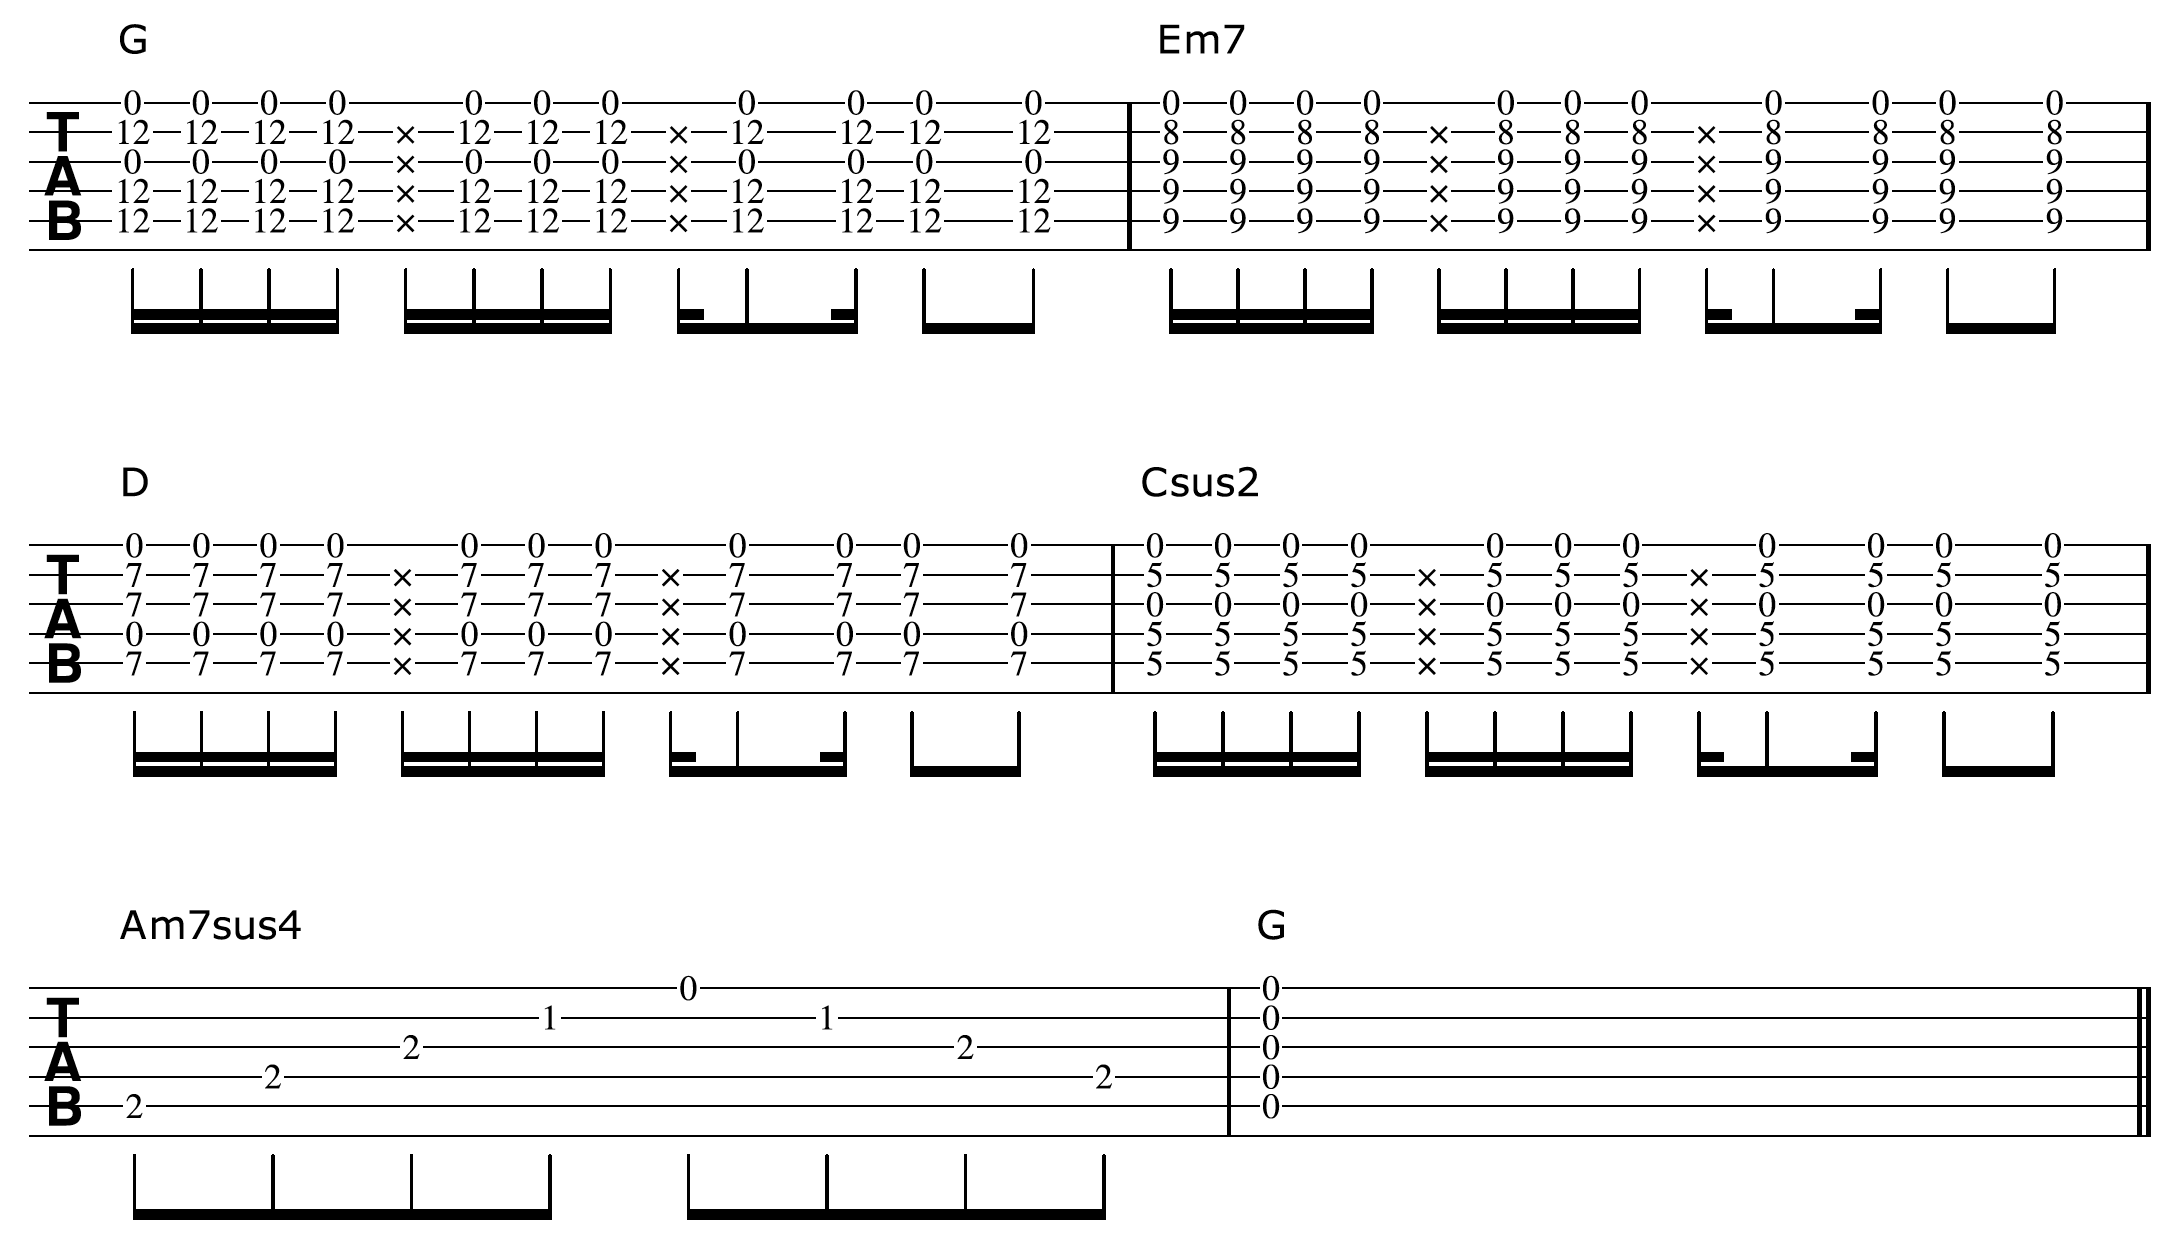
How To Sound Amazing Playing Chords On Your Guitar In Open G Tuning
by Simon Candy
 There are many cool and unique open tunings for your guitar playing that will open up all sorts of possibilities that just aren’t available to you in standard tuning. Open G tuning is one of these, and today we are going to take a close up look at chords in this tuning.
Before you decide that playing in open tunings sounds too hard, and that playing in standard is challenging enough, just understand that open tunings are created to make things EASIER to play, NOT harder. If you can play guitar to a reasonable standard, then you can most definitely be sounding great in a tuning like open G immediately!
I will prove this to you today by showing you how easy it is, and how cool you can sound right away playing chords in an open G tuning on your guitar.
What Is Open G Tuning
Before we do however, let’s first take a little bit of a closer look at open g tuning. Despite it’s popularity and association with the blues, this tuning can be traced back as far as 1830 to a piece called “Spanish Fandango”, and is why it is sometimes referred to as “spanish tuning”.
It falls into the category of “open” tunings, where some of the open strings of the guitar are tuned to different notes to create a particular chord when strumming them together.
Here is how open g compares to standard and what you need to do to alter your guitar to this tuning:

* Bolded notes are strings that have been altered from standard tuning
As you can see, to achieve an open g tuning, you simply change the 6th, 5th, and 1st strings of your guitar to a D, G, and D note respectively. The 4th, 3rd, and 2nd strings remain unchanged.
Our open strings now contain G, B, and D notes exclusively, which just happen to be the 3 notes that make up a G major chord:
G Major = G B D
Strumming all open strings together now gives you a G major chord.
Don’t Avoid Open Tunings Like I Did
 There was a time when I would avoid anything that was in an open tuning like the plague.
I had a false premise that open tunings were difficult to play in, changing the way I had come to know and visualise the fretboard.
To me, I thought it would be like starting the guitar all over again and certainly not something I wanted to do. How wrong I was, and how much I missed out on because of, HOW WRONG I WAS!
Tunings such as open g will:
• Enhance and borden your creativity on the guitar
• Increase the scope of sound available to you on the guitar
• Make other open tunings so much easier to learn and create with
Don’t make the same mistake I did, open tunings are not only fun to play in, they are easy to play in too, as I am about to show you. You will see, like I did, that you can sound great straight away in an open g tuning, even with just entry level guitar skills.
Chords In Open G Tuning
 The following are 3 ways you can create with chords in an open g tuning on your guitar. There are many more, however these will give you a great head start into the wonderful world of open tunings.
Learn them well, and then use these ideas to come up with your own creations and variations. This is essential to do to really make open g tuning part of your guitar playing.
Single Fret Bar Chords
The great thing about open tunings is that if you can sound a chord right off the bat by simply strumming the open strings of your guitar, then this holds true for when you bar a single fret.
So instead of needing the majority, if not all of your fingers, plus 3 frets to play a bar chord, you now only need 1 finger and 1 fret.
Take the following progression in open g tuning for example:
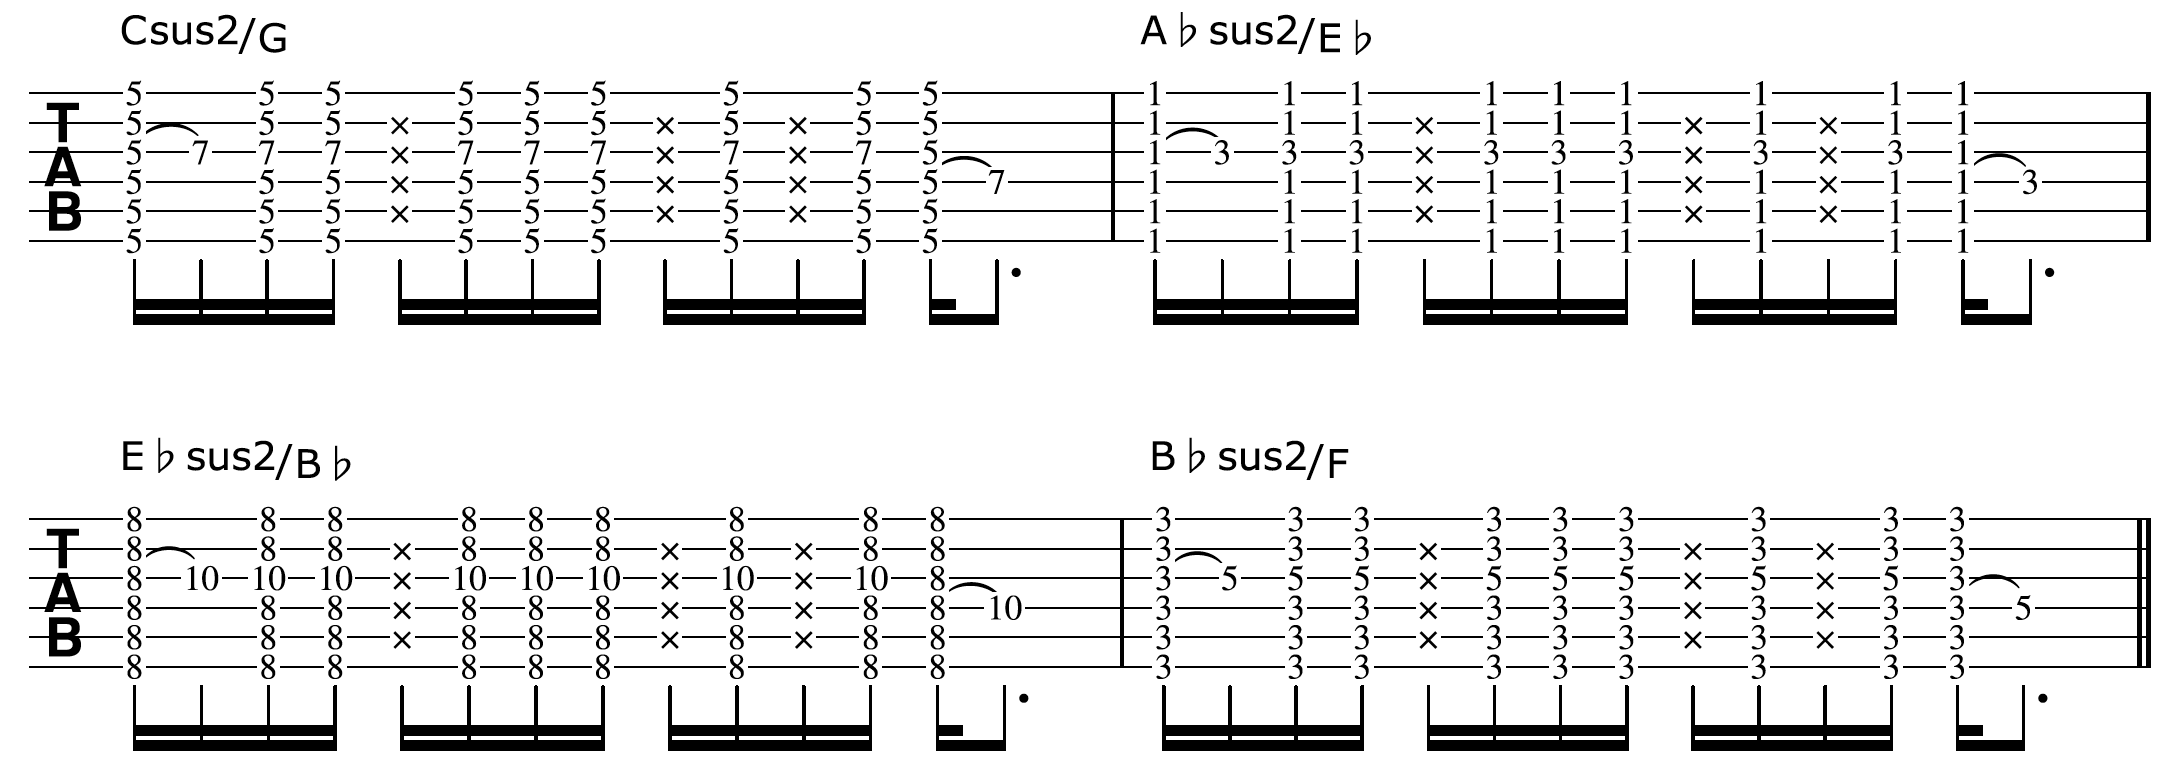
The chords above derive their name from the root note on the 5th string.
However, the 5th of each chord is also being played on the 6th string, below the root note. This results in the slash chords you see above.
Simply put, a slash chord is when the lowest note in the chord is a tone other than the root of the chord. The first note you see is the chord, the second note (to the right of the slash) is the “non root” bass note.
Due to our tuning we only need our index finger to sound these chords, resulting in the remaining fingers being free to add extensions and embellishments.
In the example above, I only need to use the ring finger of my fretting hand to apply these extensions and embellishments.
I am first hammering on the 9th of each chord before hammering on the 6th.
Doing the same thing in standard tuning would not only sound different, but be much harder to do.
Droning Open Strings
A great feature of any open tuning is the drone you get with the open strings, which you can in turn utilise in your playing.
In the following example I am running a couple of simple chord shapes down the fretboard, maintaining the drone of the open strings to give it that open g sound:
I am using my 2nd, 3rd, and 4th fingers to fret the G, Csus2, and D chord shapes above.
Notice that the G and Csus2 chords are the exact same shape, with the D only varying slightly from this.
The Em is the odd one out, and will require all 4 fingers to fret it.
The consistency of the open string drone and the various ways they relate to the fretted notes of each chord is what makes this progressions and others like it sound so cool and unique.
Harmonising In 6th’s
Let’s stick with the drone of the open strings and integrate this approach with a very common harmony used on the guitar known as 6th’s.
The great thing here is if you are already familiar with how 6th’s look on the fretboard from a visual point of view, then nothing changes in the open g tuning. This is because we’re going to play this harmony on the 2nd and 4th strings, which remain unchanged in this tuning.
Here is how the 6th harmony looks on this string set:

Your fingers are only forming one of two shapes when playing 6ths in this way.
It is best to keep your second finger on the 4th string throughout with your first and third fingers fretting the notes on the 2nd string. Which finger you use here will depend on the shape you are holding at the time.
Now let’s add the drone of the open strings to these 6th’s:

Once again we hear that awesome sound we now get with the open strings in an open g tuning ringing against the fretted notes of the 6th harmony.
Feel free to strum the above example with any kind of pattern or time/tempo you like.
There are many cool ideas you can create from these 6th’s using the droning open strings. Here is one such idea:

The idea here is to arpeggiate the 6ths (ie. play the notes of the harmony separately as opposed to together) across the drone of the G open string we now have in this tuning.
Be sure to hold each 6th harmony shape (ie. the fretted notes) of each position down at the same time so that all the notes ring throughout.
If you were to play it without holding the harmony shapes, you would not get a nice and fluent sound.
Be sure to listen to the example to hear how this sounds when holding down the 6th harmony shapes.
To solidify things in this article, plus more ways to play chords in an open g tuning, checkout the video below:
In this video you learn more ways to create great sounds using open g tuning including a very cool way to play a blues in open g that is much easier to do compared to playing the same thing in standard tuning.
To discover more awesome, advanced sounding, yet easy to play ideas using chords, melodies, and riffs in this tuning, download the acoustic guitarists guide to open g tuning
5 Ways In Which Jazz Will Make You A Better Acoustic Guitar Player
By Simon Candy
 Studying other styles of music such as jazz, will only make you a better, more rounded acoustic guitar player and musician.
To become a great guitar player, you really need to look outside of your “comfort style” so to speak. By this I mean, be open to other styles of music, such as jazz. But what if you don’t like jazz, or even have any interest in playing the style?
Strange as it may seem to you, this does not matter. There are many things you will benefit from as an acoustic guitarist by looking at various aspects of jazz guitar playing.
To be clear, I am by no means saying you have to do a 180 degree turn from your way of playing, and become a jazz guitarist. I am simply saying to be open to the style of jazz so your acoustic guitar playing can benefit.
If you study the background of your favourite guitar players you will most definitely find their style of playing, in part, will have been influenced by other styles. Think Chet Atkins, Tommy Emmanuel, and John Mayor, for example. All these players have been influenced by the style of jazz and have certainly at least dabbled in it to grab ideas and concepts they can integrate into their own style.
“Pigeon holing” yourself as a player limits your creativity and scope of playing on the guitar, running the risk of sounding like a clone of somebody else, and/or become bored and stale with your own playing.
In today’s article I am going to present to you 5 areas of your acoustic guitar playing that will improve big time by being open to and learning from the style of jazz.
Who Cares If You’re Not A Jazz Guitarist!
 Personally I love jazz! Both in playing it, and for what it has done for my guitar playing outside of the style itself. After playing guitar for 8 years, I stumbled across jazz and ended up studying it at college.
In short, this was a massive game changer for my guitar playing and I am so grateful to this day that I went down this path.
Even though I studied jazz and have played it a lot, I don’t consider myself to be a jazz guitarist and I’m certainly not saying that you need to go and study jazz at college. What I am saying is to be open to other styles of music.
Continually be on the look out for what you can grab from here and there to add to your own playing/style.
Think of everything you hear and expose yourself to as one big musical smorgasbord/buffet of food. Sure you have your favourite stuff that you’re going to have on your plate most of the time, but it’s nice to add some other things to enhance the flavour, so to speak.
5 Ways In Which Studying Jazz Will Make You A Better Acoustic Guitar Player
Below are 5 areas in which jazz will improve your acoustic guitar playing.
Do not become overwhelmed by the amount of information below.
Simply pick one area you would like to work on and improve in your playing and check out the corresponding video tutorial that accompanies it.
I still work on each and every one of these areas of guitar, and will continue to do so as there is always more to learn and apply to ones playing.
• Chords:
Jazz guitarist’s are known for their very large chord vocabularies, meaning the amount of chords they know and can use musically. Through studying jazz tunes you will drastically increase your own chord knowledge and vocabulary as you will need to in order to play the style.
The great thing is, these chords cross over to many styles of music and will be very useable to you outside of jazz. For examples of “jazzy” chords in non “jazzy” songs, check out John Mayor, Pink Floyd, or Tommy Emmanuel to name a few.
A great place to start increasing your chord vocabulary beyond open and bar chords is block chords.
Block chords will have you playing the main chord types of Major 7, Minor 7, and Dominant 7 all over the fretboard, and are great for using in any style of guitar playing.
Checkout the video below for a detailed tutorial on block chords:
• Arpeggios:
Of course arpeggio’s are used in all styles of music, none more than jazz. However, because of the nature of jazz and the fact that you are constantly switching between different key centres within the one tune, arpeggio’s become necessary a lot of the time to negotiate these changes. You may have heard the term “playing through the changes”. This is what I am referring to here.
It doesn’t matter if you play a style of music that is very diatonic and stays in the one key for the most part. Arpeggios are a great way to target specific chord tones, bringing a much more melodic component to your playing.
In June of 2007, I came across a particular way of practicing arpeggios that was a complete game changer for my playing!
Up until this point in time, I could play arpeggio shapes on the guitar, but I didn’t have any real way of using them in my playing. This was because I lacked a training method in which to develop the skill of arpeggiation.
That all changed in June of 2007, and in the video below I take your through this method I learned in great detail:
• Improvisation:
Yes, improvisation exists in other styles of music just as arpeggio’s do, however with jazz it’s at the forefront. Your improvisational skills will massively increase both in soloing and especially in jamming with other musicians when playing jazz.
Jazz musicians generally have very basic, generic charts for songs when jamming, and will totally improvise off of the basic form of the tune. This is not only great fun to do, but there is so much to gain in developing your musical skills by doing so.
Checkout the video below for an introduction to improvising.
A common misconception is that you need to be at a certain level of playing to be “ready” to improvise.
The truth is, the time is NOW wherever you are at with your playing.
You don’t even need to know a single scale shape to start improvising.
Scale shapes do help of course, but are not a necessity to begin developing the skill of improvisation, a point that is addressed amongst others in the video below:
• Walking Bass:
Walking bass lines are very prominent in jazz, and it’s not always the bass that will play these. Often you’ll find a guitar in perhaps a duo or trio, where there is no bass player, adopting some walking bass lines to include in the tune.
Learning the part of another instrument gives you a totally different perspective on your playing, and in this case with a bass part, a lesson in playing through the harmony of a chord progression.
Walking bass lines can also be applied to really “jazz” up a blues progression, as well as providing you with insights that will contribute to acoustic instrumental arrangements you may create.
To learn how easy it is to start creating and playing walking bass lines on guitar, watch the video below.
In it, I take you through a simple method to get you started with walking bass lines. While there are many approaches to playing a walking bass line on guitar, this one is by far the easiest and quickest to do:
• Chord/Melody:
Chord/Melody playing is huge in the jazz world!
Chord/melody is when you play both the chords and melody to a tune at the same time on the one instrument, in this case a guitar. Check out players such as Joe Pass, Martin Taylor, and Lenny Breau, for examples of this approach.
Studying and learning jazz chord/melody pieces will give you an insight into how to do this for your own arrangements, be it jazz or an acoustic instrumental of a song in another style.
A common misconception is that chord/melody playing is difficult to do. A simple YouTube search on chord/melody might solidify this belief.
However, be careful.
Just because you see someone playing a complicated chord/melody arrangement of something on guitar, does not mean the style of chord/melody itself is difficult.
In fact, when broken down in a systematic way, chord/melody playing is really quite simple.
Watch the video below for a comprehensive tutorial on how to build your own chord/melody arrangements of songs on guitar:
Learn these simple but creative ways to use arpeggios on guitar
